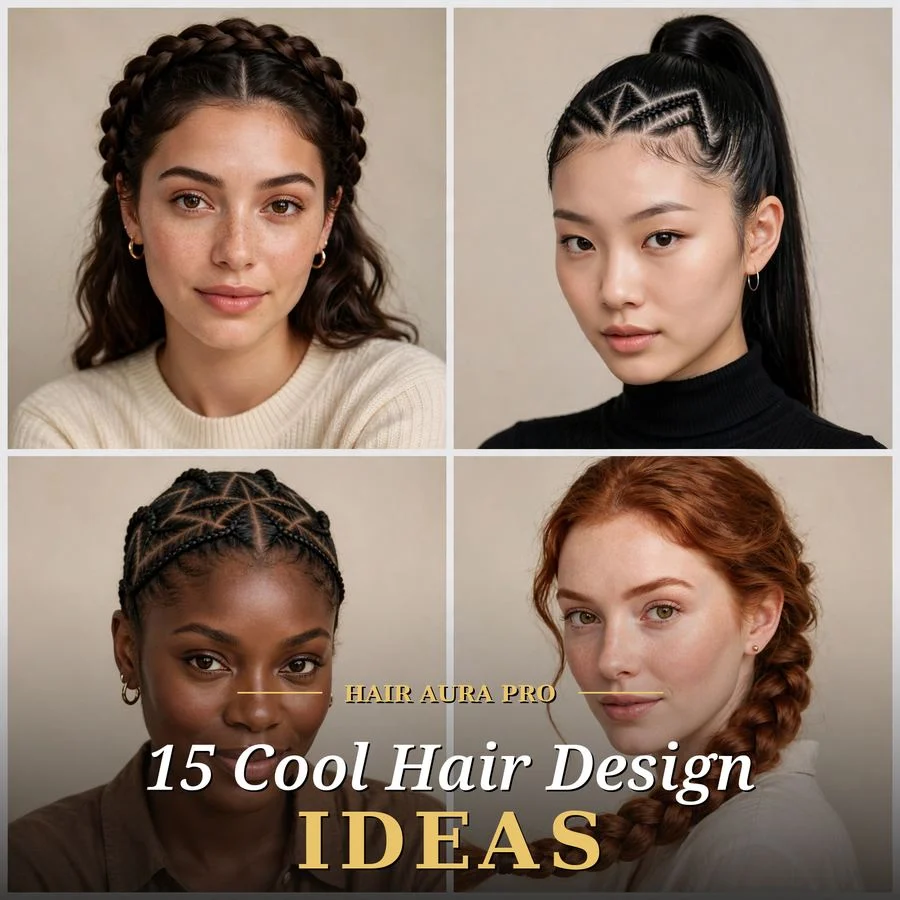
15 Cool Hair Design Ideas That Actually Work

A hair design is any style where the structure itself is the decoration: the part becomes a zigzag, the braids trace a pattern across the scalp, the sections stack into geometry. Unlike a standard blowout, which aims to look like nothing was done, a hair design shows its engineering on purpose. The lines, shapes, and negative space are the whole point.
Think of the clean snap of a center part bent into a perfect zigzag, the rhythm of cornrows curving into a star at the crown, the satisfying symmetry of a fishtail pulled over one shoulder. These are styles you feel as much as see, the scalp tingles pleasantly where the sections pull, the finished shape holds its architecture all day, and the mirror check becomes genuinely fun.
Below are fifteen designs that work on real hair in real time, each with how to build it, who it suits, and the small tricks that keep it intact past noon.
In This Guide
- Why Cool Hair Designs Work So Well
- 15 Ways to Wear Cool Hair Designs
- 1. The Braided Crown Halo
- 2. Zigzag Part Sleek Ponytail
- 3. Double Dutch Accent Braids
- 4. Fishtail Side Sweep
- 5. Criss-Cross Elastic Design
- 6. Star Cornrow Pattern
- 7. Bubble Ponytail Segments
- 8. Twisted Rope Crown
- 9. Undercut Line Design
- 10. Fulani-Inspired Beaded Braids
- 11. Peekaboo Color Braids
- 12. Heart-Part Half-Up Design
- 13. Box Braid Sculpted Top Knot
- 14. Scalloped Baby Hair Edges
- 15. The Braided Faux Hawk
- How to Start Your Cool Hair Design Transformation
- Frequently Asked Questions About Cool Hair Designs
- Ready to Try a Cool Hair Design?
- Related Reads
Why Cool Hair Designs Work So Well
Hair designs succeed because structure photographs better than texture. A camera, and the human eye, reads lines and shapes first, softness second. That is why a simple zigzag part can outshine an expensive blowout in photos: the geometry gives the eye something to follow. Here the part lines and sections do the decorating, which means the impact comes from skill rather than length or expensive color.
They are also practical in a way people underestimate. A style anchored by braids, twists, or pinned sections stays put through wind, workouts, and long days in a way loose hair never does. The tension that creates the pattern also creates the hold. Many of these designs double as protective styles, keeping ends tucked away from friction and weather for days at a time.
The learning curve is kinder than it looks. Most designs here are built from three or four basic moves, a Dutch braid, a rope twist, a clean section, a wrapped elastic, combined in different arrangements. Master the components once and the whole catalog opens up. Start with the designs marked beginner-friendly and work upward; your hands learn the patterns faster than you expect.
Finally, designs are endlessly personal. The same cornrow pattern reads completely differently with beads, with cuffs, or bare. A braided crown can be romantic or severe depending on how tightly you pull it. Treat each idea below as a starting point and adjust the tension, accessories, and finish to make it yours.
| Style at a Glance | Details |
|---|---|
| Design Family | Braids, parts, twists, sculpted updos, scalp patterns |
| Best Hair Types | Medium to thick hair holds patterns longest; all textures work |
| Skill Level | Ranges from 5-minute beginner to 45-minute advanced |
| Hold Time | Most last a full day; braided designs last 3, 7 days |
| Tools Needed | Tail comb, elastics, pins, and one styling product |
15 Ways to Wear Cool Hair Designs
1. The Braided Crown Halo
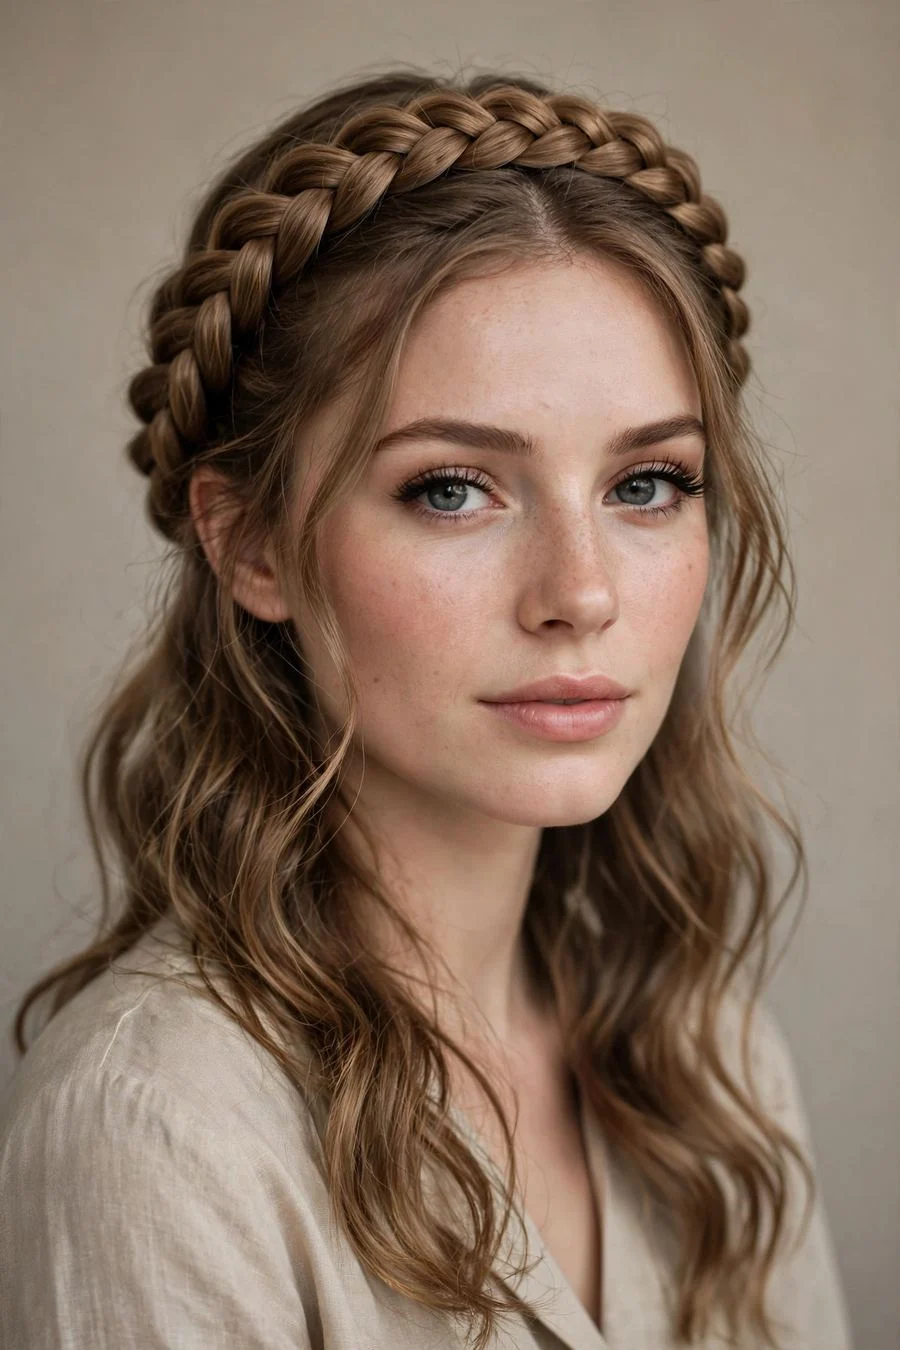
Vibe: A circlet of braid, worn like jewelry.
Why it works: Two Dutch braids travel up from the nape on each side and meet at the crown, forming a continuous halo around the head. It keeps every strand off the face and neck, which makes it ideal for hot days and formal events alike. The halo reads polished from every angle, there is no 'back of the head' problem, and it holds for a full day because the braids anchor each other.
How to get it: Ask your stylist for a double Dutch braided crown, or build it yourself: part down the center, Dutch-braid each side from the nape upward, and pin the ends where they cross at the crown. Pancake the braids, gently pull the edges wider, for a fuller halo. A light mist of flexible hairspray locks it without stiffness.
💡 Quick Win: Braid on slightly damp hair with a pea-sized amount of styling cream for extra grip and a cleaner finish.
Shop the Look
- Flexible-hold hairspray that brushes out without residue
- Styling cream for grip on clean, slippery hair
- U-shaped hair pins that disappear into braids
- Tail comb for precise center parting
- Clear mini elastics for securing braid ends invisibly
2. Zigzag Part Sleek Ponytail
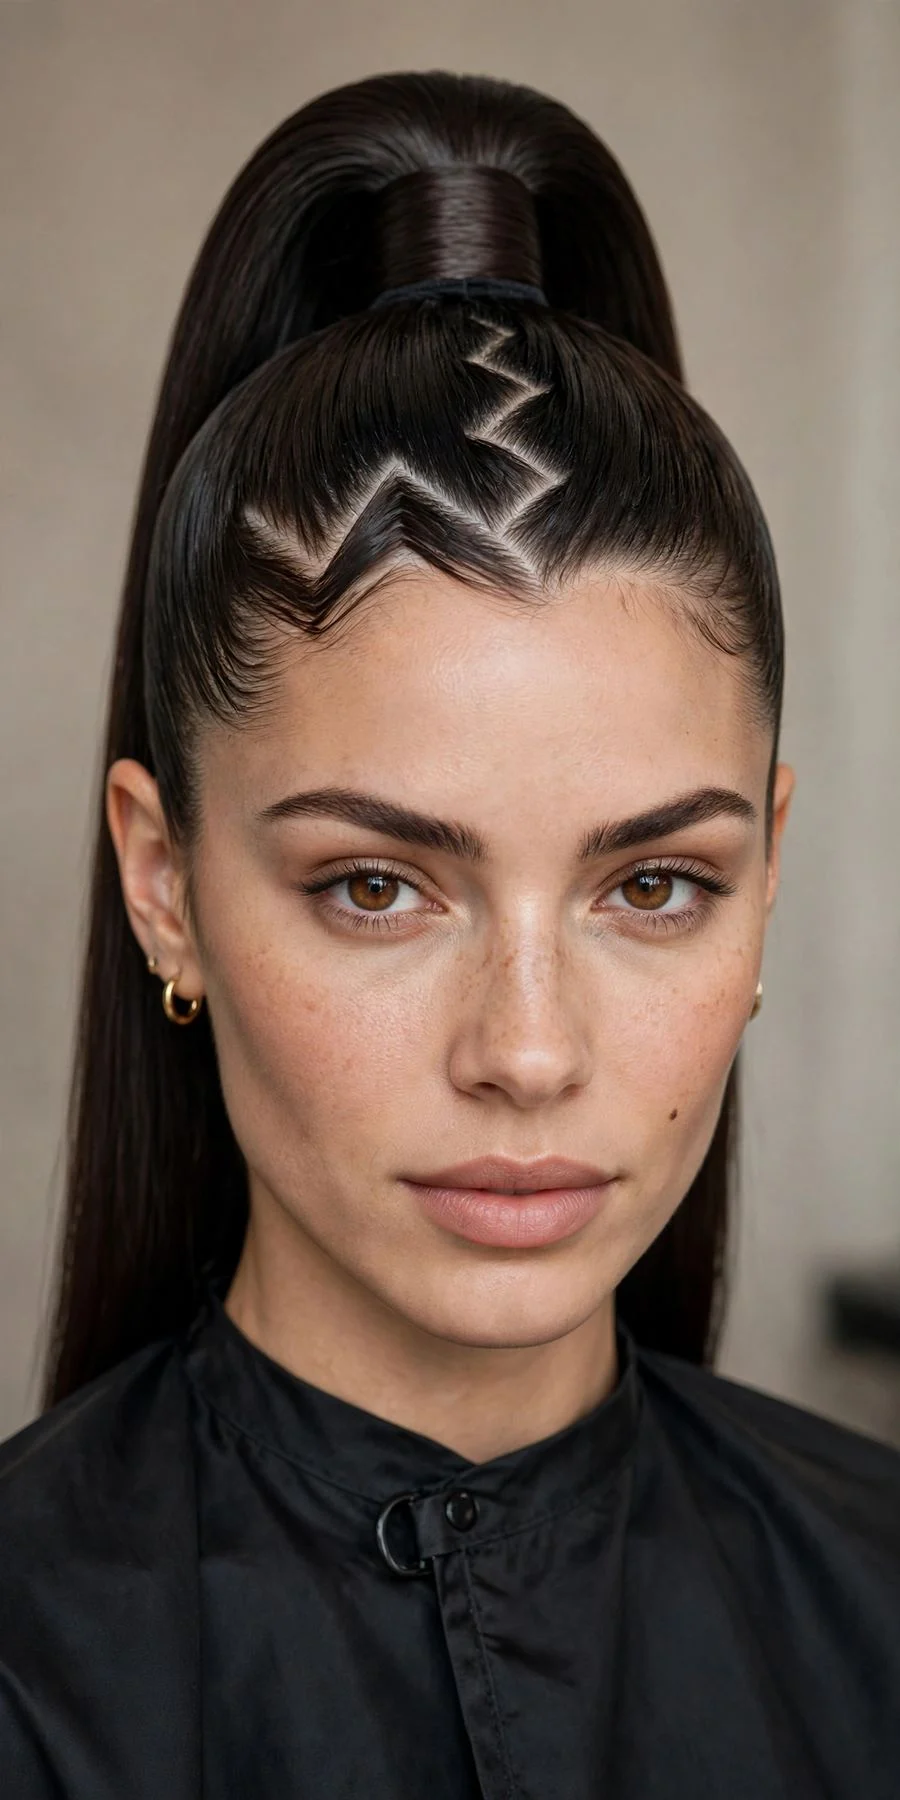
Vibe: Geometry up top, gloss everywhere else.
Why it works: The part zigzags sharply from hairline to crown before the hair pulls back into a glass-smooth ponytail. The zigzag is the entire design, one graphic detail that transforms the most ordinary style in the book. It suits straight and relaxed hair best, where the part line stays crisp, and it takes under ten minutes once your hands learn the zigzag motion.
How to get it: Ask your stylist to demonstrate the zigzag parting technique, or do it with a tail comb: draw short diagonal strokes, alternating direction, from front to crown. Smooth the lengths with a paddle brush and a smoothing serum, then secure the pony high and tight. Wrap a strand around the elastic for the polished finish.
Shop the Look
- Tail comb with a fine metal tip for sharp part lines
- Smoothing serum for a glass-like ponytail finish
- Strong-hold elastic bands that do not stretch out
- Anti-frizz finishing spray for flyaway control
- Paddle brush for sleek blow-drying
3. Double Dutch Accent Braids
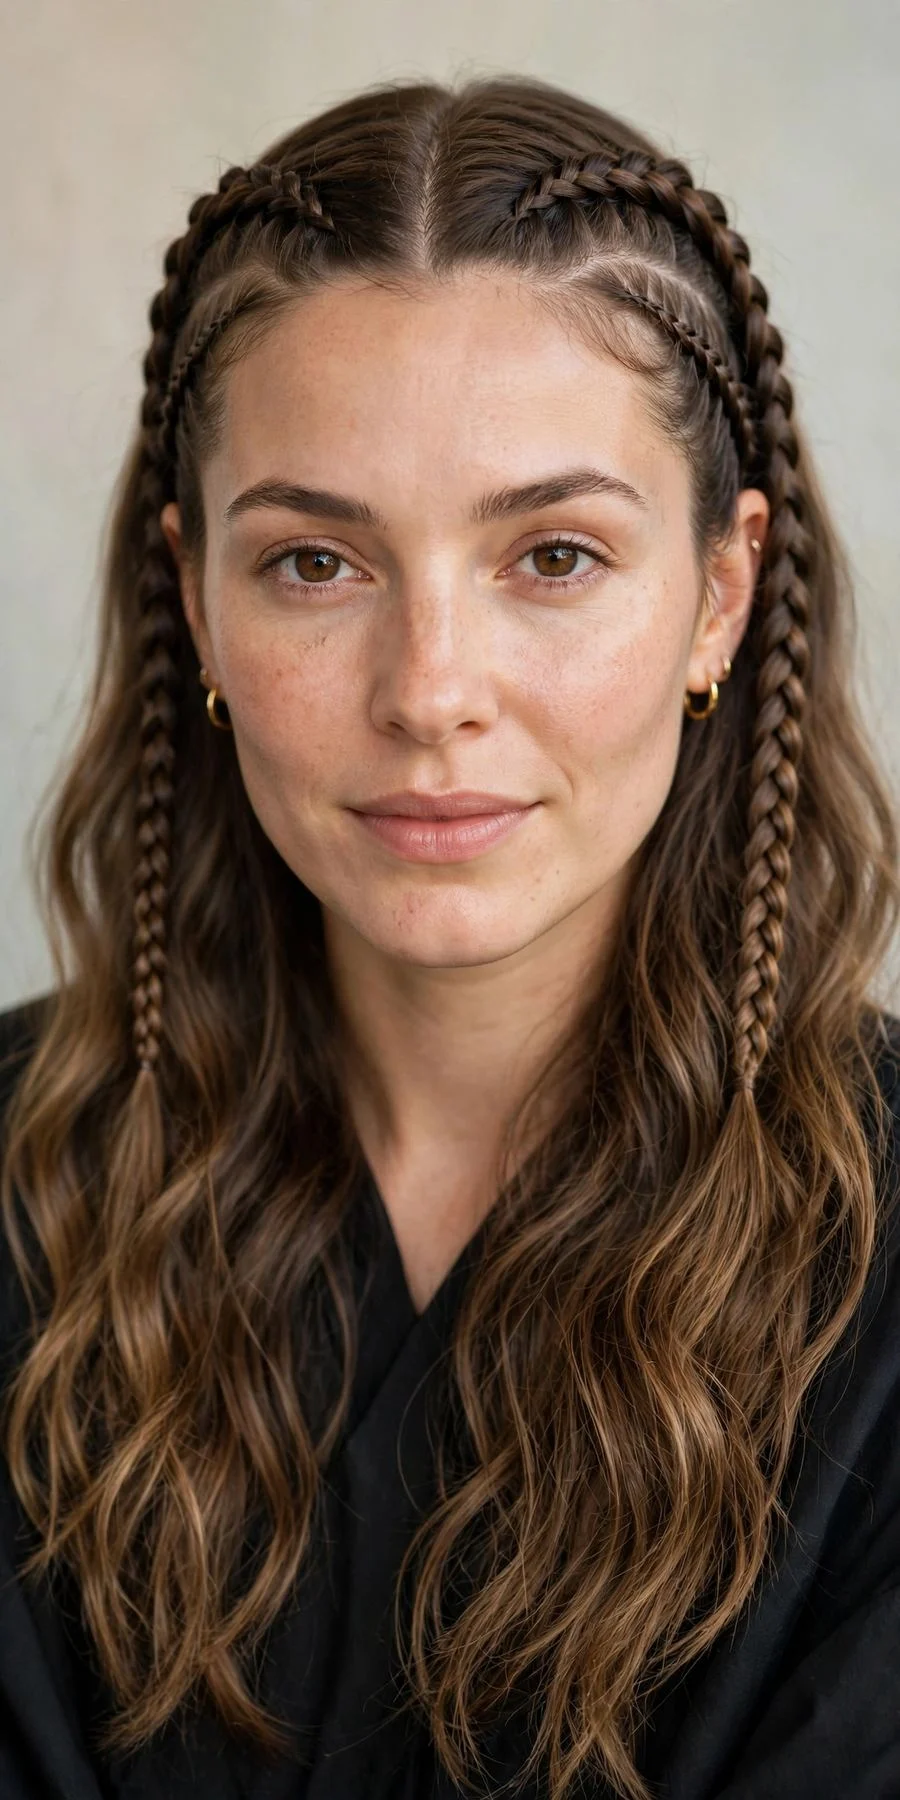
Vibe: Two bold lines framing everything else.
Why it works: Two chunky Dutch braids run along each side of the head while the remaining hair falls in loose waves. The braids act as a headband built from your own hair, sporty, youthful, and surprisingly versatile. They keep the front sections controlled all day, which makes this a favorite for workouts, festivals, and windy-weather plans where loose hair would be a liability.
How to get it: Ask your stylist for face-framing Dutch accent braids, or section two two-inch strips from temple to behind the ear on each side and Dutch-braid them back, securing behind the ears. Leave the rest down and wave it loosely. The braids should sit tight to the scalp; pancake only the very edges if you want softness.
Also view: https://hairaurapro.com/long-lasting-hairstyles-for-women/
Shop the Look
- Texturizing spray for grip before braiding
- Small clear elastics for invisible braid ends
- Edge control gel for sleek braid roots
- Curling wand for the loose wavy lengths
- Bobby pins in your hair color for pinning braid tails
4. Fishtail Side Sweep
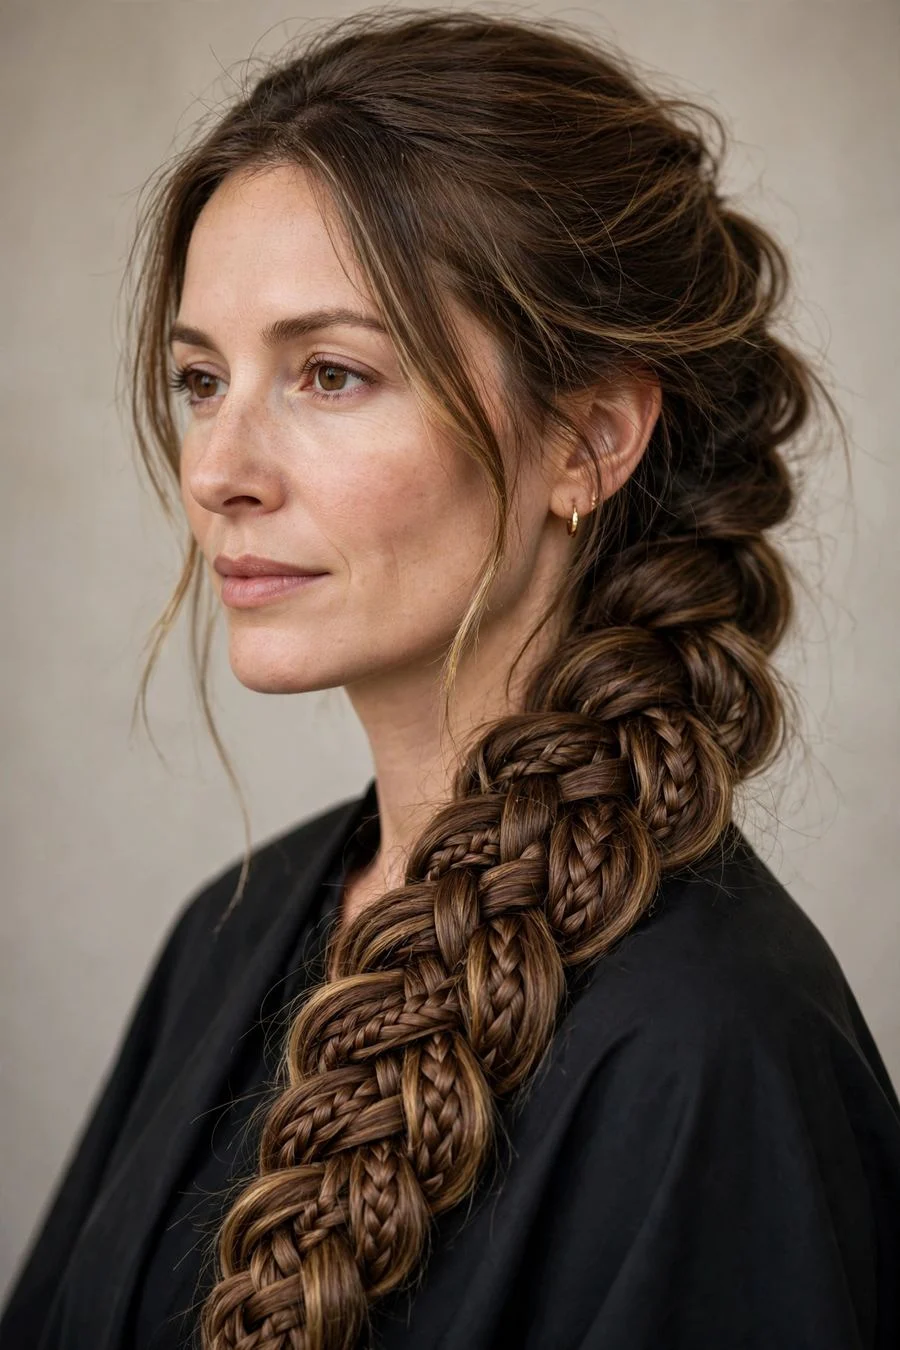
Vibe: Intricate weave, thrown casually over one shoulder.
Why it works: A thick fishtail braid drapes over one shoulder, its fine woven texture catching light with every movement. The fishtail weave looks far more complex than it is, it uses only two sections, which gives you maximum visual payoff for moderate effort. Worn to the side, it shows the full weave instead of hiding it down your back, and it flatters round and square faces by drawing the eye diagonally.
How to get it: Ask your stylist for a loose side fishtail, or sweep all hair over one shoulder, split it in two, and cross thin outer pieces to the opposite side repeatedly. Keep the pieces thin for a detailed weave; pancake the finished braid for fullness. Secure with a fabric-covered elastic and pull a few face-framing strands free.
💡 Quick Win: Braid with slightly dirty hair, day-two texture grips better and the weave looks fuller.
Shop the Look
- Dry texturizing spray for grip and fullness
- Fabric-covered elastics gentle on braided hair
- Shine mist to highlight the woven texture
- Wide-tooth comb for pre-braid detangling
- Flexible hairspray to tame halo frizz
5. Criss-Cross Elastic Design
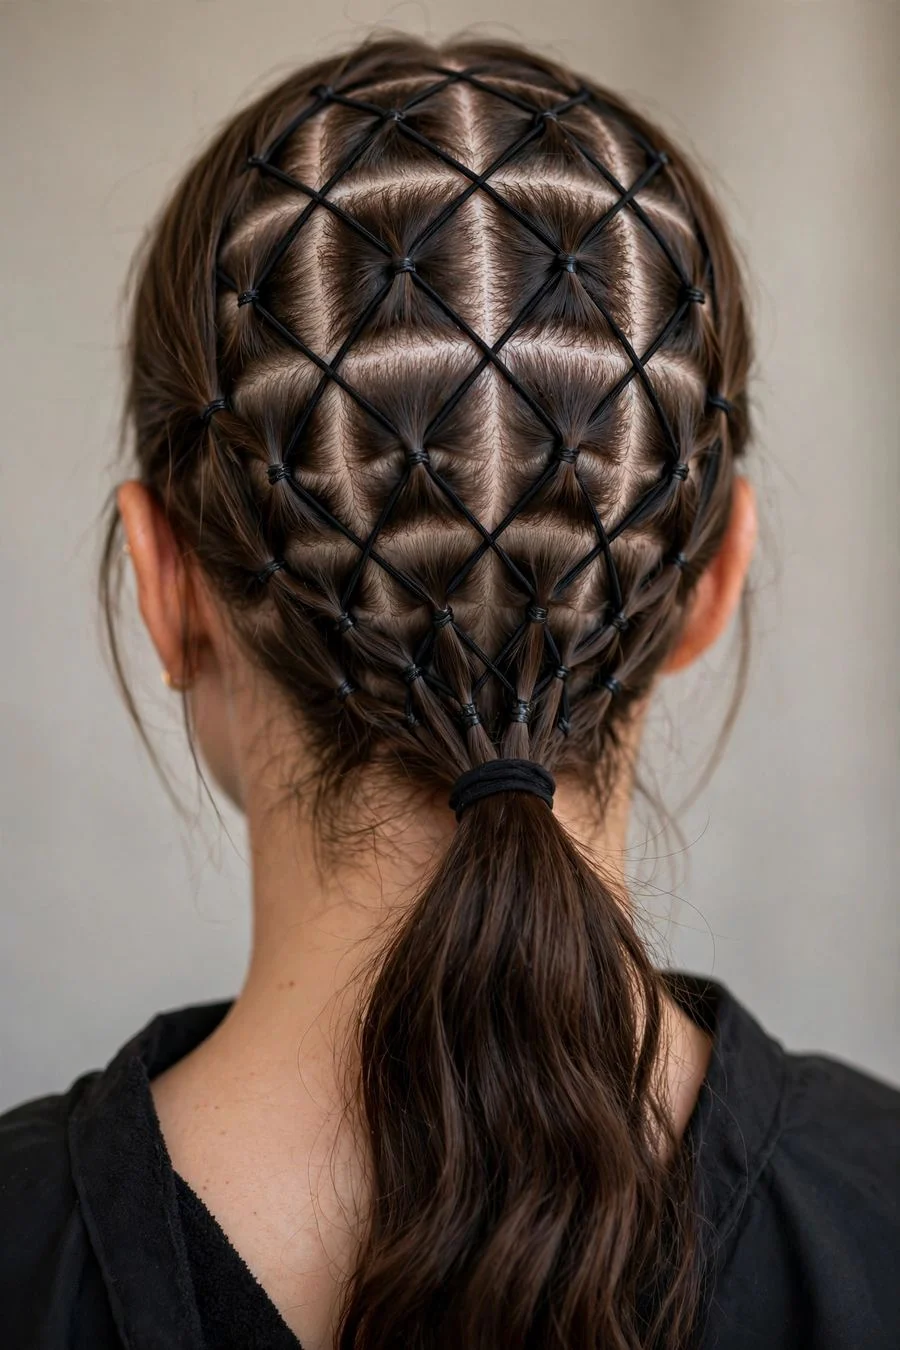
Vibe: A lattice drawn directly on the scalp.
Why it works: Small clear elastics section the crown into a criss-cross lattice before the hair gathers into a ponytail. The geometric pattern is the star, precise, graphic, and oddly satisfying to look at. It works on medium to long hair of any texture and holds its architecture all day because every section is independently secured. Kids love it, but worn sleek it is fully grown-up.
How to get it: Ask your stylist for an elastic lattice crown, or build it at home: section the front into small squares, secure each with a clear elastic, then split each ponytail and rejoin the halves with neighboring sections to form the lattice. Gather everything into a ponytail at the crown. Keep sections even with a tail comb for the cleanest grid.
Shop the Look
- Clear mini elastic bands in bulk, you will use many
- Precision tail comb for even sectioning
- Smoothing gel for crisp lattice lines
- Ponytail elastic with strong hold for the final gather
- Edge brush for polishing the hairline
6. Star Cornrow Pattern
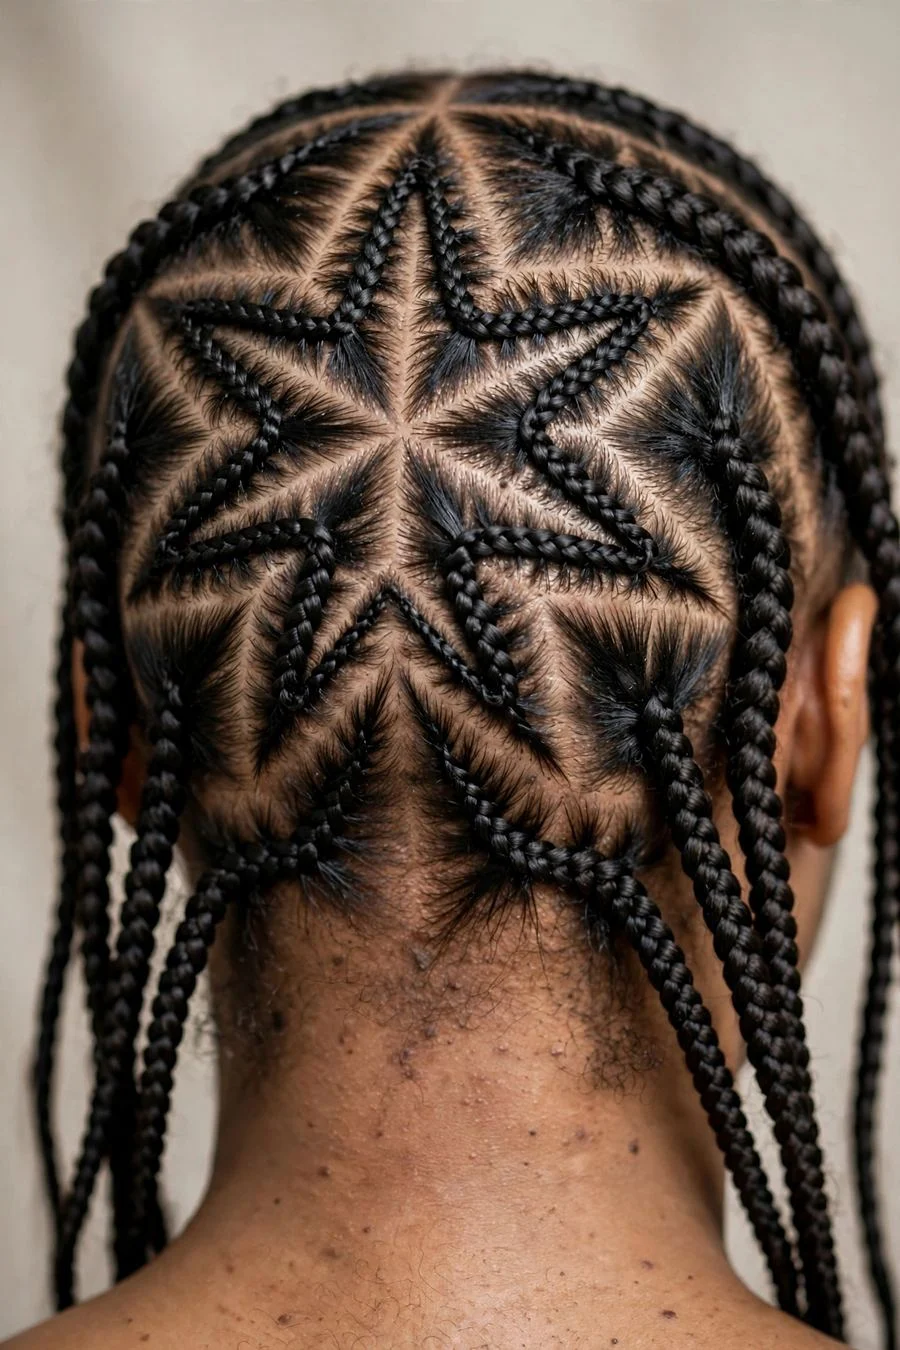
Vibe: Constellation braided into the crown.
Why it works: Cornrows radiate from a central point to form a five-point star on the scalp, with the remaining hair left in braids, twists, or an afro. The star is a genuine showpiece, symmetrical, architectural, and deeply rooted in braiding tradition. Because the pattern is braided tight to the scalp, it lasts one to two weeks with nighttime protection, making it as practical as it is striking.
How to get it: Ask your braider for a starburst cornrow pattern, bring a reference photo, since the geometry must be mapped before braiding starts. This is a salon service; the symmetry requires a practiced hand and a second pair of eyes. Protect it at night with a satin bonnet and moisturize the scalp with a light oil every few days.
💡 Quick Win: A small amount of lightweight scalp oil massaged along the parts keeps the design fresh-looking all week.
Also view: https://hairaurapro.com/short-crochet-twist-hairstyles/
Shop the Look
- Satin bonnet for nighttime pattern protection
- Lightweight scalp oil with a nozzle applicator
- Edge control for crisp hairline finishing
- Moisturizing braid spray for the lengths
- Satin pillowcase as backup protection
7. Bubble Ponytail Segments
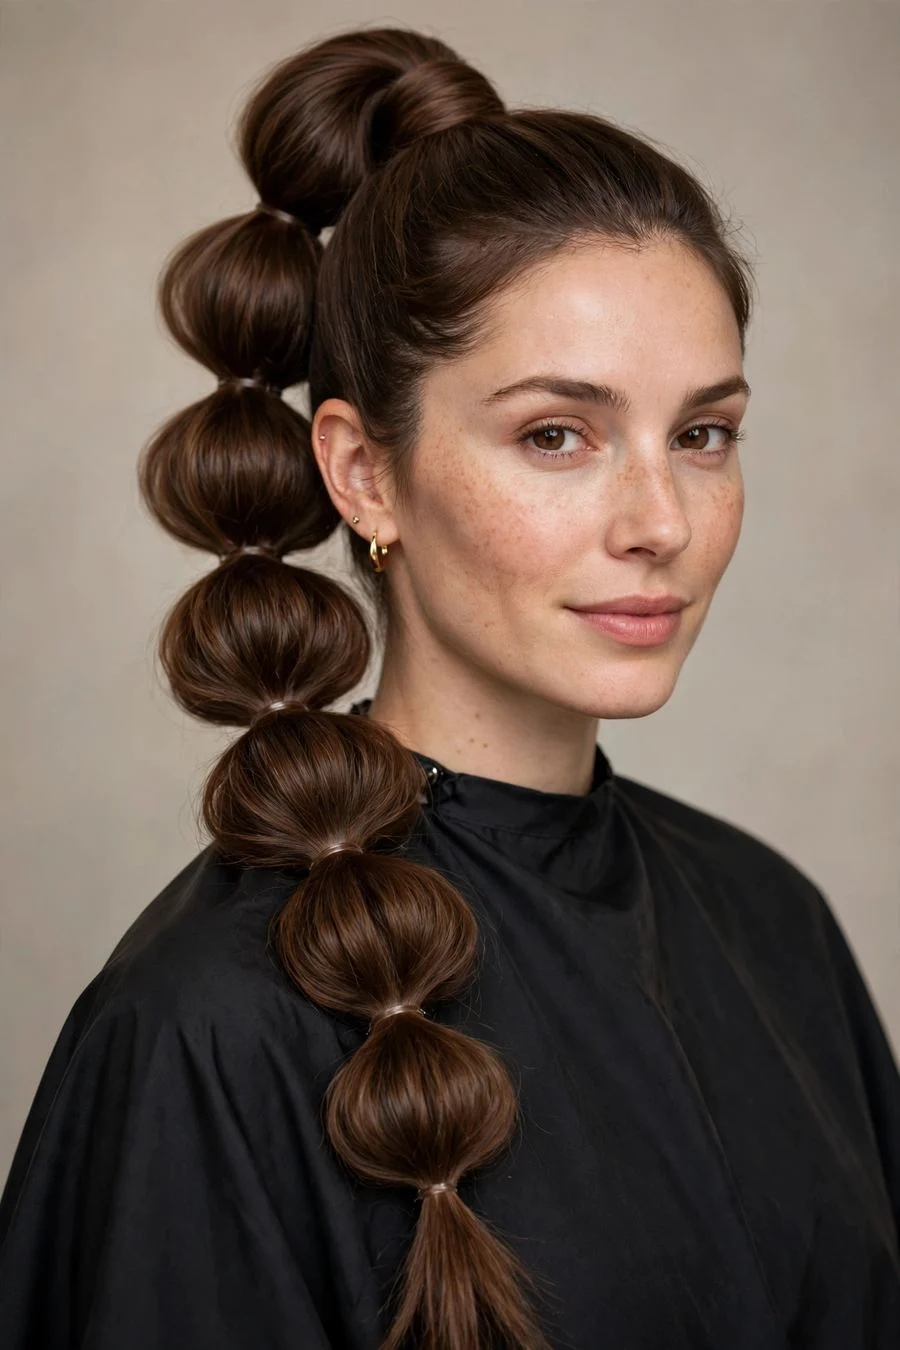
Vibe: A ponytail reimagined as a string of pearls.
Why it works: Elastics spaced down the length of a ponytail create rounded 'bubbles' between them, playful, graphic, and far easier than it looks. Each bubble can be fluffed to different sizes, so the silhouette is adjustable: neat and uniform for polish, oversized and loose for drama. It works on any hair long enough for three or more segments and survives the whole day without touch-ups.
How to get it: Ask your stylist for a bubble ponytail, or pull hair into a high pony, add elastics every two to three inches, and gently tug each section outward to form the bubbles. Hide the elastics by wrapping small strands around them, or lean into the look with colorful bands. A spritz of texturizing spray before you start gives the bubbles grip.
Shop the Look
- Colorful elastic band set for a playful version
- Texturizing spray for bubble volume and grip
- Teasing comb for fluffing each segment
- Strong ponytail elastic for the base
- Shine spray for a polished bubble finish
8. Twisted Rope Crown
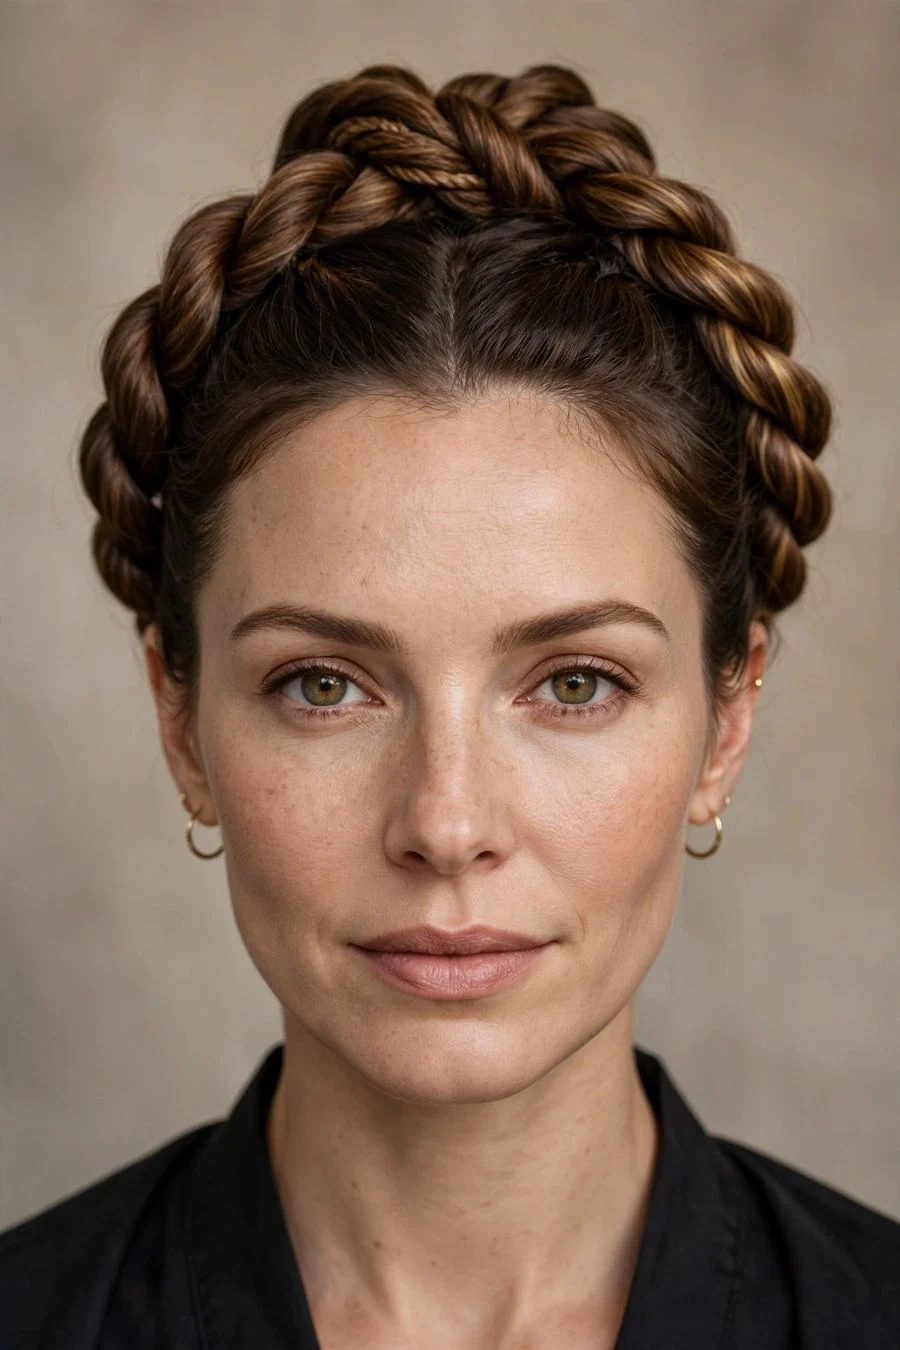
Vibe: Two ropes of hair, tied into elegance.
Why it works: Two rope twists sweep back from the temples and join at the crown or nape, forming a twisted circlet. Rope twists are faster than braids and create a beautiful spiral texture that catches light along its ridges. The style reads romantic and refined, wedding-guest ready, yet takes about ten minutes. It suits fine hair especially well, since twisting builds visual thickness.
How to get it: Ask your stylist for a twisted rope crown, or part down the center, rope-twist each front section back (twist two strands individually, then wind them around each other), and pin where they meet. Secure with crisscrossed bobby pins for real hold. Leave the remaining hair down in soft waves or gather it into a low bun for evening.
💡 Quick Win: Twist with the strands pulled slightly upward, the crown sits higher and looks more regal.
Shop the Look
- Lightweight twisting cream for smooth rope texture
- Bobby pins that match your hair color
- Flexible-hold spray to set the twists
- Decorative hair pins for an evening upgrade
- Smoothing brush for the unwound lengths
9. Undercut Line Design
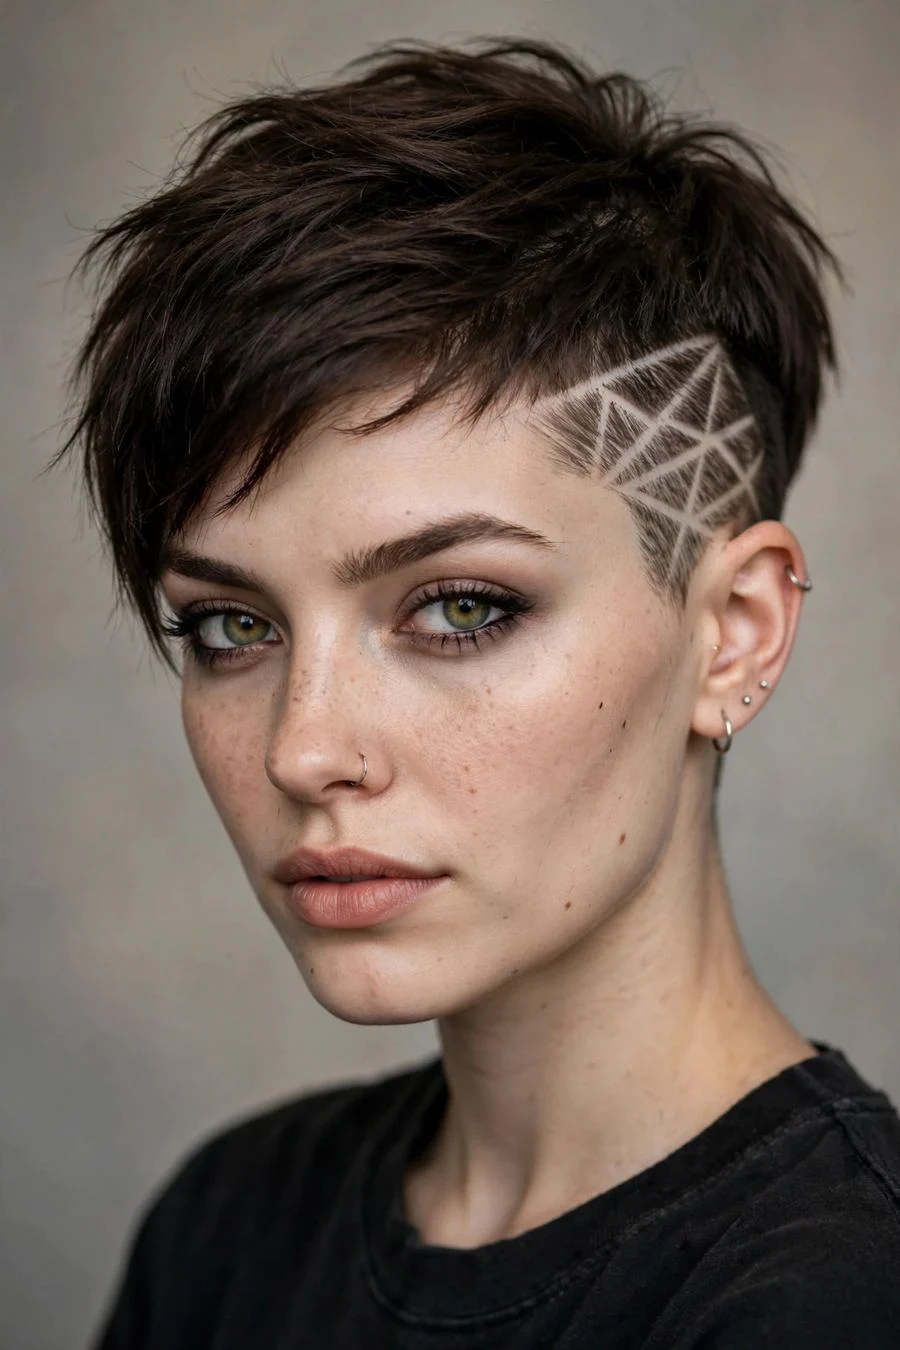
Vibe: Hidden edge, revealed on your terms.
Why it works: The nape or side is clipped short and carved with lines, curves, or geometric shapes, while the longer top layer covers it completely when worn down. It is the only design here with a true secret identity, professional by day, patterned when you tie your hair up. The shaved design grows out in about three weeks, so it is a commitment to upkeep but never a permanent one.
How to get it: Ask your barber or stylist for a disconnected undercut with a line design at the nape, bring a photo of the exact pattern, since freehand varies. The top layer must be long enough to cover the shaved section fully. Book a cleanup every three to four weeks; the design blurs as it grows and needs re-carving to stay sharp.
Also view: https://hairaurapro.com/prom-hairstyles-for-strapless-dresses/
Shop the Look
- Precision trimmer for at-home line touch-ups
- Matte styling clay for the longer top layer
- Sunscreen spray for the exposed shaved area
- Gentle exfoliating scalp scrub for clipper comfort
- Small detail mirror for checking the back
10. Fulani-Inspired Beaded Braids
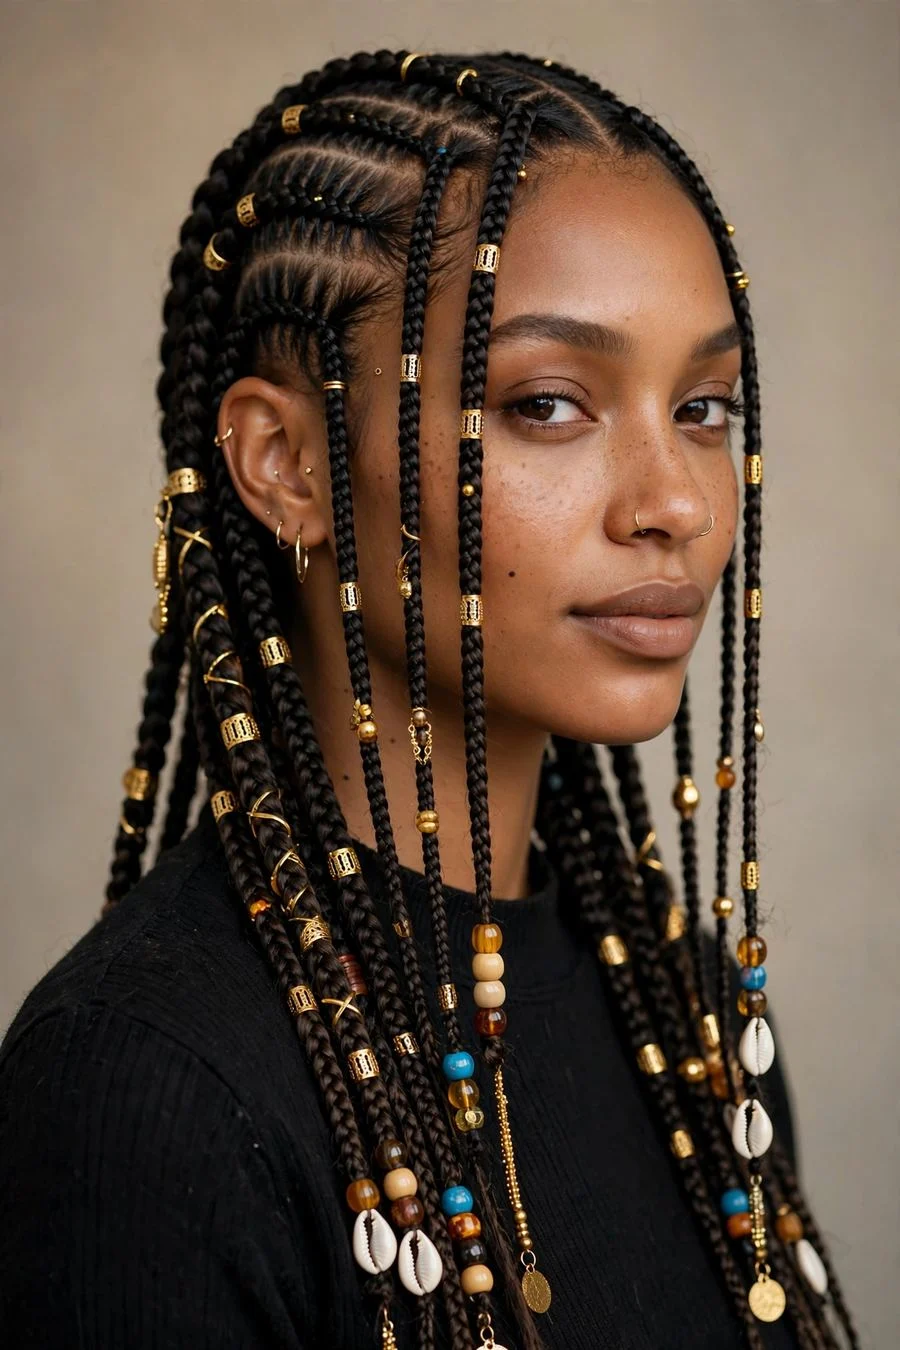
Vibe: Heritage braiding, dressed in gold.
Why it works: Cornrows braided along the scalp, often with a center braid and curved side patterns, finished with beads, cuffs, and rings on the ends. The accessories are inseparable from the design: they add movement, sound, and glinting detail that plain braids cannot match. Rooted in West African Fulani tradition, this is a protective style that lasts two to four weeks while looking intentionally adorned every single day.
How to get it: Ask your braider for Fulani-style cornrows with beaded ends, discuss bead colors and placement before the service starts, since threading happens as the braids finish. Choose lightweight beads; heavy ones strain the hairline. Moisturize the scalp every few days and sleep in a satin bonnet to keep the pattern crisp for weeks.
💡 Quick Win: Thread beads onto a bobby pin to slide them onto braid ends without a special tool.
Shop the Look
- Lightweight wooden or acrylic bead set
- Gold braid cuffs and rings variety pack
- Satin bonnet for long-lasting pattern protection
- Leave-in braid moisturizing spray
- Scalp-soothing oil for braided styles
11. Peekaboo Color Braids
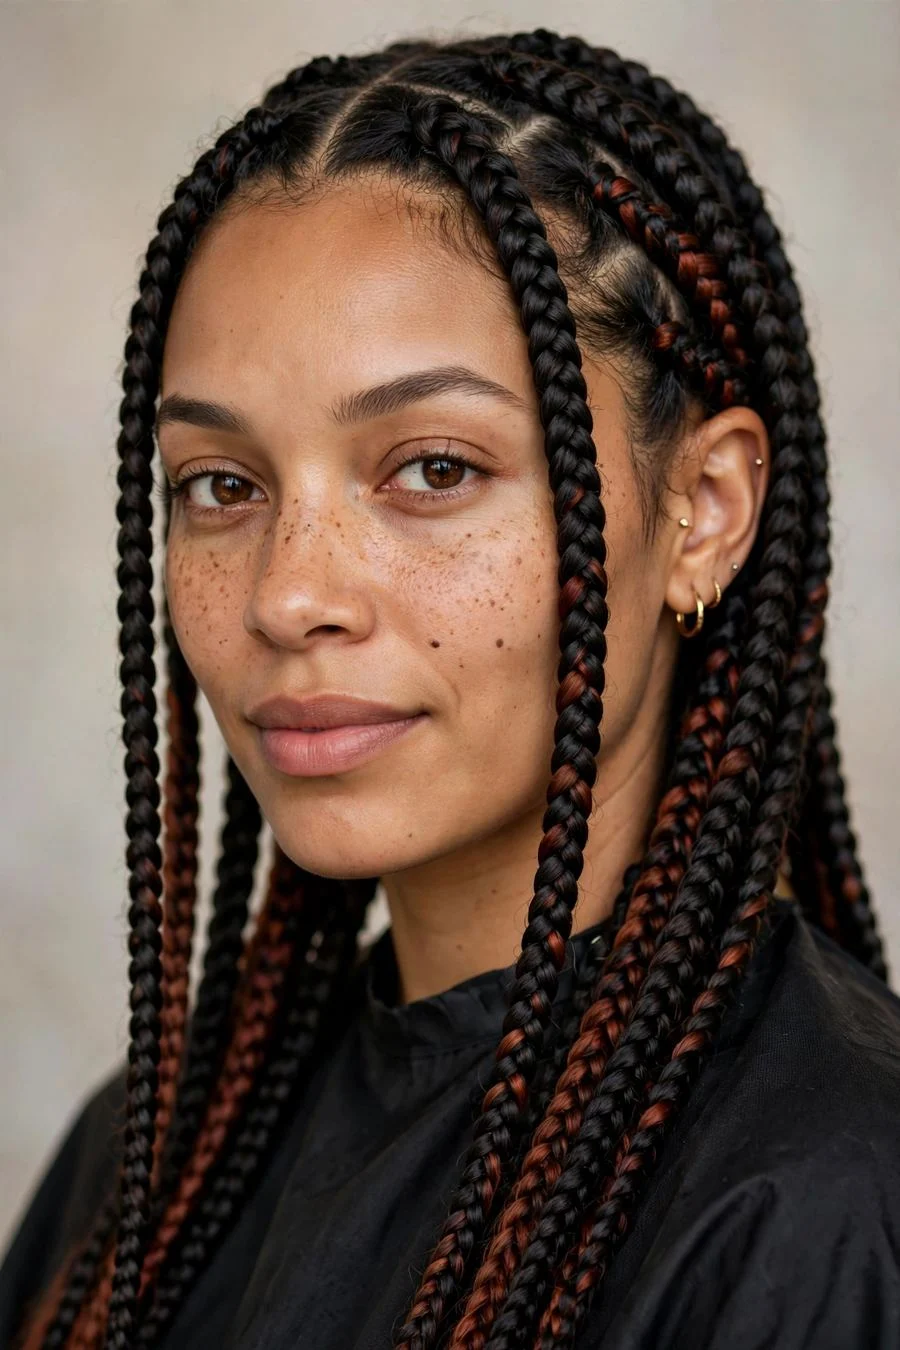
Vibe: Color that hides inside the braid until it doesn't.
Why it works: Braids woven with hidden strands of a contrasting color, auburn through black, blonde through brown, so the color flashes only where the braid turns. The design and the color work together: the weave controls exactly when the brightness appears. It is a clever way to wear bold color in conservative settings, since the strands disappear when the hair is worn loose and straight.
How to get it: Ask your colorist for peekaboo panels in the underlayer first, then ask your stylist to braid over them, or cheat with colored clip-in extensions woven into the braid. Dutch and fishtail braids show the hidden color best because their weave turns outward. Keep the colored strands conditioned; they are usually pre-lightened and thirstier than the rest.
Shop the Look
- Colored clip-in extension strands for a commitment-free version
- Color-safe conditioner for the lightened peekaboo pieces
- Purple shampoo if the hidden strands are blonde
- Braid-sealing pomade for neat weaving
- Silk scrunchies for tying off braided ends gently
12. Heart-Part Half-Up Design
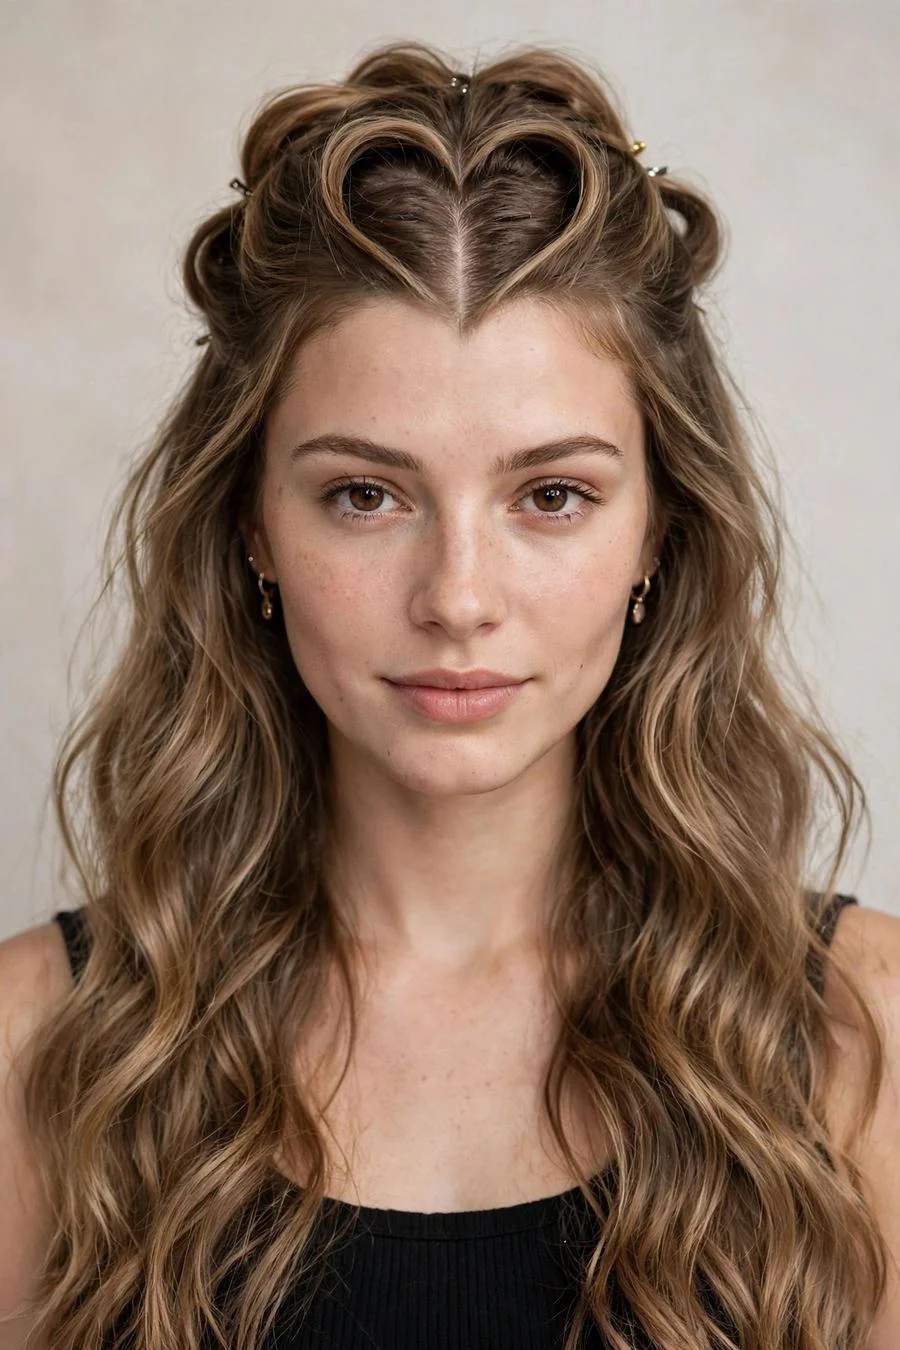
Vibe: A valentine drawn in your parting.
Why it works: The crown section is parted into a heart shape before being gathered into a half-up style, sweet, graphic, and wildly popular in photos. The heart reads clearly from behind, which makes this a favorite for events and date nights. It works on straight to wavy hair where the part lines stay visible, and the half-up structure keeps it secure for hours.
How to get it: Ask your stylist to map the heart part with a tail comb, or draw it yourself: two curved part lines meeting in a point at the crown. Gather the heart section into a small ponytail or twist, leaving the rest down. Set the part lines with a light gel so they stay crisp. Practice the symmetry once and it takes five minutes.
💡 Quick Win: Trace the heart with a shimmer hair chalk for parties, it washes out in one shampoo.
Also view: https://hairaurapro.com/weave-ponytail-hairstyles-with-bangs/
Shop the Look
- Shimmer hair chalk set for temporary part accents
- Light-hold gel for crisp part lines
- Mini claw clips for the half-up section
- Tail comb for drawing the heart shape
- Decorative mini barrettes to mark the heart's point
13. Box Braid Sculpted Top Knot
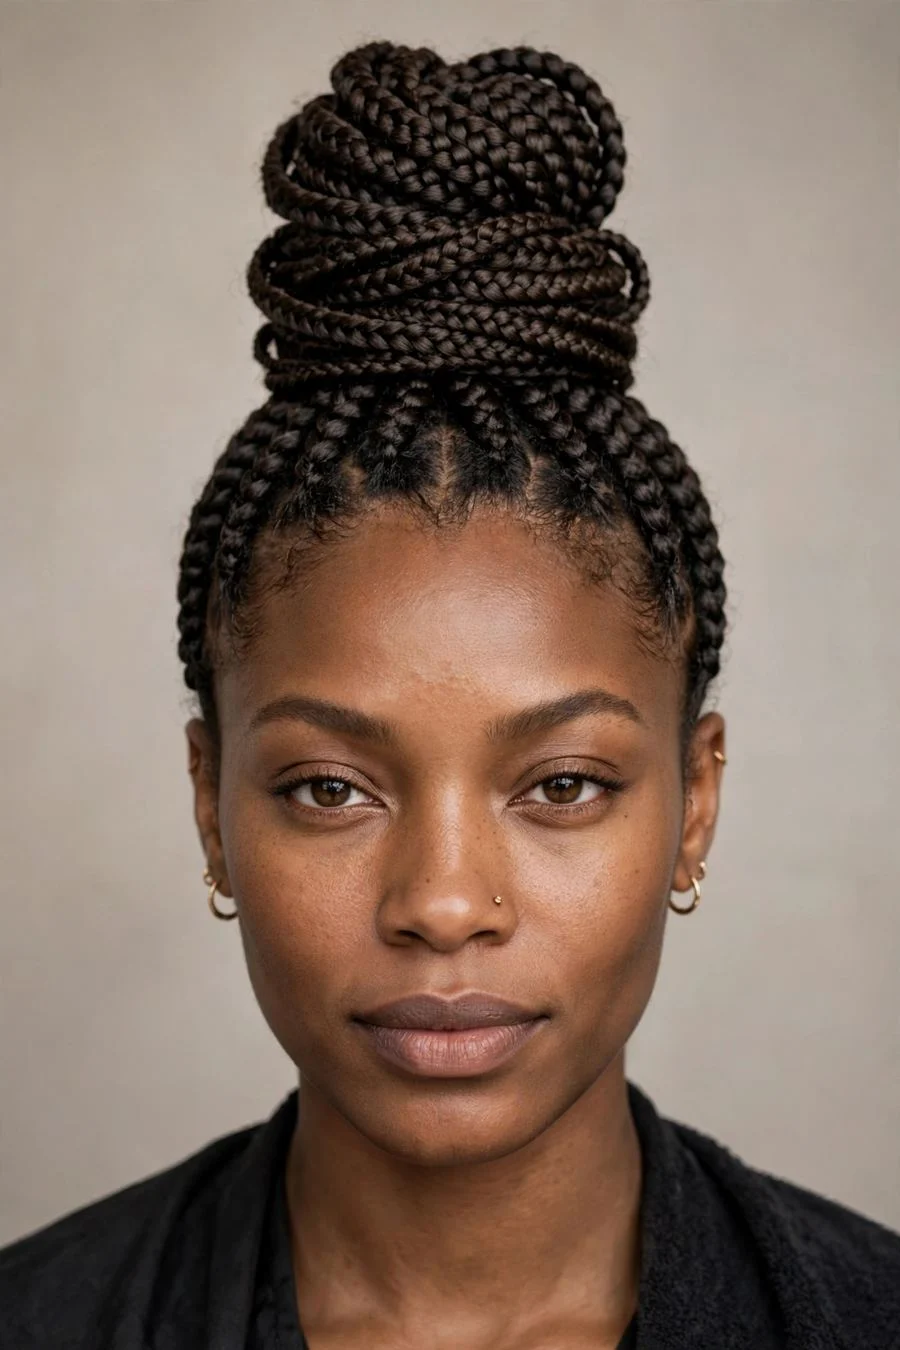
Vibe: Architecture you can wear.
Why it works: Long box braids are wound and pinned into a towering sculpted knot at the crown, dramatic, regal, and unmistakably intentional. The braids' uniform texture makes the knot look carved rather than messy, and the height elongates the neck and face beautifully. As a protective style it is unmatched: the ends stay completely tucked away for the knot's entire wear.
How to get it: Ask your braider for medium box braids long enough to wrap, at least bra-strap length. To build the knot, gather all braids high, twist the mass loosely, coil it around its base, and pin generously with large hair pins. Leave two or three braids out at the front to frame the face. The knot holds for days; re-pin any escapees each morning.
Shop the Look
- Extra-large hair pins for anchoring heavy braided knots
- Edge control gel for a polished hairline
- Braid sheen spray for a healthy finish
- Satin scarf for wrapping the knot at night
- Lightweight mousse to smooth flyaways
14. Scalloped Baby Hair Edges
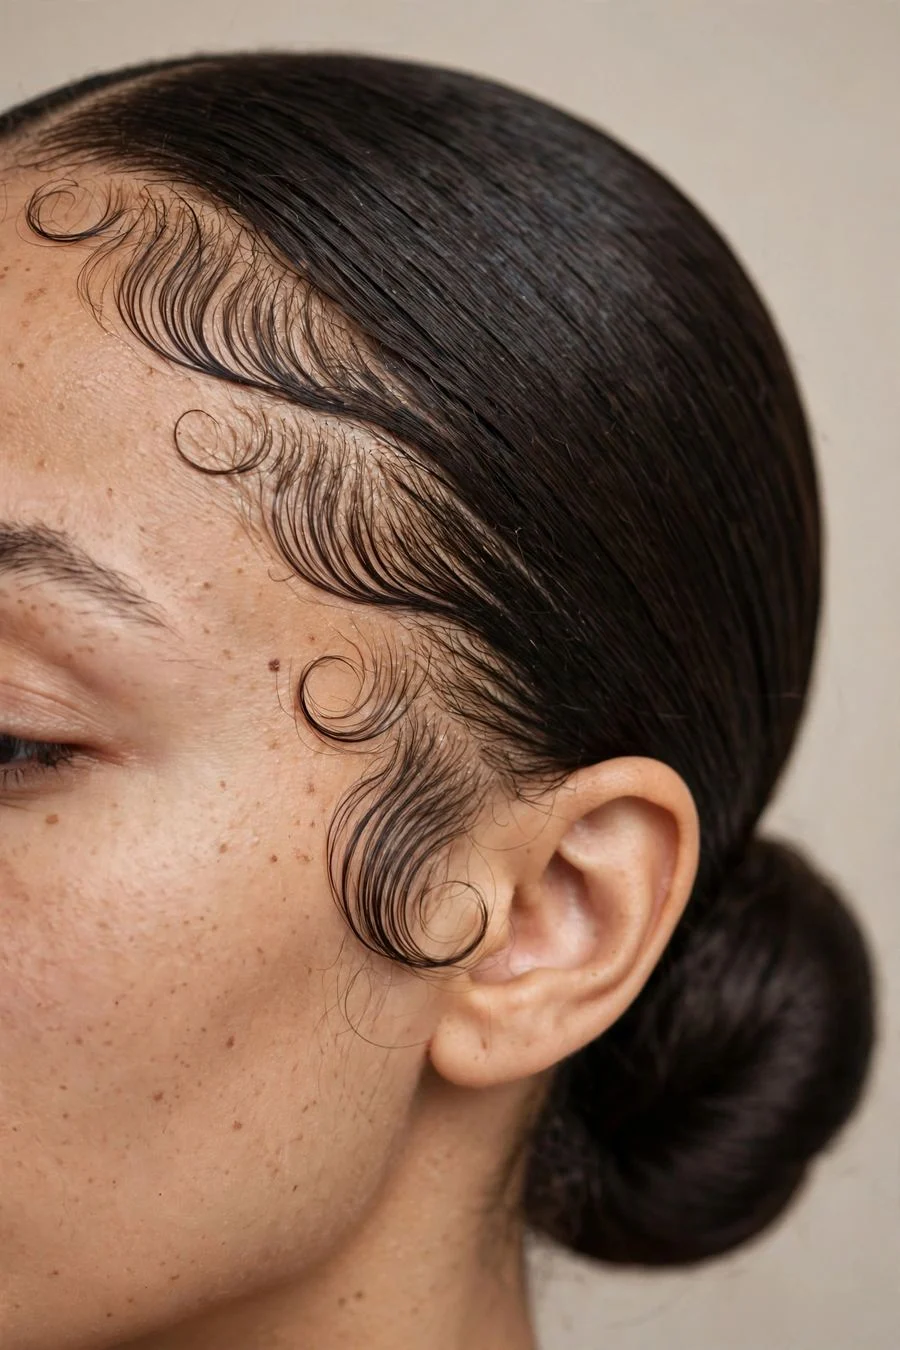
Vibe: The hairline as calligraphy.
Why it works: Baby hairs along the hairline are sculpted into swoops and scallops with edge control, a detail borrowed from braided and sleek styles that has become a design statement of its own. Done well, the edges frame the face like delicate filigree and elevate any bun, ponytail, or braided style. It is the smallest canvas on this list and one of the most expressive.
How to get it: Ask your stylist to demonstrate edge styling, or do it with a small edge brush: apply a thin layer of edge control to the baby hairs, then swoop them into S-curves and press for ten seconds each. Less product is more, buildup flakes by afternoon. Tie a satin scarf over the edges for five minutes to set them firmly.
💡 Quick Win: An old soft toothbrush works as well as any specialty edge brush for fine swoops.
Shop the Look
- Strong-hold edge control gel that dries without flaking
- Dual-ended edge brush and comb tool
- Satin scarf for setting styled edges
- Travel-size edge control for midday touch-ups
- Gentle micellar water for removing edge product at night
15. The Braided Faux Hawk
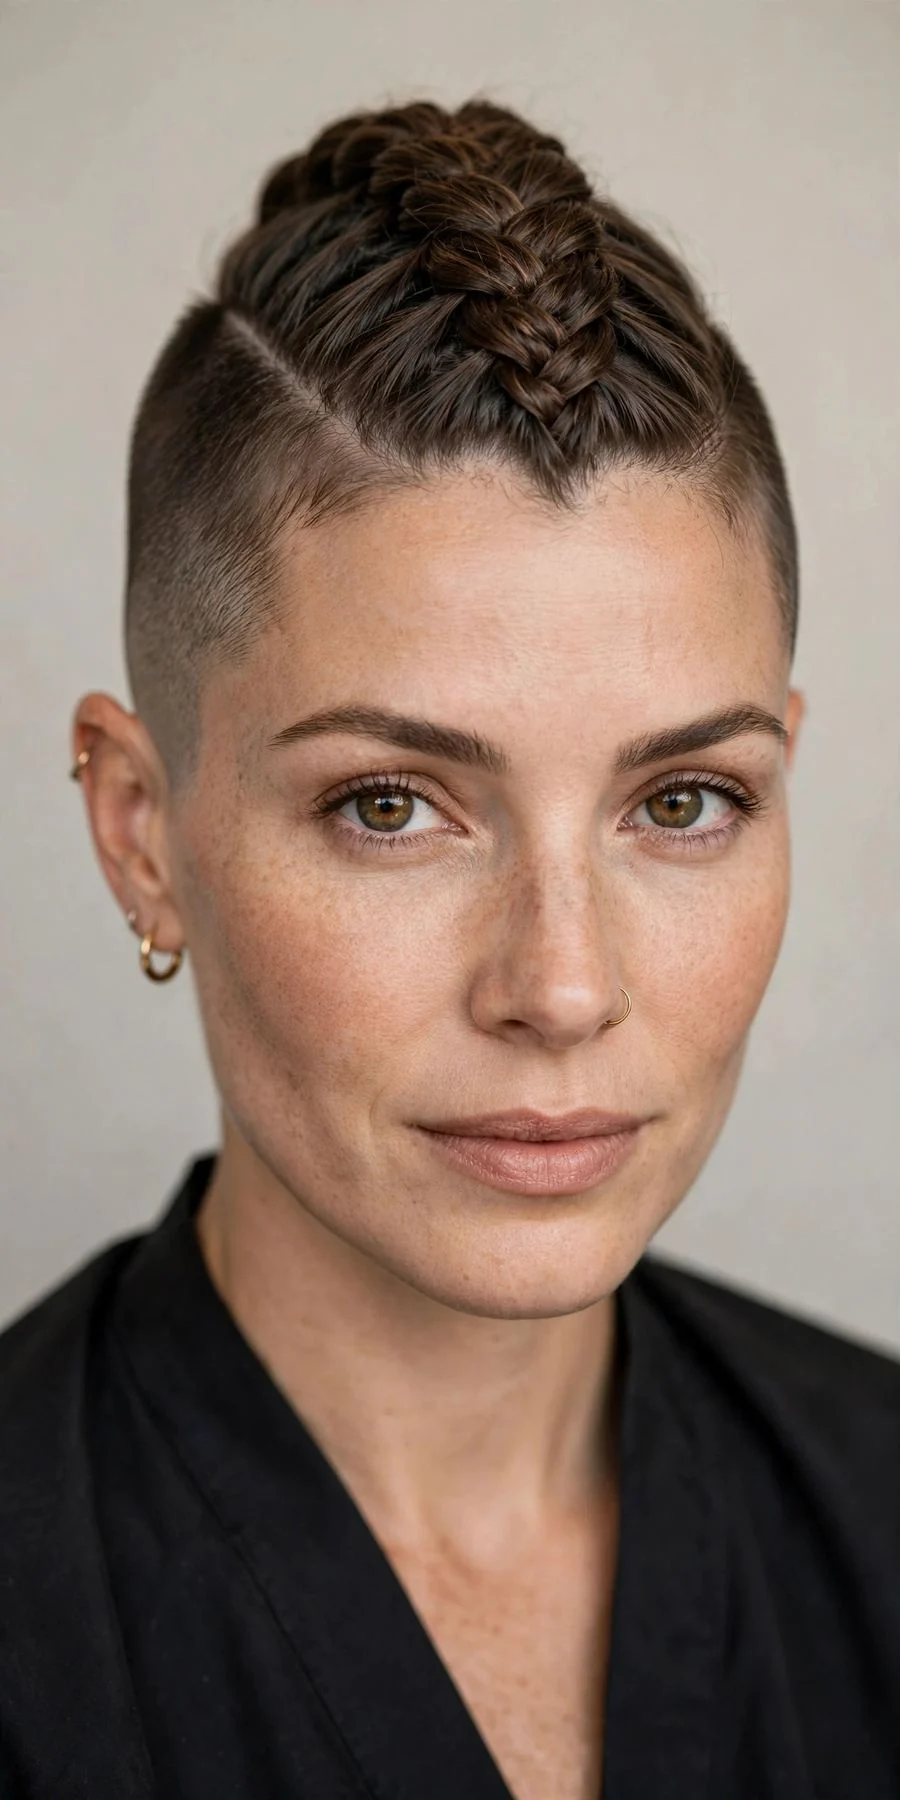
Vibe: Mohawk energy, zero clippers required.
Why it works: A wide strip of braids, Dutch, cornrow, or twisted, runs front to back down the center of the head while the sides pull back sleek and tight. You get the silhouette and attitude of a mohawk with no shaving and no grow-out saga. It is the boldest design here, and it holds its shape longer than any loose style because the center strip is fully anchored.
How to get it: Ask your stylist for a braided faux hawk with sleek sides, or section a wide center strip from hairline to nape, braid it (Dutch shows best), and smooth the sides back with gel into the braid's base. Pin the braid end under for a clean finish. The sides must be genuinely flat, that flatness is what sells the hawk shape.
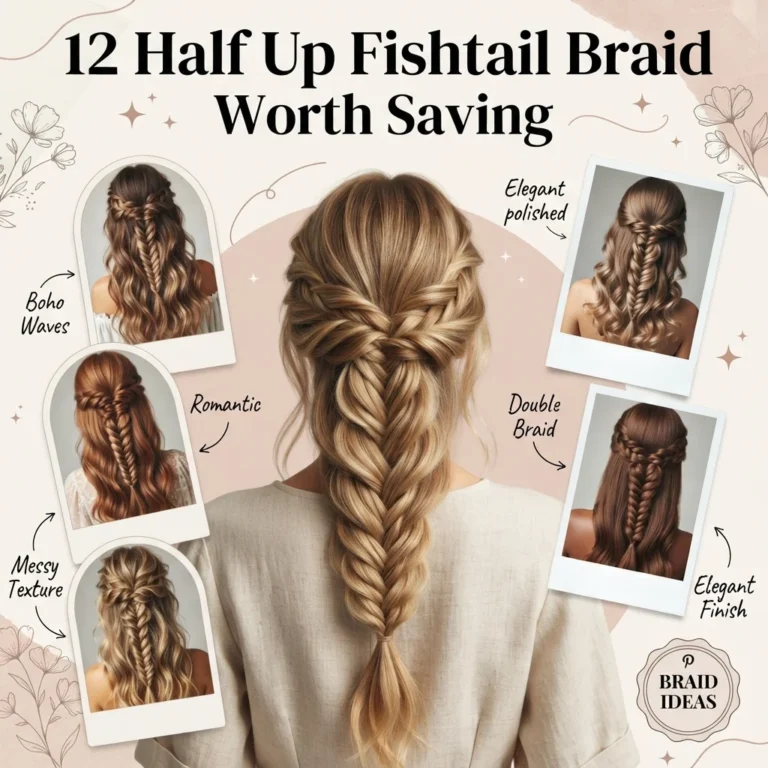
Also view: https://hairaurapro.com/half-up-fishtail-braid-hairstyles/
Shop the Look
- Strong-hold gel for flattening the sides
- Firm bristle brush for sleek side smoothing
- Heavy-duty bobby pins for anchoring the center braid
- Shine serum for the braided strip
- Freezing-hold hairspray for all-day architecture
How to Start Your Cool Hair Design Transformation
Start with a consultation, even for styling, not just color. Bring two or three reference photos of the exact design, taken from the front, side, and back if possible. A photo of the scalp pattern matters more than a photo of the finished style, because the pattern is what your stylist must map onto your head shape and hair density. Be honest about your skill level and your mornings: a beautiful design you cannot recreate is a one-day style.
The most common mistake is choosing a design your hair cannot support yet. Tight scalp patterns need at least three inches of hair to grip; sculpted knots need enough length to wrap; sleek geometric parts need hair that will lie flat. A good stylist will tell you when to grow first and style later, listen. The second mistake is skipping the prep: braiding freshly washed, product-free hair gives you slippage and frizz, while day-old hair with a little texture spray grips and behaves.
The at-home kit is refreshingly cheap: a quality tail comb, a bulk pack of clear mini elastics, bobby pins in your hair color, one edge control, and one texturizing spray. That handful of tools builds nearly every design on this list. What costs money is time, not product, block out an unhurried hour for your first attempt at any braided design, and keep a tutorial paused on your phone at each step.
Salon pricing varies by labor time. Simple designed styles like a bubble ponytail or zigzag part run $40 to $80 as a styling service. Braided designs run $80 to $200 depending on complexity, and full-head pattern work like cornrow designs runs $150 to $350. Protective braided styles cost more upfront but last weeks, which makes them the cheapest per-day option on this list. Always ask how long the design should last and what nighttime care it needs before you book.
Frequently Asked Questions About Cool Hair Designs
How long do cool hair designs actually last?
It depends on the anchoring. Styles built on braids, twists, or pinned sections, crowns, faux hawks, cornrow patterns, hold a full day easily, and scalp-braided patterns last one to four weeks with nighttime protection. Designs that rely on a crisp part or smooth finish, like the zigzag ponytail, last until you sleep on them. Humidity is the universal enemy: anti-frizz products and a silk pillowcase extend every design. As a rule, the more structure in the build, the longer the wear.
Do hair designs work on fine or thin hair?
Yes, with the right choices. Fine hair actually holds braided designs well because the sections stay put, but the designs can look sparse, texturizing spray and gentle pancaking add visible fullness. Twisted styles like the rope crown are especially flattering on fine hair since twisting builds diameter. Avoid designs that need a lot of hair to fill them, like oversized bubble ponytails, unless you add a fill-in ponytail extension. A volumizing mousse at the roots before styling helps every design look more substantial.
Will tight braided designs damage my hair?
Tension is the deciding factor, not the style itself. Braids installed with comfortable, even tension protect the hair by keeping ends tucked away, that is why they are called protective styles. Problems start with excessive tightness, especially at the hairline, which can cause breakage and, over time, traction alopecia. A design should never hurt, throb, or give you a headache; if it does, have it loosened immediately. Keep the scalp moisturized and do not leave any braided style in longer than your stylist recommends.
Can beginners really do these at home?
About half of this list, yes. The zigzag ponytail, bubble ponytail, heart part, and baby-hair edges need only a comb and ten minutes, genuinely beginner territory. The braided designs need practice: expect your first Dutch braid to take thirty minutes and look imperfect, and your fifth to take ten and look good. Start with two-strand rope twists, which are nearly foolproof, before attempting three-strand braids. Video tutorials paused at each step beat written instructions for learning hand positions.
What should you sleep in to preserve a hair design?
A satin or silk bonnet is the single best investment, it prevents friction that frizzes parts and loosens braids overnight. For tall designs like the sculpted knot or faux hawk, a satin-lined sleep cap with room, or a loose high pineapple with a satin scrunchie, protects the shape. Never sleep on cotton pillowcases with a fresh design; the friction undoes hours of work. In the morning, smooth the hairline with a dab of edge control and mist lightly with water mixed with leave-in conditioner to revive the pattern.
Ready to Try a Cool Hair Design?
Fifteen designs, one takeaway: structure is the most reliable beauty tool you own. Pick the design that matches your morning, a ten-minute zigzag part, a weekend braided crown, and give your hands one practice run before the day you need it. Bring your reference photos to your stylist if you want the patterned work done professionally.
Pin your favorite design now so it is waiting when inspiration strikes, and send this guide to the friend whose braids you have always admired. The pattern is easier than it looks.
Related Reads
- https://hairaurapro.com/half-up-fishtail-braid-hairstyles/
- https://hairaurapro.com/short-crochet-twist-hairstyles/
- https://hairaurapro.com/weave-ponytail-hairstyles-with-bangs/
- https://hairaurapro.com/formal-hairstyles-for-long-hair/