
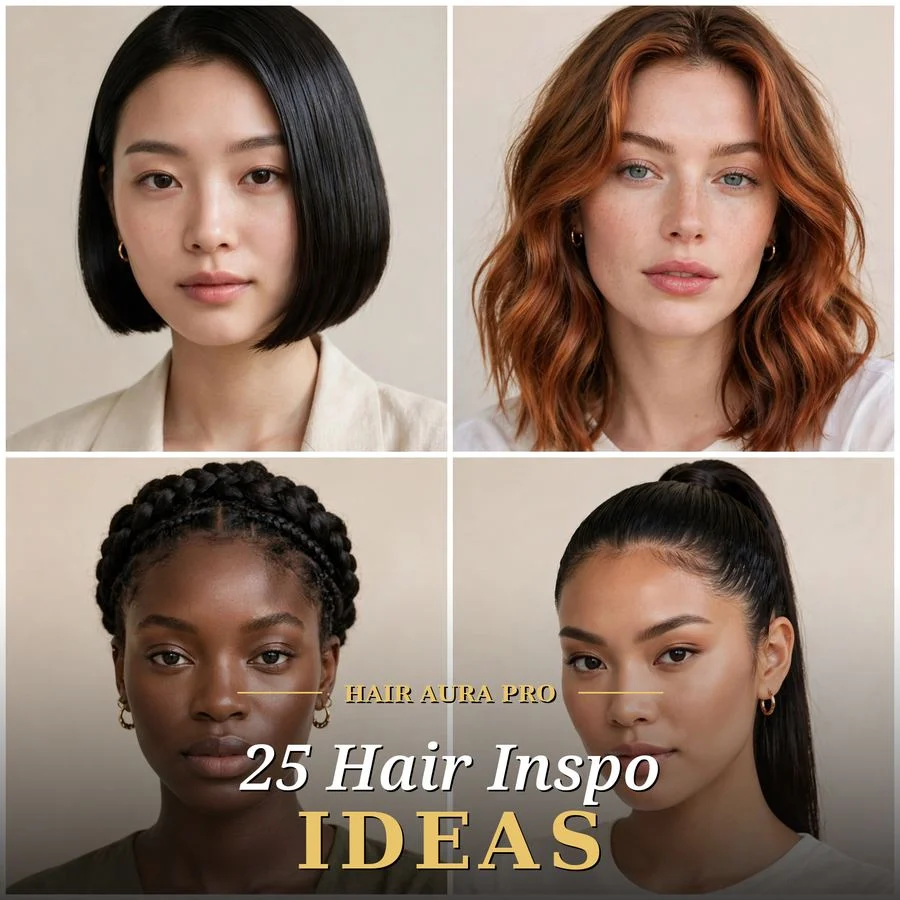
25 Hair Inspo Ideas Worth Saving for Your Next Makeover

Hair inspo is the saved-folder shorthand for hairstyle inspiration: the cuts, colors, and styling ideas you collect on Pinterest and Instagram long before you ever sit in the salon chair. It is not a single look but a practice, gathering reference photos until a direction starts to emerge, then handing that direction to your stylist.
Think of the feeling when a photo stops your scroll: the copper balayage catching afternoon light, the blunt bob swinging in perfect unison, the braided crown that looks like it belongs in a period drama. That little jolt of want is the whole engine of hair inspo. This list is built to give you more of those moments, with enough variety that something here matches your length, texture, and commitment level.
Below are 25 ideas worth saving, each with its own photo and a practical guide to getting the look, what to ask for, how to style it at home, and the products that make it work. Screenshot freely.
Why Hair Inspo Works So Well
Most hair regrets come from walking into a salon with a vague feeling instead of a concrete picture. Hair inspo flips that: you arrive with reference photos, and your stylist can see exactly what you mean by "lived-in" or "chunky", words that mean wildly different things to different people. Photos remove the translation problem, and they give your stylist permission to be honest about what your hair type can actually do with that look.
The second reason inspo works is that it separates the dreaming phase from the deciding phase. Saving twenty photos over two weeks lets patterns surface, maybe every photo you love has curtain bangs, or warm copper tones, or a blunt perimeter. That pattern is data about your own taste, and it is far more reliable than a single impulsive screenshot taken the night before your appointment.
Finally, good inspo respects maintenance reality. Every idea below notes the grow-out behavior and upkeep level, because a style you love in the chair and resent at week six was the wrong choice. The best hair decision is the one you still like when you are styling it yourself on a rushed Tuesday morning.
A useful rule: bring two or three photos of the same idea from different angles, not ten photos of ten different ideas. Your stylist needs depth on one direction, not breadth across all of them.
Style at a Glance
| The Inspo Approach | |
|---|---|
| Philosophy | Collect first, decide slowly, commit with reference photos in hand |
| Key materials | Satin ribbons, oversized claw clips, clear mini elastics, silk scarves |
| Key colors | Copper, cherry cola, caramel, lived-in brunette, glass black |
| Upkeep spectrum | Wash-and-go texture on one end, precision bobs and vivid color on the other |
| Best starting point | Your current length and texture, adapt the idea, do not fight your hair |
25 Ways to Wear Hair Inspo
1. The Lived-In Lob
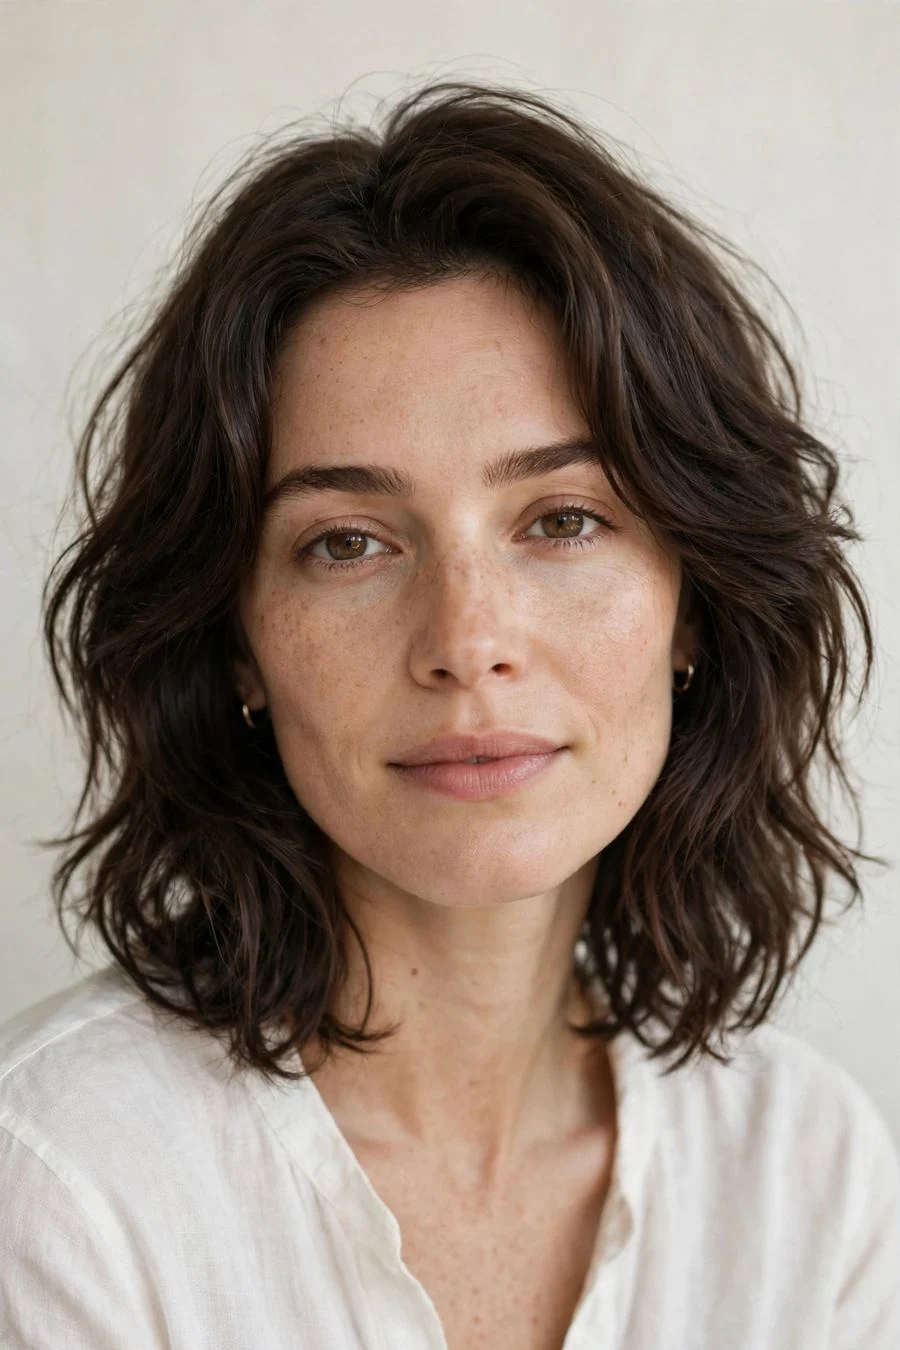
Vibe: Relaxed polish that reads expensive without trying.
Why it works: A lob that lands between the chin and collarbone flatters nearly every face shape, because the length draws the eye downward, softening a strong jaw and giving round faces the illusion of length. The "lived-in" layering means it grows out gracefully, with no harsh shelf after six weeks. It cooperates with your natural texture instead of fighting it, so even wash-and-go days look deliberate. And the length is the true sweet spot: long enough for a low bun, short enough to skip the tangles.
How to get it: Ask your stylist for a collarbone-grazing lob with soft, invisible layers concentrated through the ends. Bring photos that show the exact length you want, since "lob" means different things in different chairs. Request texturizing only at the very ends so the perimeter stays thick and strong. At home, rough-dry with a volumizing mousse, then bend random mid-length sections with a flat iron for that slept-in wave.
💡 Quick Win: Flip your part from center to deep side once a week, instant crown volume with zero heat.
Shop the Look
| Product | Lightweight volumizing mousse | Heat protectant spray | 1.25-inch flat iron | Flexible-hold hairspray | Boar-bristle paddle brush |
|---|---|---|---|---|---|
2. Curtain Bangs with Long Layers
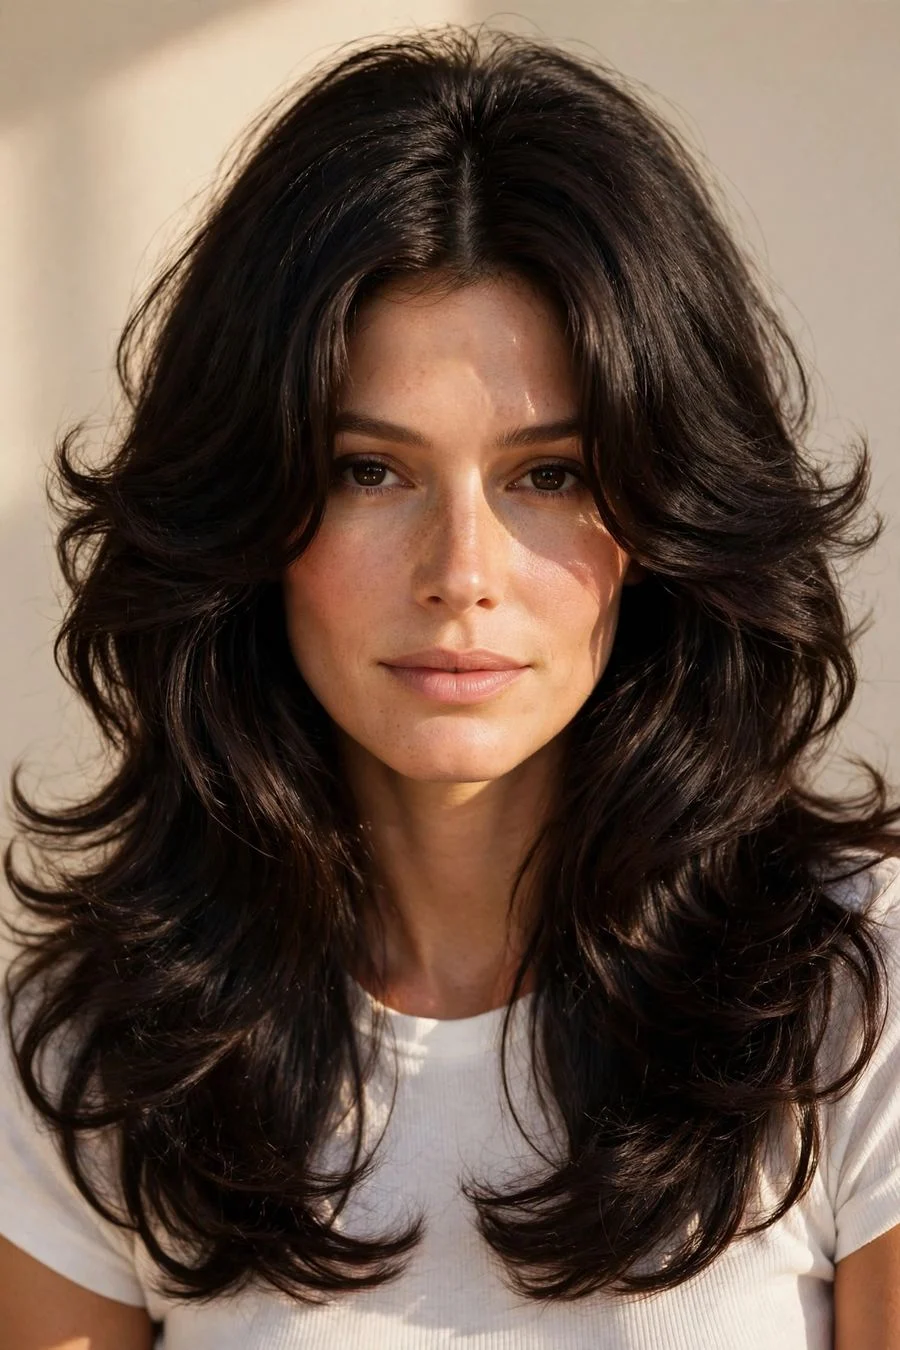
Vibe: Seventies softness, modernized.
Why it works: Curtain bangs frame the cheekbones and forehead without the commitment of a full fringe, they grow out directly into face-framing layers, so there is no awkward in-between stage. On long hair they break up the flat curtain effect and put movement exactly where the face is. They are especially kind to oval, square, and heart-shaped faces, and they make high ponytails and buns look instantly more considered.
How to get it: Ask for bangs that part in the middle and taper from the cheekbones to the jaw, melting into long layers. Have your stylist cut them dry or nearly dry so the length is honest, bangs spring up as they dry. Style by blow-drying with a round brush, rolling each side away from your face. A pinch of dry shampoo powder at the roots keeps them from separating by mid-afternoon.
Also view: [INTERNAL:curtain bangs styling guide]
Shop the Look
| Product | Round thermal brush | Blow-dry smoothing cream | Mini flat iron | Dry shampoo powder | Sectioning clips |
|---|---|---|---|---|---|
3. The Glass-Hair Bob
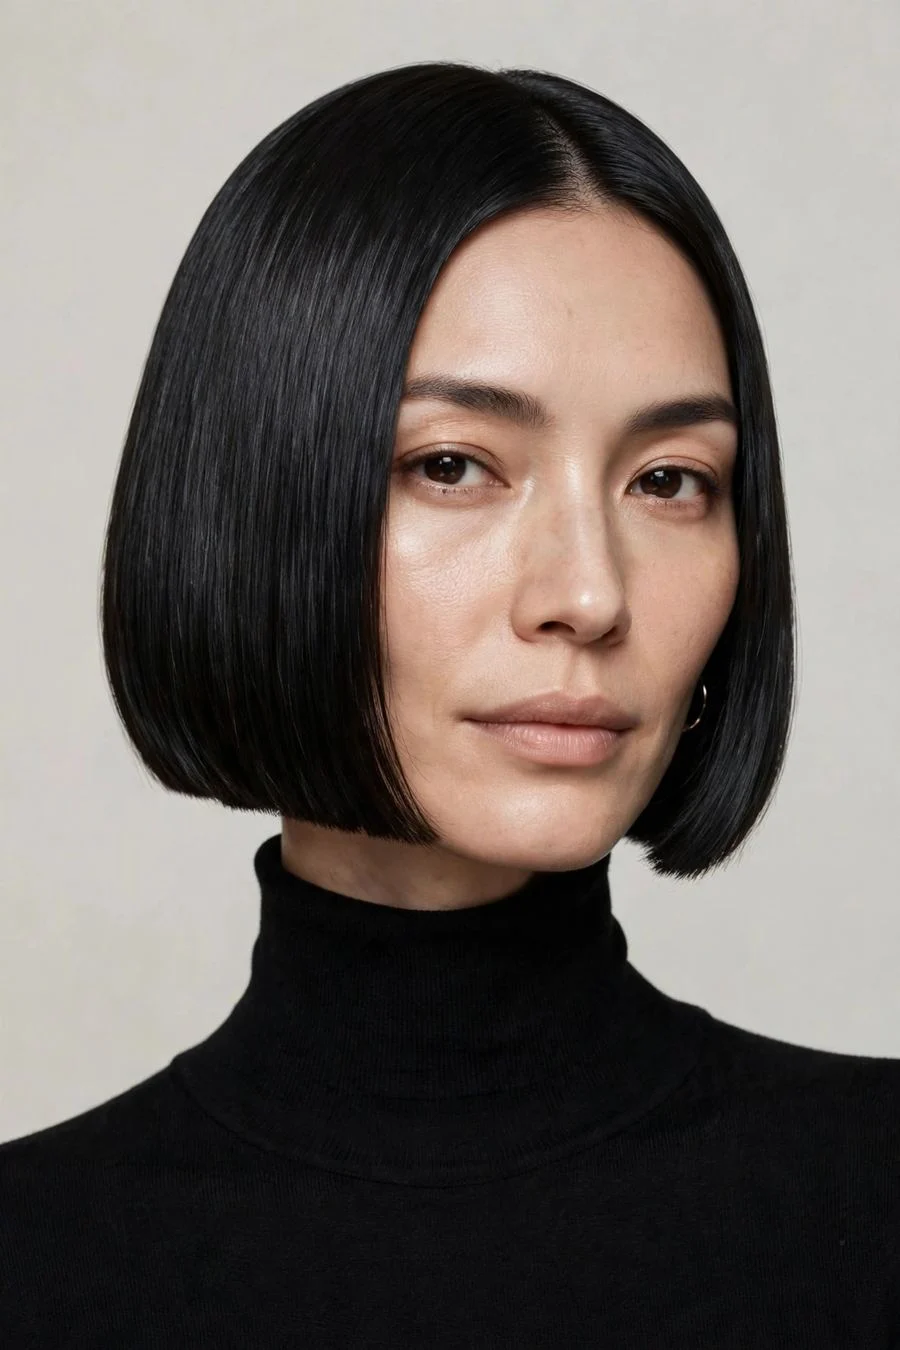
Vibe: Liquid shine, razor edges.
Why it works: The glass bob is cut blunt and styled pin-straight so light bounces off one continuous, smooth surface, that reflection is the entire trick. It makes fine hair look twice as dense because the blunt perimeter forms a solid, heavy line with no wispiness. The silhouette is graphic and confident, and it photographs beautifully, which matters when the photo is the point. As a bonus, it grows into a lob, so you effectively get two haircuts for the price of one.
How to get it: Ask your stylist for a one-length bob with no layering and a clean, sharp perimeter, ending at or just below the jawline. At home, work a smoothing serum through damp hair, blow-dry with a paddle brush pulling straight down, then pass a flat iron through thin sections. Finish with a pea-sized amount of shine serum pressed, not rubbed, over the surface.
💡 Quick Win: Sleep on a silk pillowcase; it keeps the flat-ironed surface smooth for an extra full day.
Shop the Look
| Product | Smoothing blow-dry serum | Paddle brush | Titanium flat iron | Anti-frizz shine spray | Silk pillowcase |
|---|---|---|---|---|---|
4. Copper Balayage Waves
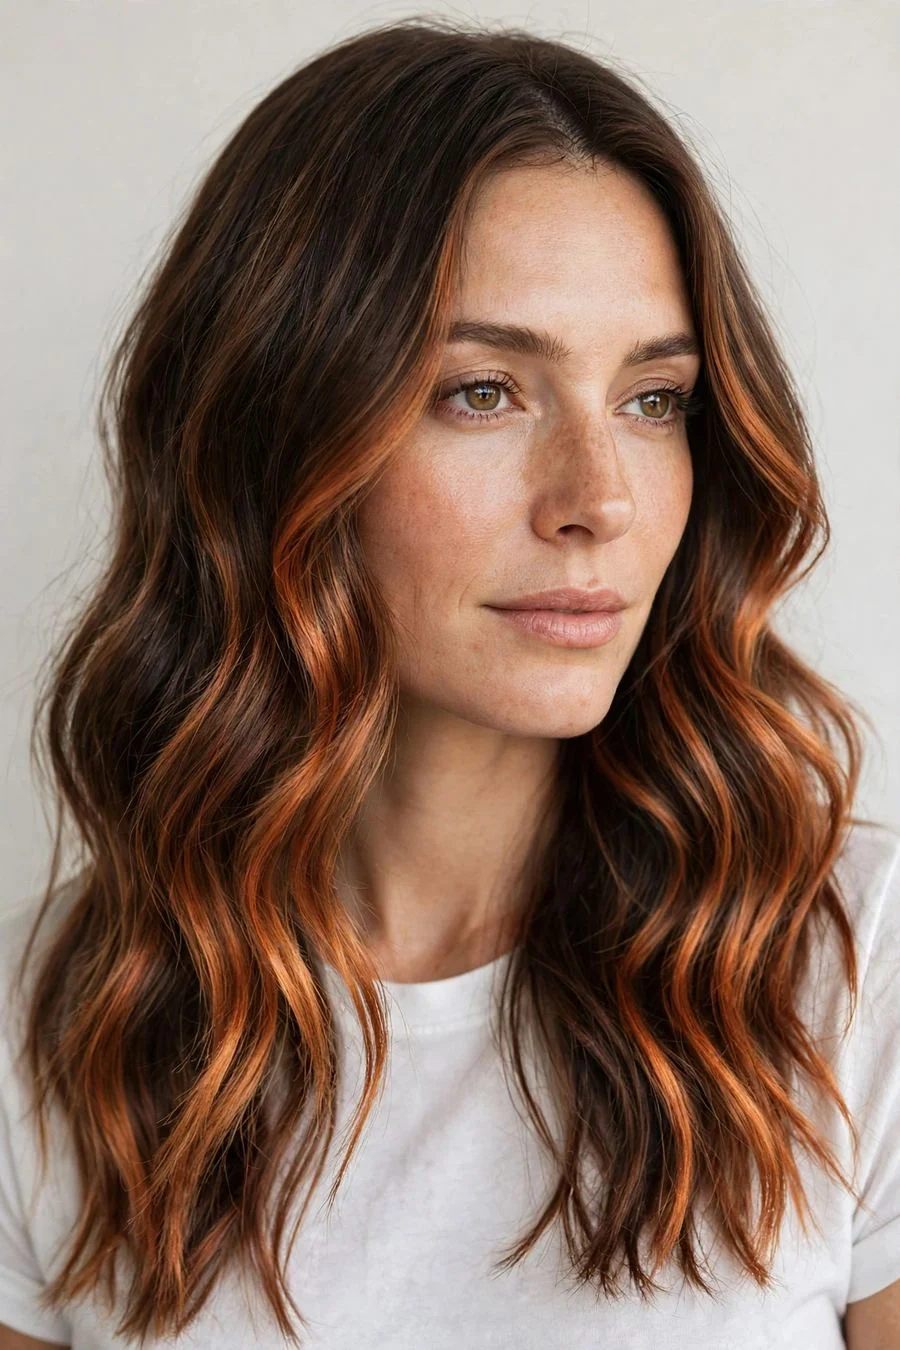
Vibe: Warm light, bottled.
Why it works: Copper painted through a brown base achieves what a full color change cannot: warmth and dimension while your natural root keeps the grow-out invisible. Balayage placement concentrates brightness through the mid-lengths and ends, exactly where hair catches the light, so the effect glows without looking dyed. Copper is especially flattering on green and hazel eyes, and it warms up cool skin tones that can look washed out in ash shades.
How to get it: Ask your colorist for hand-painted copper balayage, level 7 to 8 copper ribbons through the mid-lengths, with your natural base untouched at the root. Request a gloss in the same copper family to unify the tone. At home, maintenance is a color-depositing conditioner once a week, because copper molecules are small and slip out of the hair shaft faster than other pigments.
Shop the Look
| Product | Color-depositing copper conditioner | Sulfate-free shampoo | Wide-tooth comb | 1.25-inch curling wand | Color-safe heat protectant |
|---|---|---|---|---|---|
5. The Modern Shag
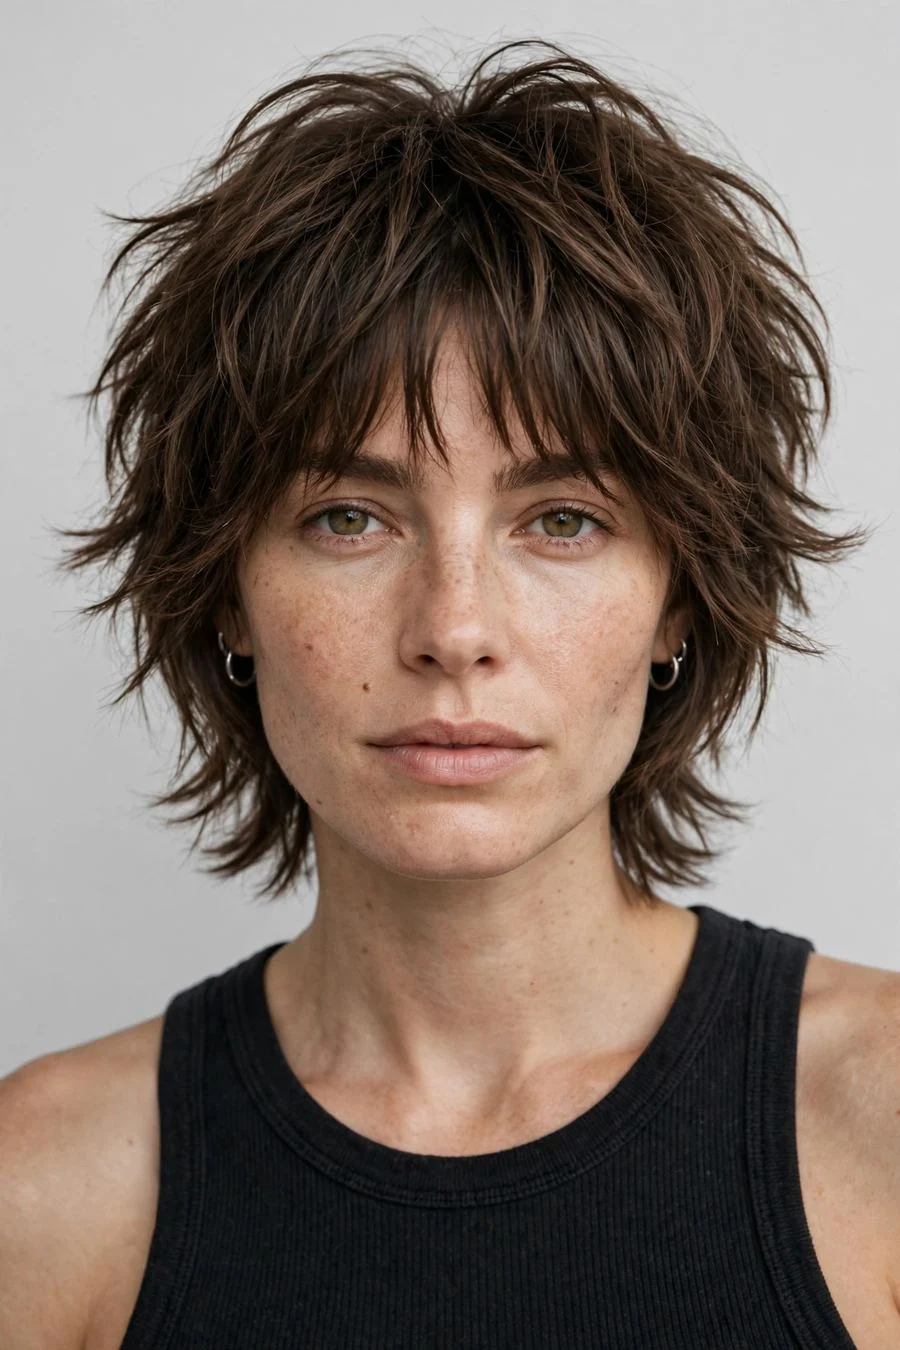
Vibe: Rock-and-roll texture, zero fuss.
Why it works: The shag's short crown layers and piecey ends build volume exactly where flat hair needs it, at the top, while the length stays lean and swingy. It is one of the few cuts that genuinely improves the less you style it, because the texture does all the talking. A curtain fringe is usually built in, so the face-framing happens automatically. It suits medium to thick hair best, where the layers collapse into each other instead of puffing outward.
How to get it: Ask for a shag with heavy layering through the crown, disconnected ends, and fringe that blends into the shortest layers. Bring a photo, because "shag" ranges from subtle to nearly mullet. Style with sea salt spray on damp hair and scrunch, or rough-dry upside down for lift. A pea-sized amount of pomade on the ends defines the pieces.
💡 Quick Win: On day two, revive the texture with dry texture spray at the crown instead of re-washing.
Shop the Look
| Product | Sea salt texturizing spray | Lightweight pomade | Diffuser attachment | Dry texture spray | Microfiber hair towel |
|---|---|---|---|---|---|
6. Slicked-Back Bun
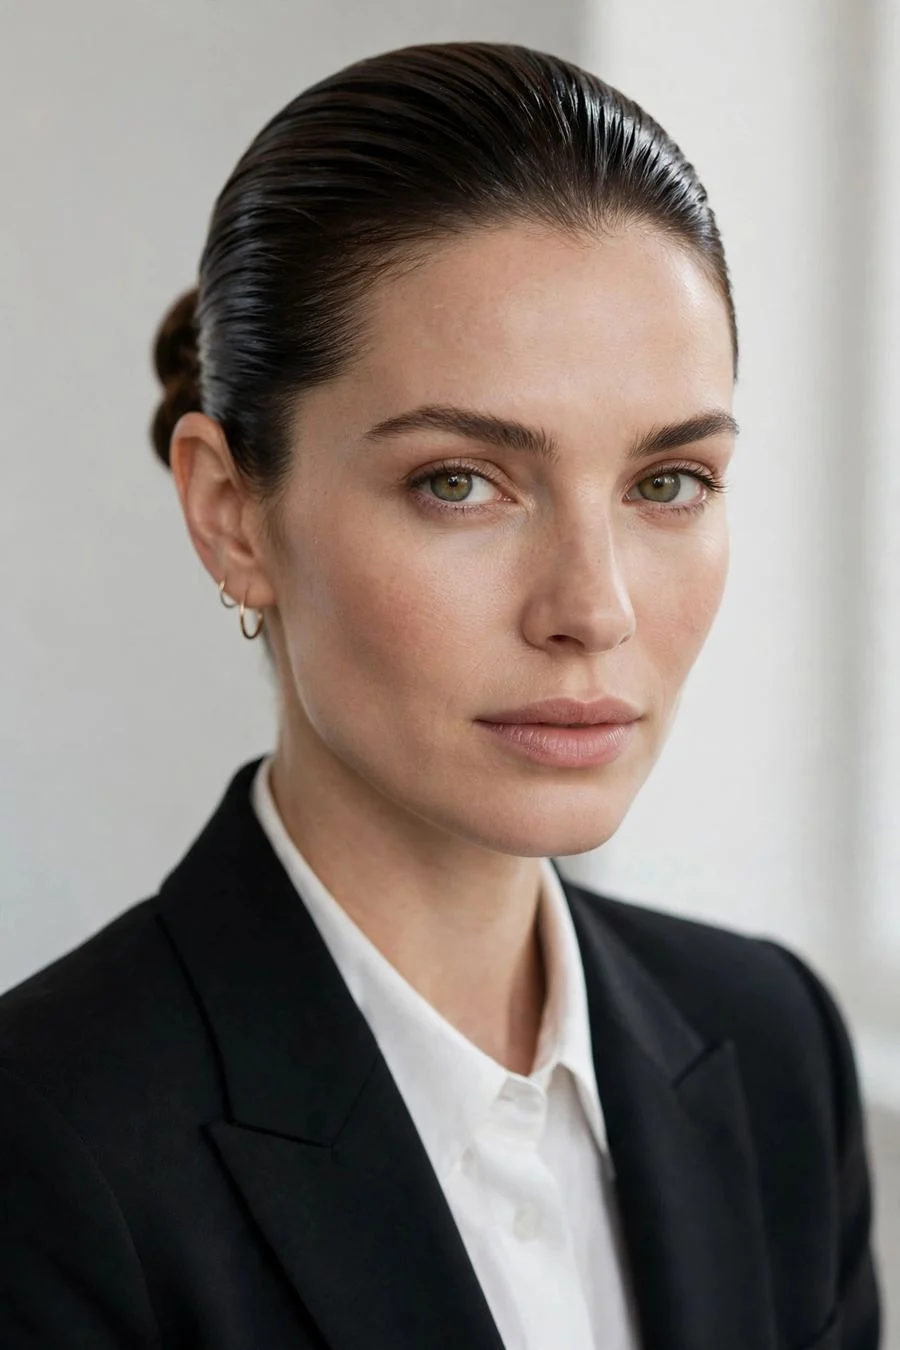
Vibe: Boardroom ballet.
Why it works: Pulling everything back and up puts your bone structure on full display, cheekbones, jawline, earrings, all of it. The lacquered finish reads polished and intentional, which is why the style works for job interviews and weddings alike. It also completely disguises second- or third-day hair, since smoothing products work with natural oils rather than against them. On long hair, wrapping the bun flat keeps the profile sleek instead of bulky.
How to get it: Brush damp or day-old hair straight back with a smoothing cream, secure a ponytail at the crown or nape, then twist and wrap into a bun, pinning as you go. Use a fine-tooth comb to perfect the hairline and a strong-hold gel through the front for the lacquered finish. Mist with hairspray and press flyaways down with your palms.
Also view: [INTERNAL:easy updos for work]
Shop the Look
| Product | Strong-hold smoothing gel | Fine-tooth styling comb | Bobby pins | Firm-hold hairspray | Edge brush |
|---|---|---|---|---|---|
7. Bubble Braid Ponytail
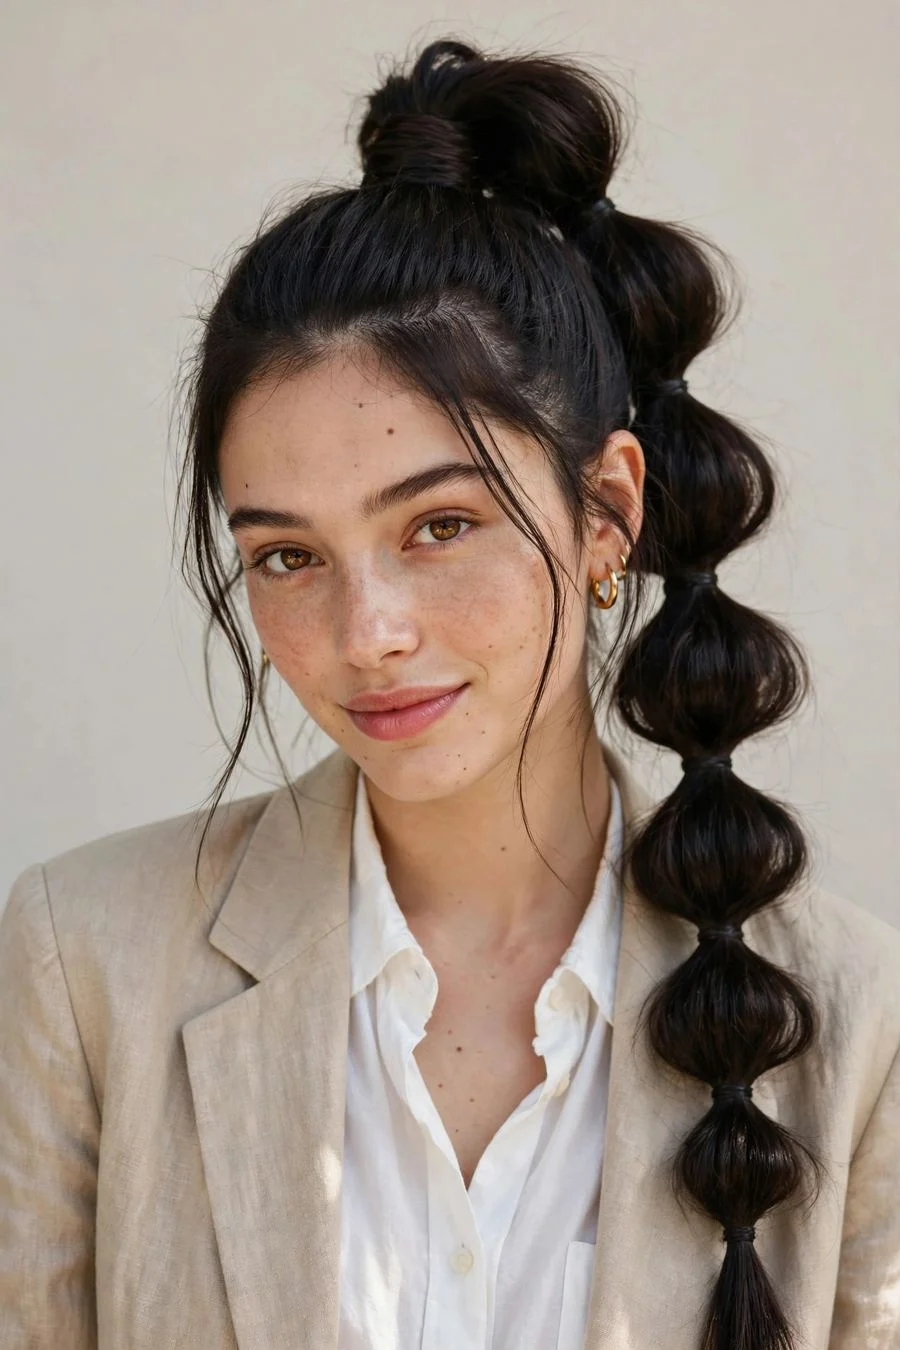
Vibe: Playground nostalgia, grown up.
Why it works: The bubble braid gives a basic ponytail architecture, each rounded section adds width and visual rhythm down the length, turning one-dimensional hair into something sculptural. It suits medium to long hair and genuinely holds better than a plain pony, because the elastics distribute tension along the whole length instead of concentrating it at the base. It photographs with beautiful dimension and survives wind, workouts, and twelve-hour days without collapsing.
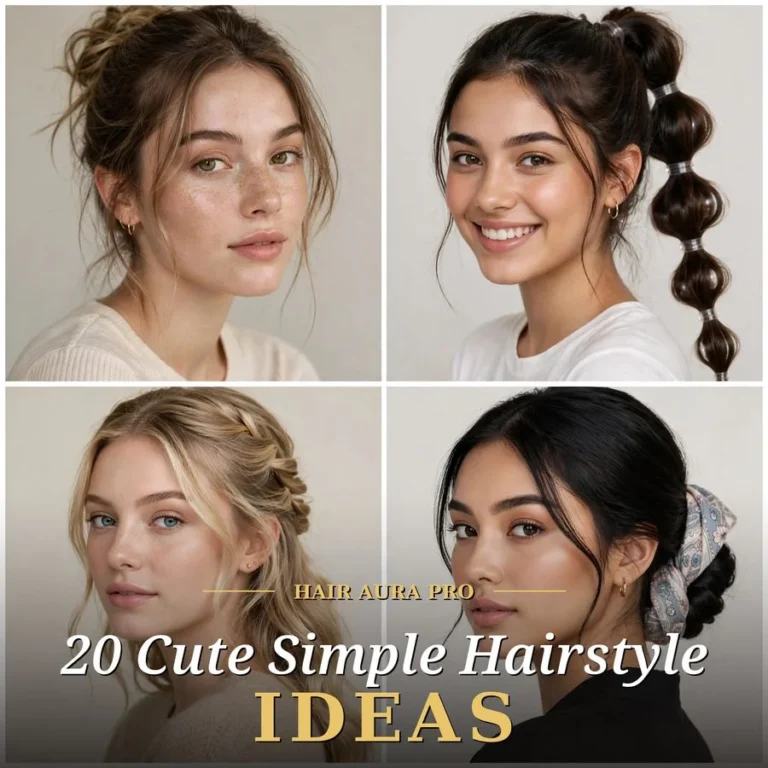
How to get it: Pull hair into a high or mid ponytail and anchor it firmly. Place small clear elastics every two to three inches down the length, then gently tug each section outward to puff the bubbles. Pancake the sides for extra width. Conceal each elastic by wrapping a thin strand of hair around it, or leave them visible for a sportier finish.
💡 Quick Win: Do it on unwashed hair, the natural grip holds the style twice as long as freshly washed strands.
Shop the Look
| Product | Clear mini elastics | Teasing comb | Texturizing powder | Flexible hairspray | Smoothing brush |
|---|---|---|---|---|---|
8. Claw Clip Twist
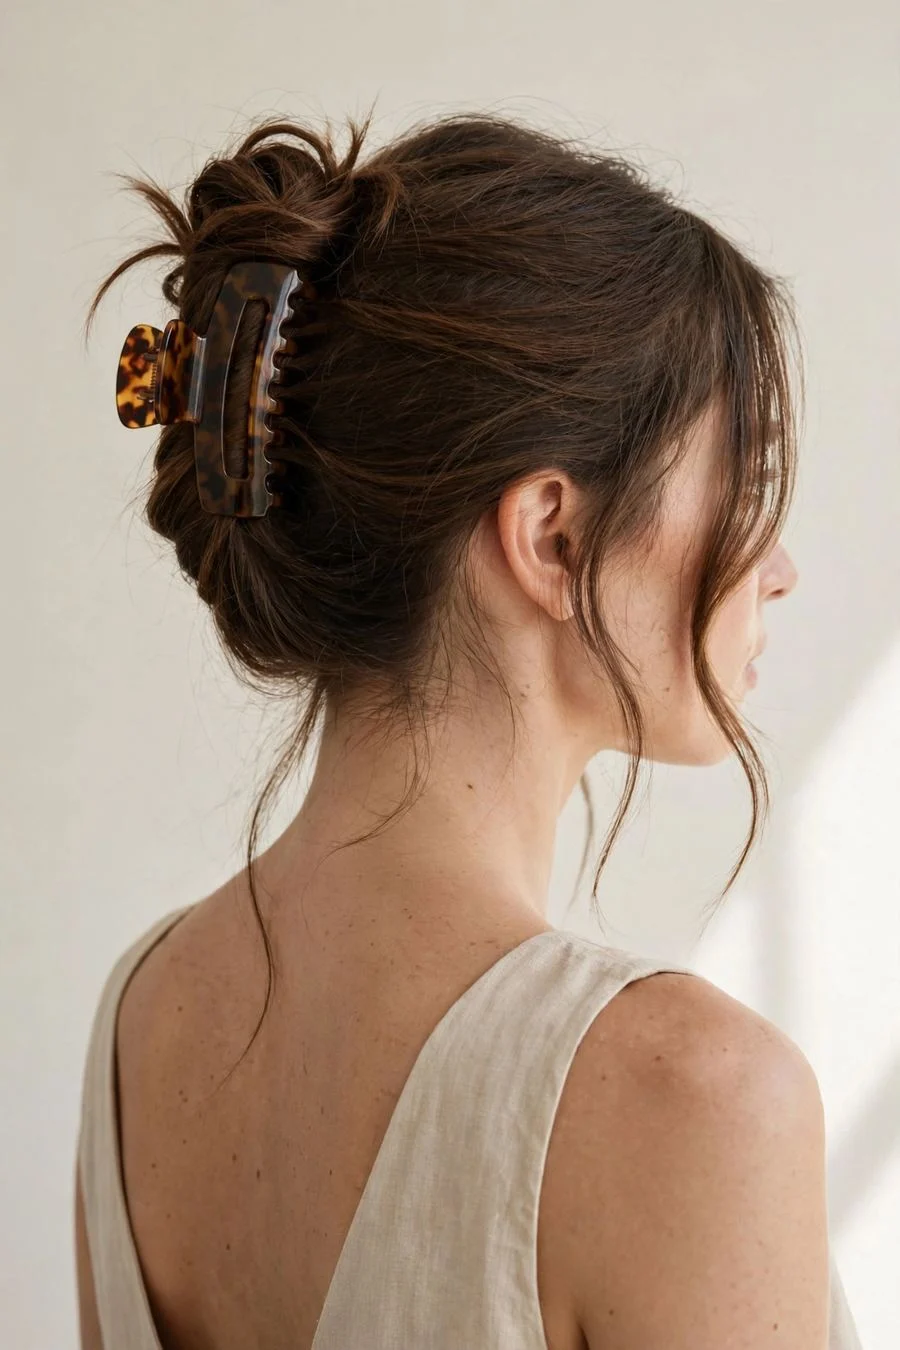
Vibe: French-girl efficiency.
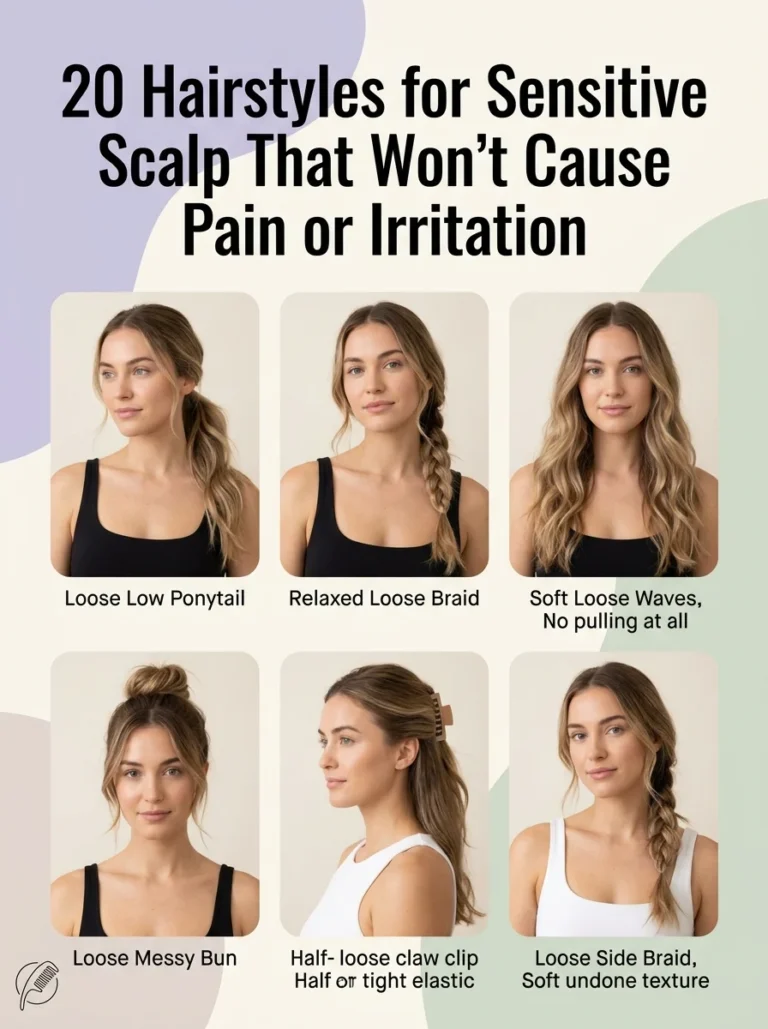
Why it works: The claw clip twist gets every strand off your neck in under a minute, and the undone finish is the entire aesthetic, two face-framing pieces left loose make it look effortless rather than messy. It distributes weight far better than a tight ponytail, so there is no tension headache by mid-afternoon. The clip itself functions as an accessory, and today's oversized, matte, and tortoiseshell designs look deliberate rather than dated.
How to get it: Gather hair as though making a low ponytail, twist the length upward flat against the back of your head, fold the ends down, and clamp the claw clip over the twist to lock it. Pull out two thin front pieces and loosen the crown slightly for softness. Thick hair needs a large clip with strong teeth; fine hair only needs a medium one.
Shop the Look
| Product | Large matte claw clip | Medium claw clip | Light-hold mousse | Travel-size hairspray | Metal-free hair ties |
|---|---|---|---|---|---|
9. The Half-Up Bow
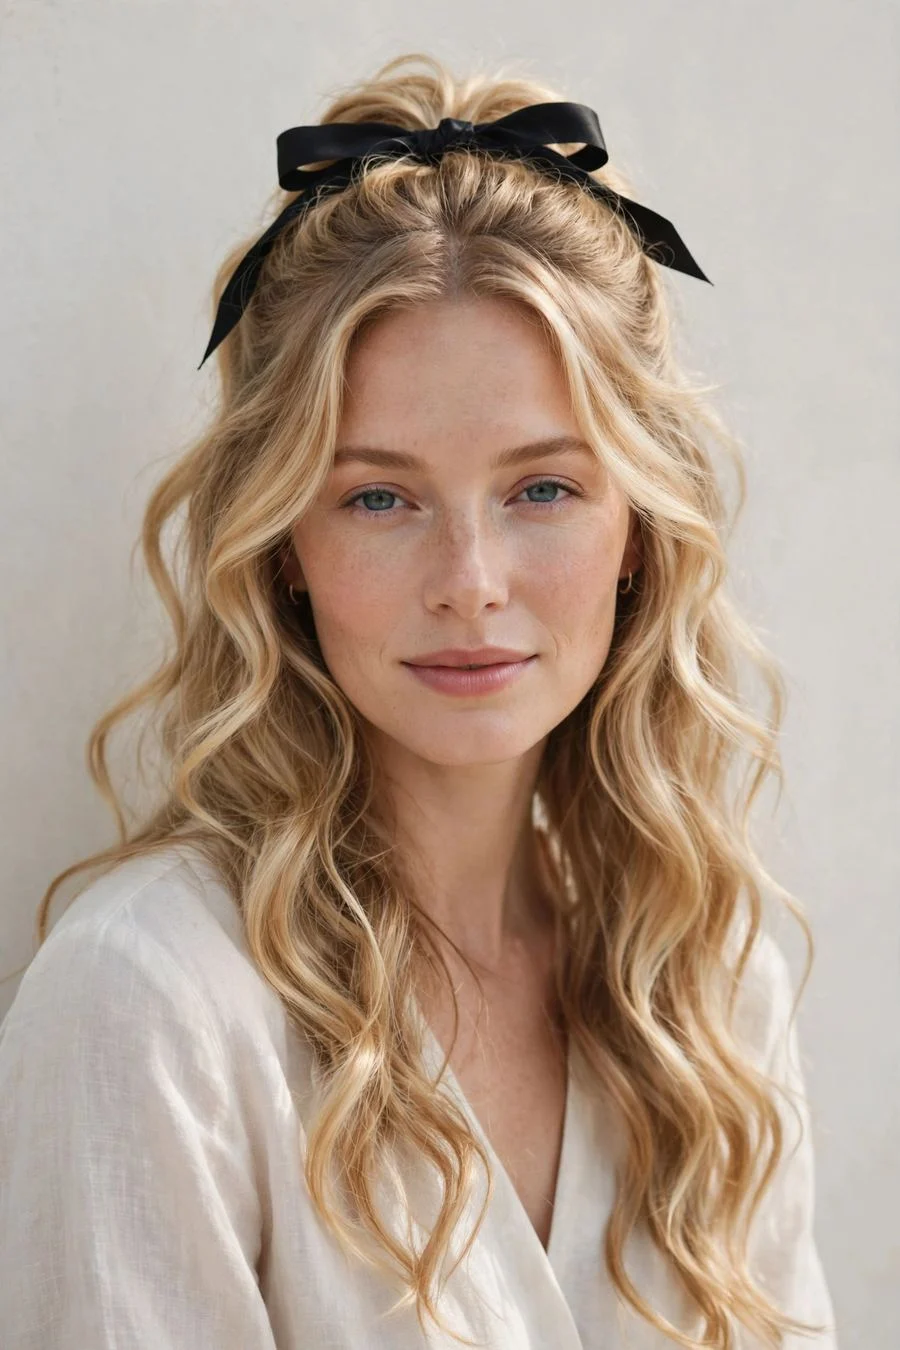
Vibe: Ballet-core sweetness.
Why it works: Securing the half-up section with a ribbon bow instead of an elastic changes the whole register of the style, suddenly it reads romantic and occasion-ready. The bow sits at the crown, exactly where the eye lands first, so even simple unstyled lengths underneath look finished. It works across straight, wavy, and curly textures, and the ribbon color is an easy way to tie the hairstyle directly to your outfit.
How to get it: Section the top half of your hair from temple to temple and secure it with a small elastic. Tie a satin or grosgrain ribbon around the base in a full bow, trimming the tails to your preferred length. Curl the lengths loosely for a dressier finish or leave them natural for daytime. Positioning the bow slightly off-center feels more modern.
💡 Quick Win: Curl the ribbon tails with a curling iron for a polished, gift-wrap finish.
Shop the Look
| Product | Satin ribbon spool | Small clear elastics | 1-inch curling iron | Light shine mist | Fabric scissors |
|---|---|---|---|---|---|
10. Chunky Money Pieces
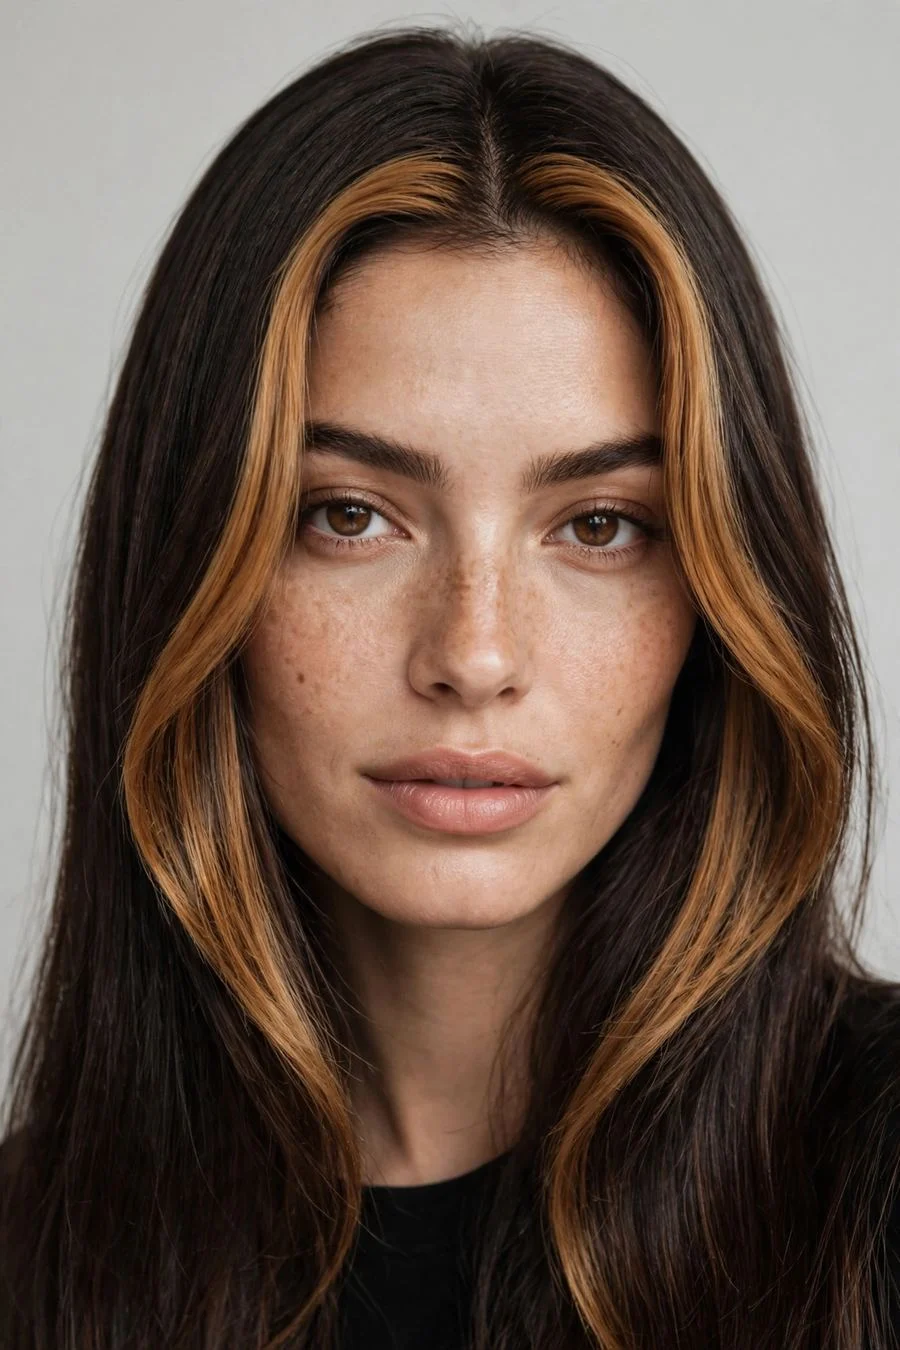
Vibe: Face-framing light, no full commitment.
Why it works: Two bold, face-framing sections of lightness brighten the entire face, eyes look brighter, skin looks warmer, without lightening the whole head. Because the brightness sits right at the front, you get highlight impact in every photo while the back stays low-maintenance. The chunky (rather than finely woven) placement is the current iteration; it reads bold and graphic instead of streaky, and the regrowth is soft when a root shadow is applied.
How to get it: Ask your colorist for two thick face-framing sections lifted two to three levels brighter than your base, with a root shadow melted in so there is no harsh regrowth line. Bring a photo showing the exact width you want, because "chunky" is subjective. Tone the pieces to complement your base: warm caramel over brown, icy over dark blonde.
Also view: [INTERNAL:balayage vs highlights guide]
Shop the Look
| Product | Toning hair mask | Sulfate-free shampoo | Heat protectant spray | Wide-tooth comb | Microfiber towel |
|---|---|---|---|---|---|
11. Braided Crown
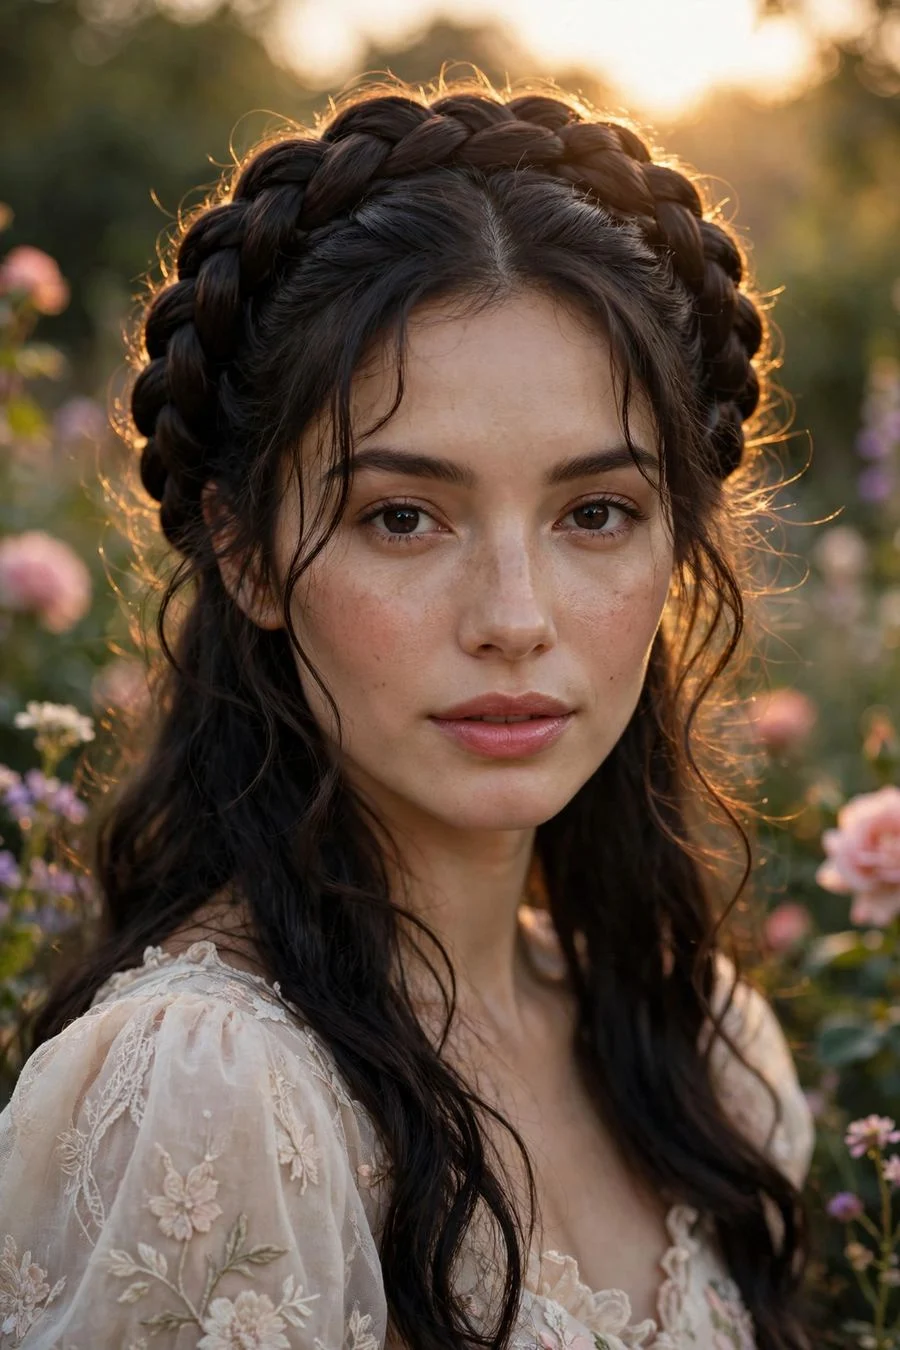
Vibe: Regency romance.
Why it works: A braid wrapped around the head like a crown keeps every strand off your face and neck while looking far more intricate than the technique actually is. It distributes the hair's weight evenly around the head, so it stays comfortable for all-day wear, weddings, festivals, long shifts. It grips best on second-day hair, and the style softens beautifully as pieces loosen, so it still looks good at hour ten, not just hour one.
How to get it: Part down the middle and Dutch-braid each side from the hairline toward the nape, then cross the braids over the crown and pin the ends underneath the opposite braid. Pancake each braid, gently pull the edges wider, before pinning for a fuller crown. Set the whole style with a medium-hold spray.
💡 Quick Win: Braid on slightly damp hair with texturizing spray for extra grip that lasts all day.
Shop the Look
| Product | Bobby pins | Medium-hold hairspray | Texturizing spray | Rat-tail comb | Small clear elastics |
|---|---|---|---|---|---|
12. High Sleek Ponytail
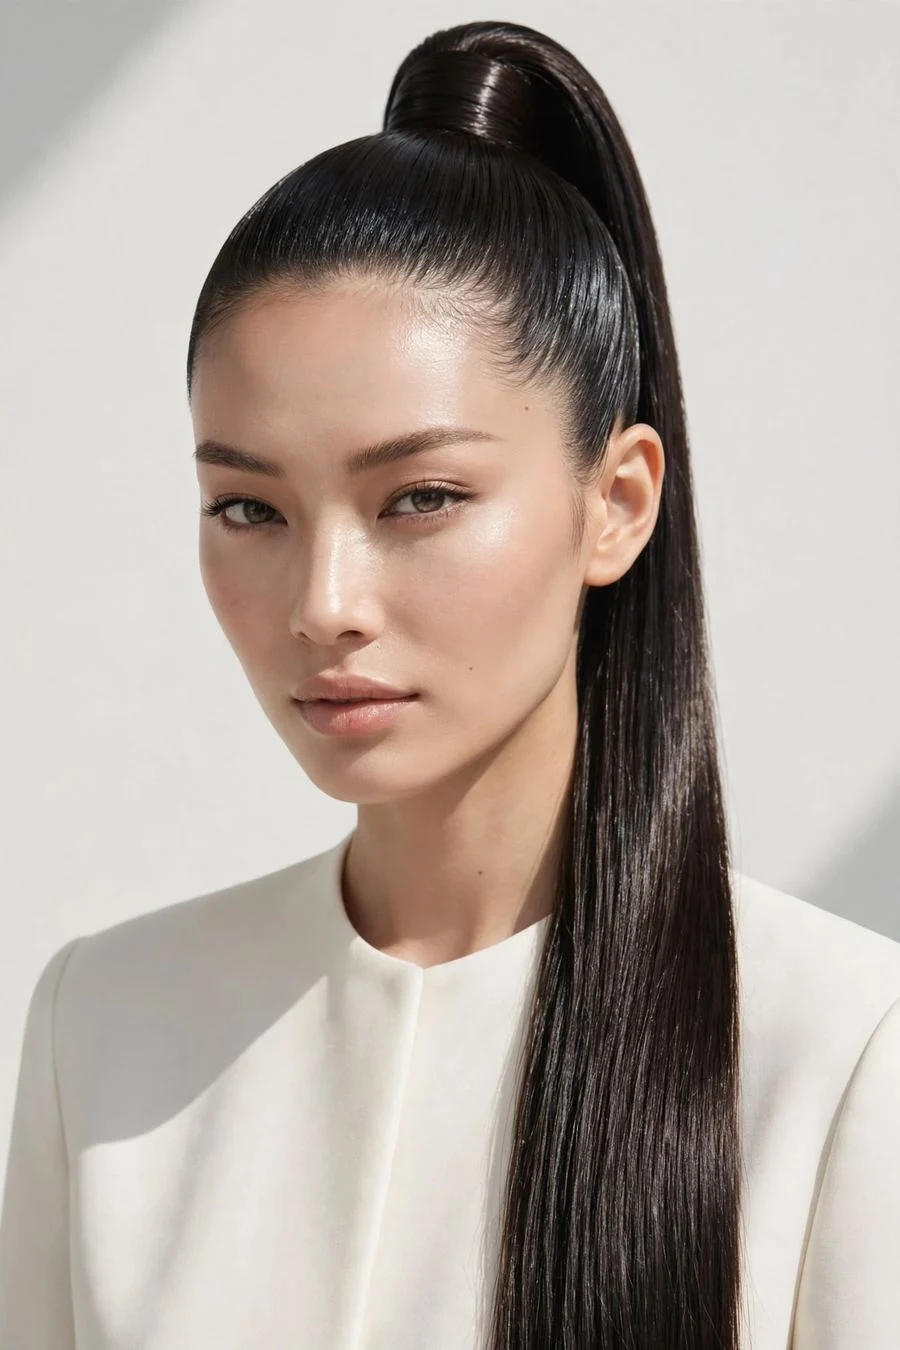
Vibe: Snatched and sculptural.
Why it works: A high, tight ponytail lifts the entire face visually, the upward pull sharpens the cheekbones and opens the eyes. Smoothing the hairline to a high shine makes the style look expensive and deliberate, the opposite of a gym pony. It is also genuinely practical: hair stays off your face and neck through heat, workouts, and windy days, and the style endures because the tension itself is doing the structural work.
How to get it: Flip your head upside down and brush all hair toward the crown, securing with a strong elastic at your chosen height. Smooth the hairline with gel and a fine-tooth comb, then wrap a strand of hair around the elastic to conceal it. Straighten the length for maximum sleekness, or add a loose wave for softness.
Shop the Look
| Product | Extra-strong hair ties | Smoothing gel | Fine-tooth comb | Flat iron | Shine serum |
|---|---|---|---|---|---|
13. Textured Space Buns
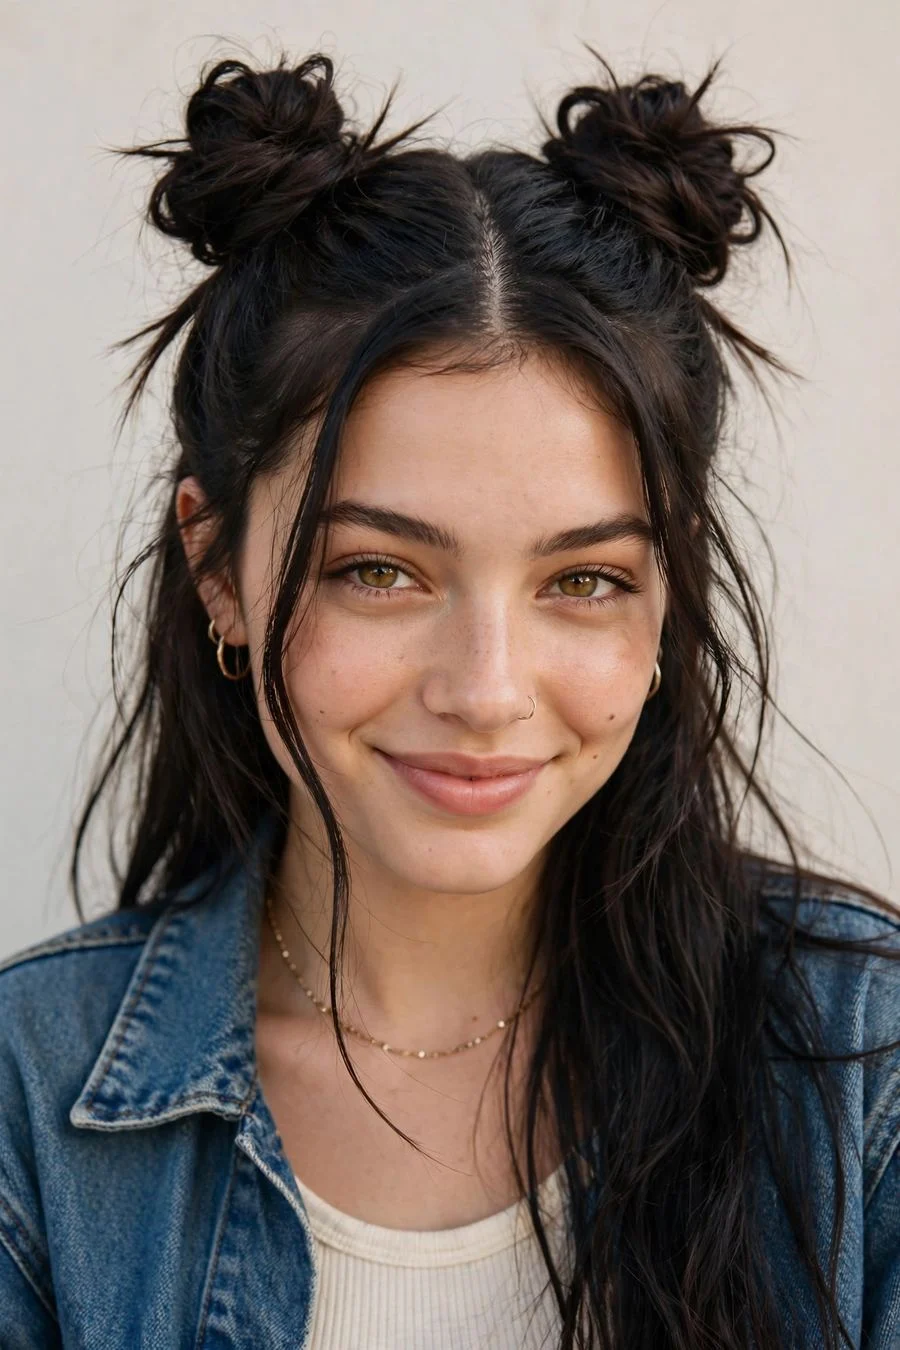
Vibe: Festival-day fun.
Why it works: Two buns double the volume illusion, and the symmetry is inherently playful, it reads youthful without reading childish when the texture stays undone rather than perfect. Space buns keep hair completely contained, which is why they dominate festival and workout inspo boards. The style works on short, medium, and long hair; on shorter lengths the buns sit higher and cuter, while long hair makes them gloriously oversized.
How to get it: Part down the middle and secure two high pigtails. Tease each ponytail lightly, twist, wrap into a bun, and pin to secure. Pull out face-framing pieces and loosen each bun with your fingertips for lived-in texture. For festival versions, add glitter at the part or a wash of temporary color spray.
💡 Quick Win: Set the base with two stacked elastics per side instead of one, the buns sit higher and never sag by evening.
Shop the Look
| Product | Mini hair ties | Bobby pins | Teasing brush | Texture spray | Temporary color spray |
|---|---|---|---|---|---|
14. The Bixie Cut
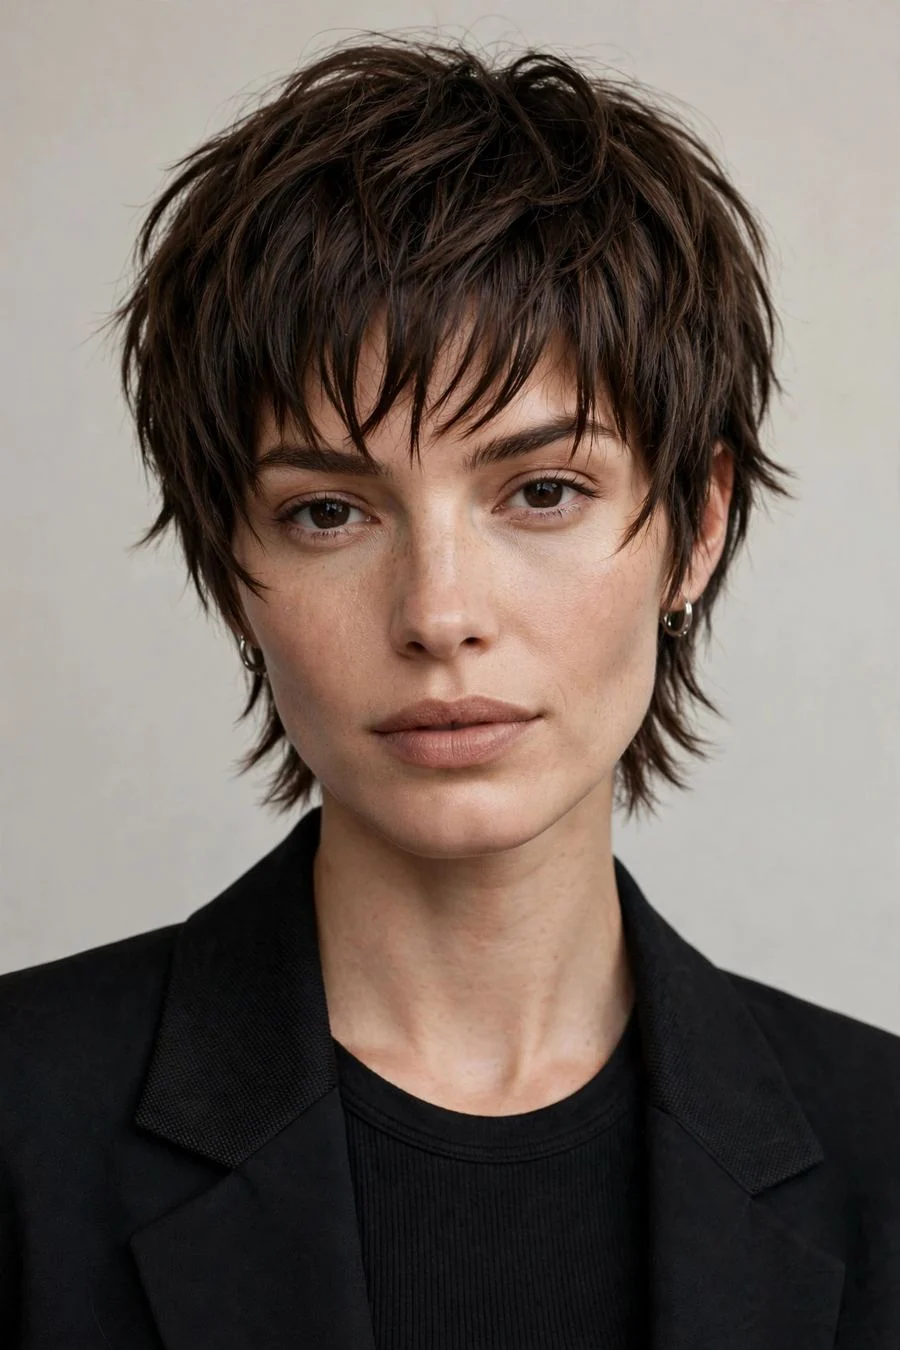
Vibe: Pixie meets bob, best of both.
Why it works: The bixie keeps the pixie's short, feathered nape and adds the bob's length on top, short-hair freedom with enough length to tuck behind the ears and restyle different ways. It grows out into a bob rather than an awkward in-between, which solves the classic short-hair grow-out dread. The texture on top adds volume to fine hair, while the cropped back keeps thick hair from ballooning outward.
How to get it: Ask for a cut that is pixie-short at the nape and sides with bob-length layers on top, textured with point cutting. Bring photos from multiple angles, because the bixie lives or dies on the back view. Style with a dab of wax worn piecey and forward, or sweep it to the side for a softer finish.
Also view: [INTERNAL:short haircuts for fine hair]
Shop the Look
| Product | Texturizing wax | Small round brush | Blow-dryer with nozzle | Dry shampoo | Matte pomade |
|---|---|---|---|---|---|
15. Beachy Mermaid Waves
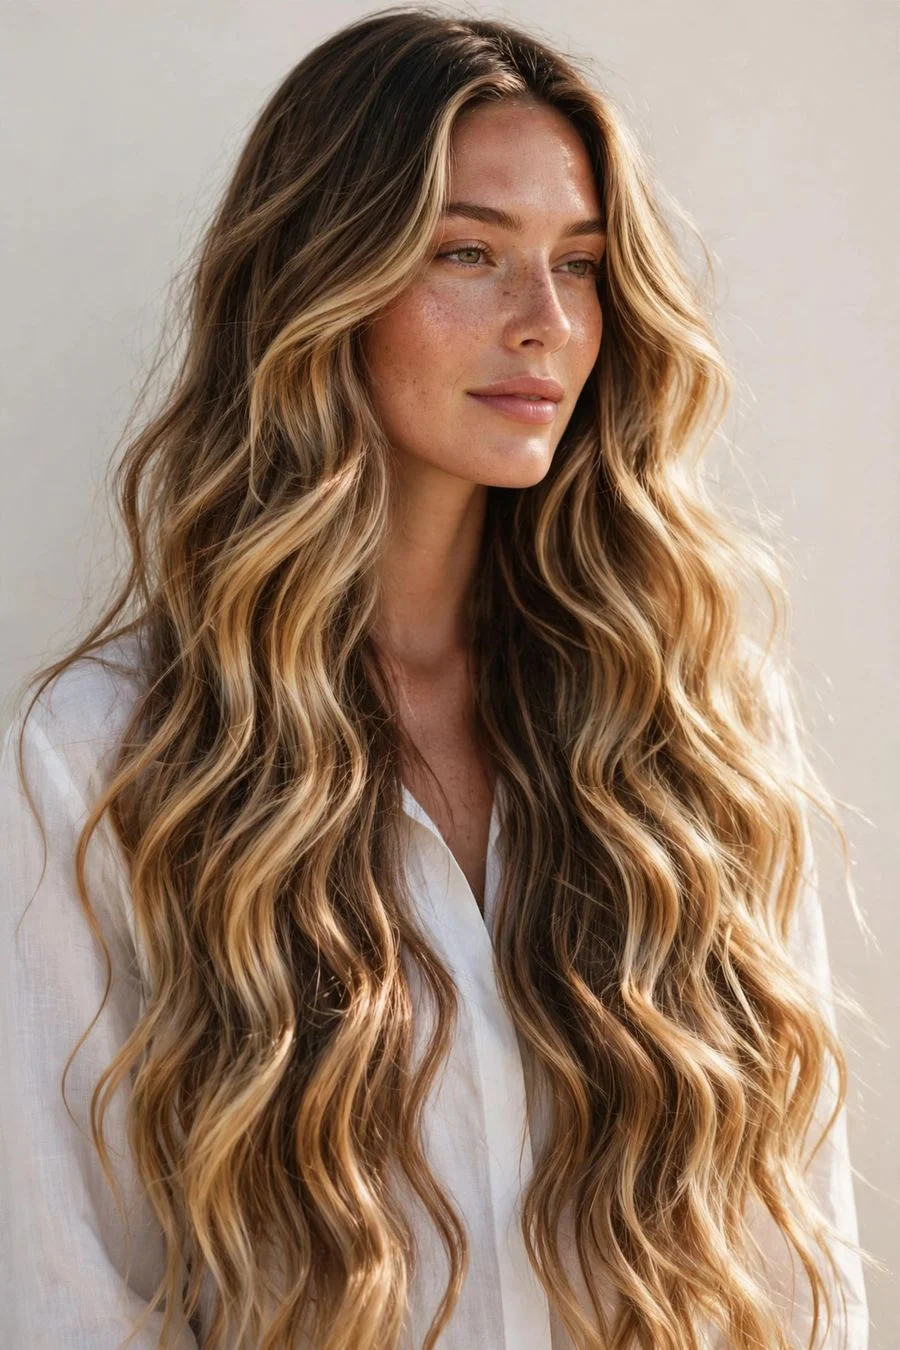
Vibe: Salt air, bottled.
Why it works: Long, loose S-shaped waves are the most-saved texture on Pinterest for a reason: they make any length look thicker and any color look more dimensional, because the curves catch light and shadow in alternation. The "mermaid" version runs longer and more uniform than classic beach waves, which suits very long hair that would otherwise hang flat. It is also the most forgiving style to do yourself, imperfect waves look completely intentional here.
How to get it: On dry hair, wrap two-inch sections around a 1.25-inch wand, alternating directions, leaving the ends out for a modern finish. Once cool, rake through with your fingers, never a brush, and mist with salt spray. For a heatless version, braid damp hair into two loose braids before bed and unravel in the morning.
💡 Quick Win: Sleep in the braids on a silk pillowcase and the waves last into day three.
Shop the Look
| Product | 1.25-inch curling wand | Sea salt spray | Heat protectant | Wide-tooth comb | Light-hold hairspray |
|---|---|---|---|---|---|
16. French Braid Pigtails
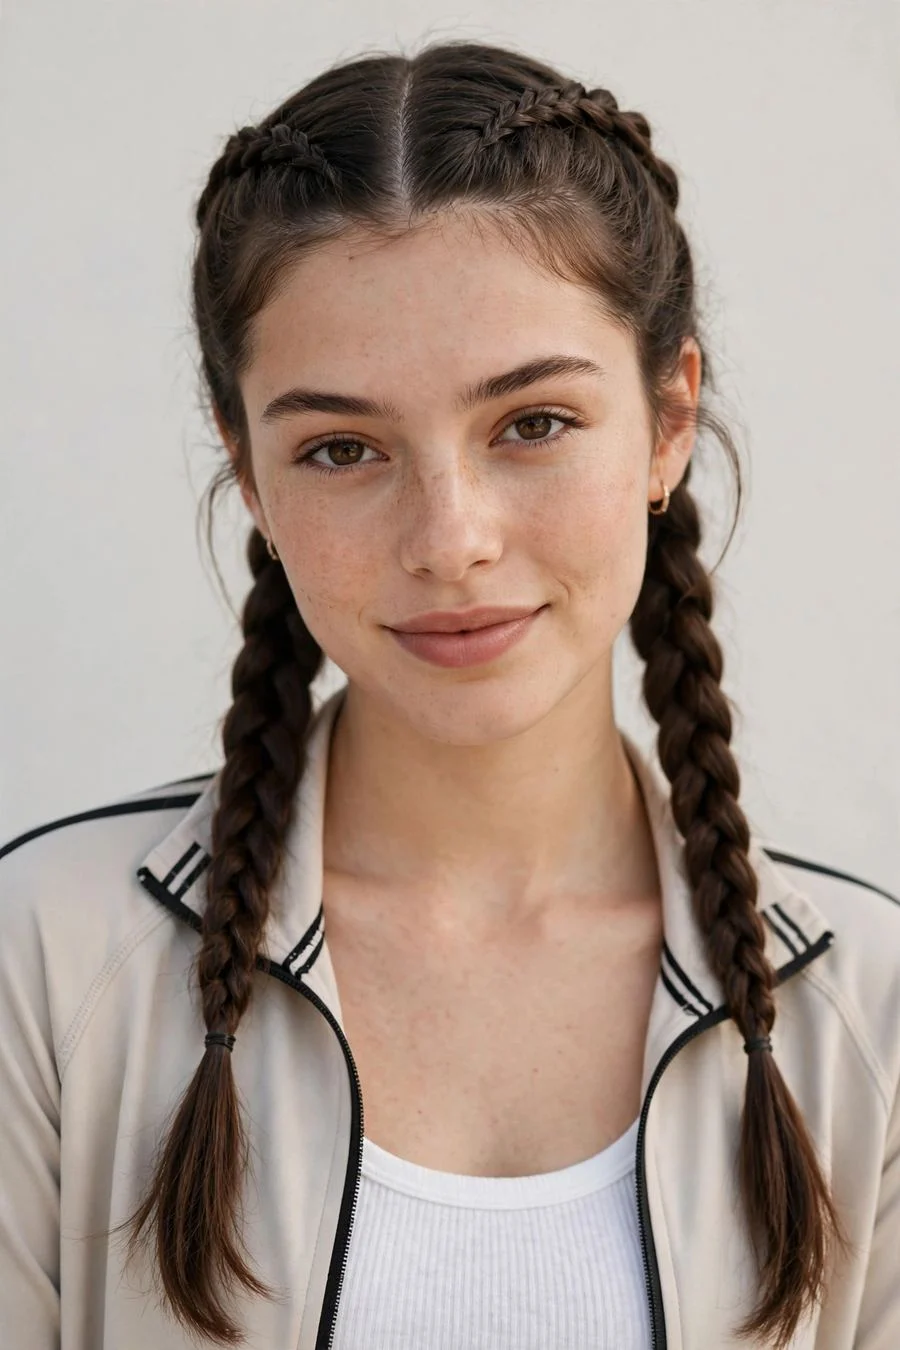
Vibe: Sporty-sweet symmetry.
Why it works: Two French braids keep hair locked down through workouts, windy days, and long shifts better than almost any other style, the scalp-anchored braid distributes tension so nothing pulls at one point. They look neat from every angle, which is why they photograph so well, and they work on all textures including natural hair. Undo them at night and you wake up to heatless waves by morning.
How to get it: Part down the middle. On each side, French-braid from the hairline backward, feeding in hair as you go, and finish with a regular three-strand braid secured with an elastic. Keep the braids close to the scalp at the front for a clean hairline, then pancake them gently for fullness.
Shop the Look
| Product | Leave-in cream | Rat-tail comb | Small elastics | Edge control gel | Light hair oil |
|---|---|---|---|---|---|
17. The Wet-Look Pixie
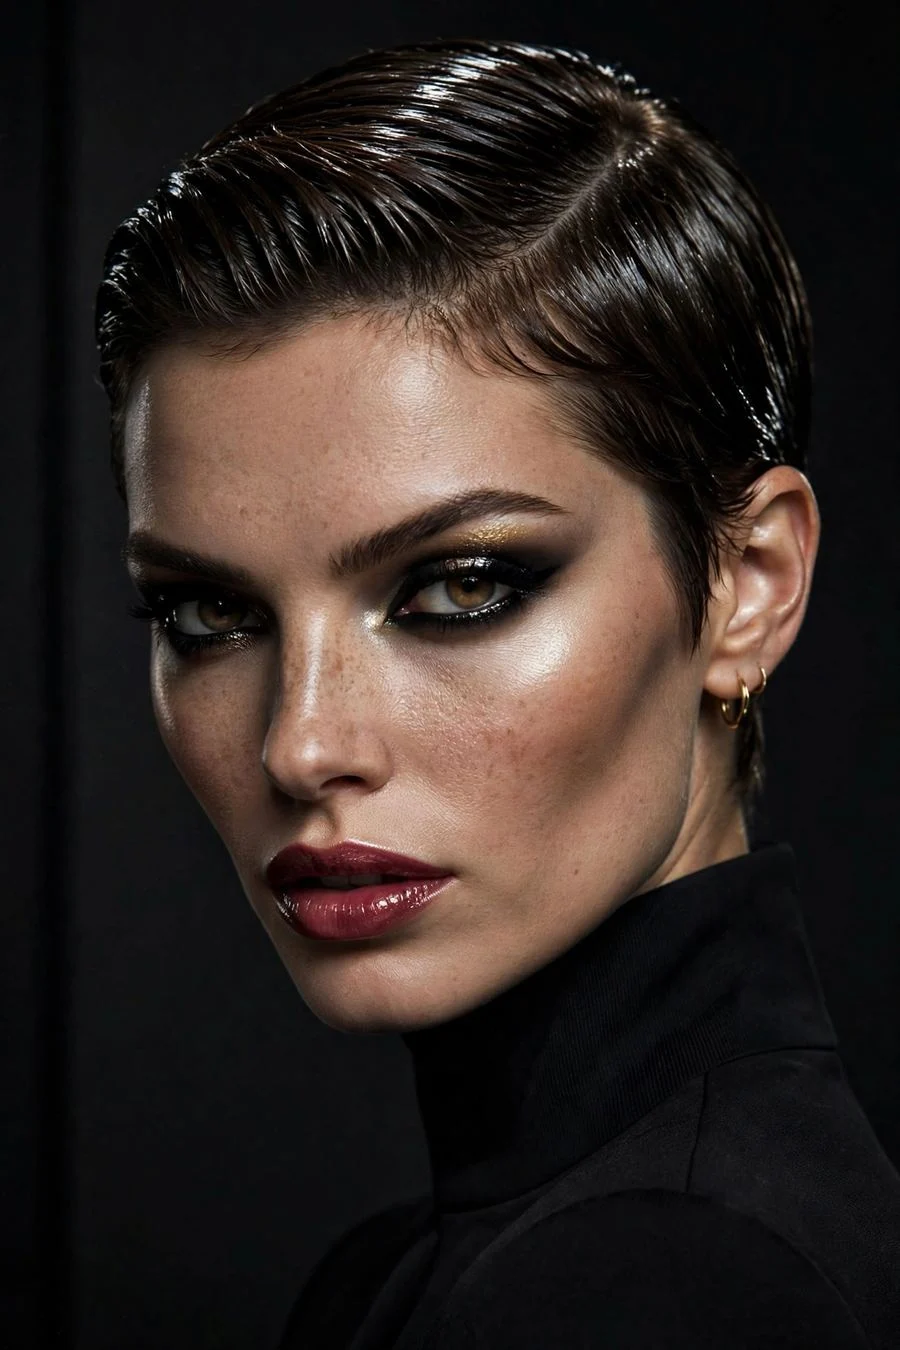
Vibe: Runway edge, minimal effort.
Why it works: Slicking a pixie down with a wet finish turns the shortest cut into the boldest one, the high-shine texture set against cropped length reads pure editorial. It grows out gracefully because the product creates the shape, not the cut. On fine hair the gelled finish suggests density; on thick hair it tames volume into something intentional.
How to get it: Work a generous amount of strong-hold gel through damp hair, combing everything in one direction, straight back or to the side. Press the hair flat against the head with your palms and let it air-dry, or diffuse on low heat. Once it sets, do not touch it; the lacquered finish is the entire point.
💡 Quick Win: A final mist of shine spray over the set gel doubles the wet effect.
Shop the Look
| Product | Strong-hold wet-look gel | Fine-tooth comb | Diffuser attachment | Shine spray | Small bristle brush |
|---|---|---|---|---|---|
18. Silk Press with Middle Part
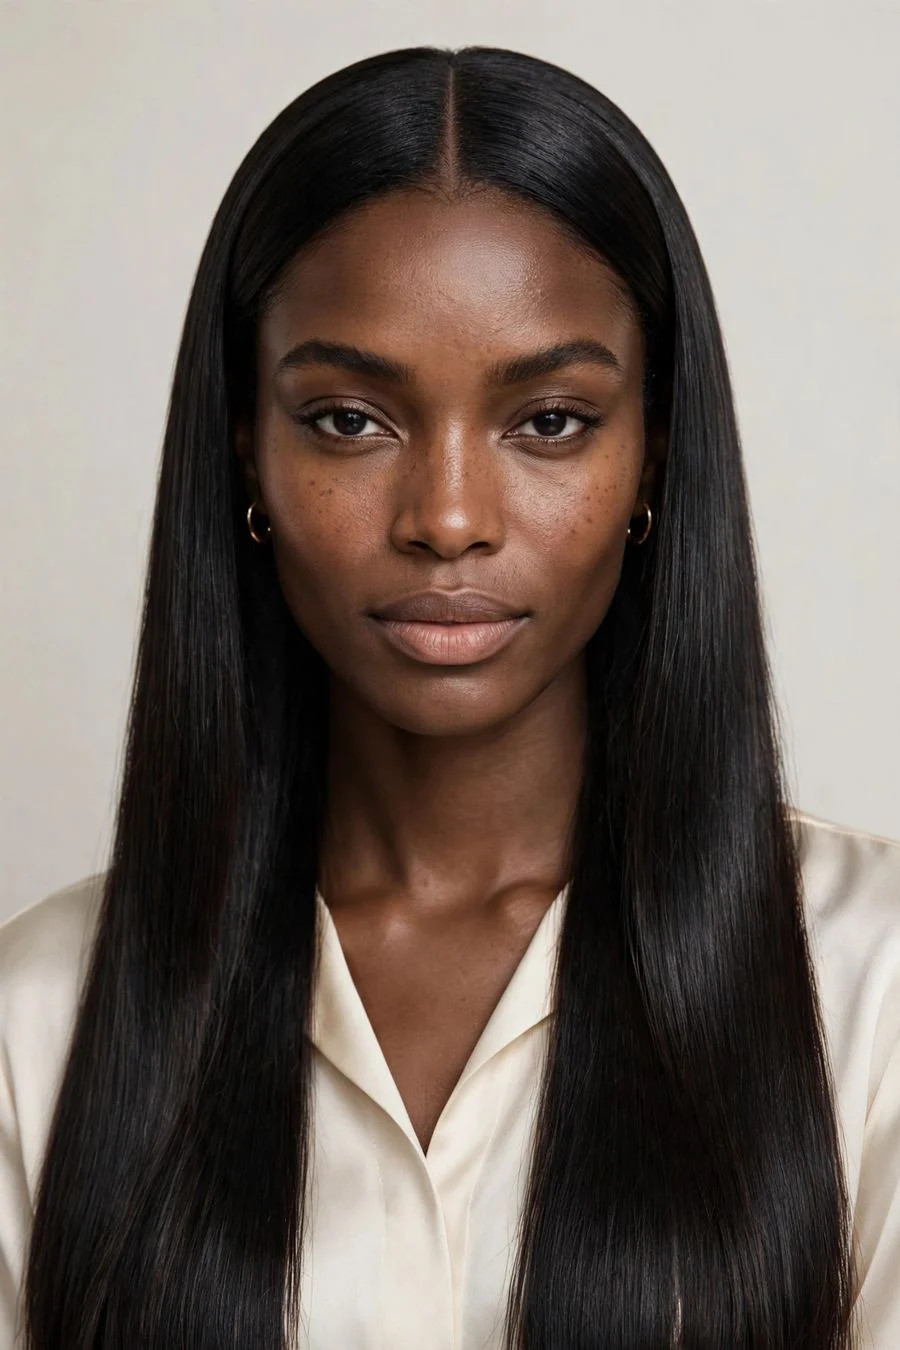
Vibe: Mirror-smooth movement.
Why it works: A silk press straightens natural hair with heat and tension rather than chemicals, delivering that liquid, swinging finish while preserving the hair's health when done correctly. The middle part keeps the look modern and symmetrical, showing off the shine from every angle. It is the ultimate versatility style, wear it bone straight, or wrap it at night and wake up to soft body and movement.
How to get it: Treat this as a salon service worth paying for: your stylist will clarify, deep-condition, blow-dry with tension, then press in small sections. At home, wrap your hair at night and cover it with a silk scarf to preserve the press. Avoid water and heavy products for the first few days, steam is the enemy of the finish.
Also view: [INTERNAL:silk press aftercare guide]
Shop the Look
| Product | Clarifying shampoo | Deep conditioner | Silk scarf | Lightweight serum | Heat protectant spray |
|---|---|---|---|---|---|
19. Twist-Out Curls
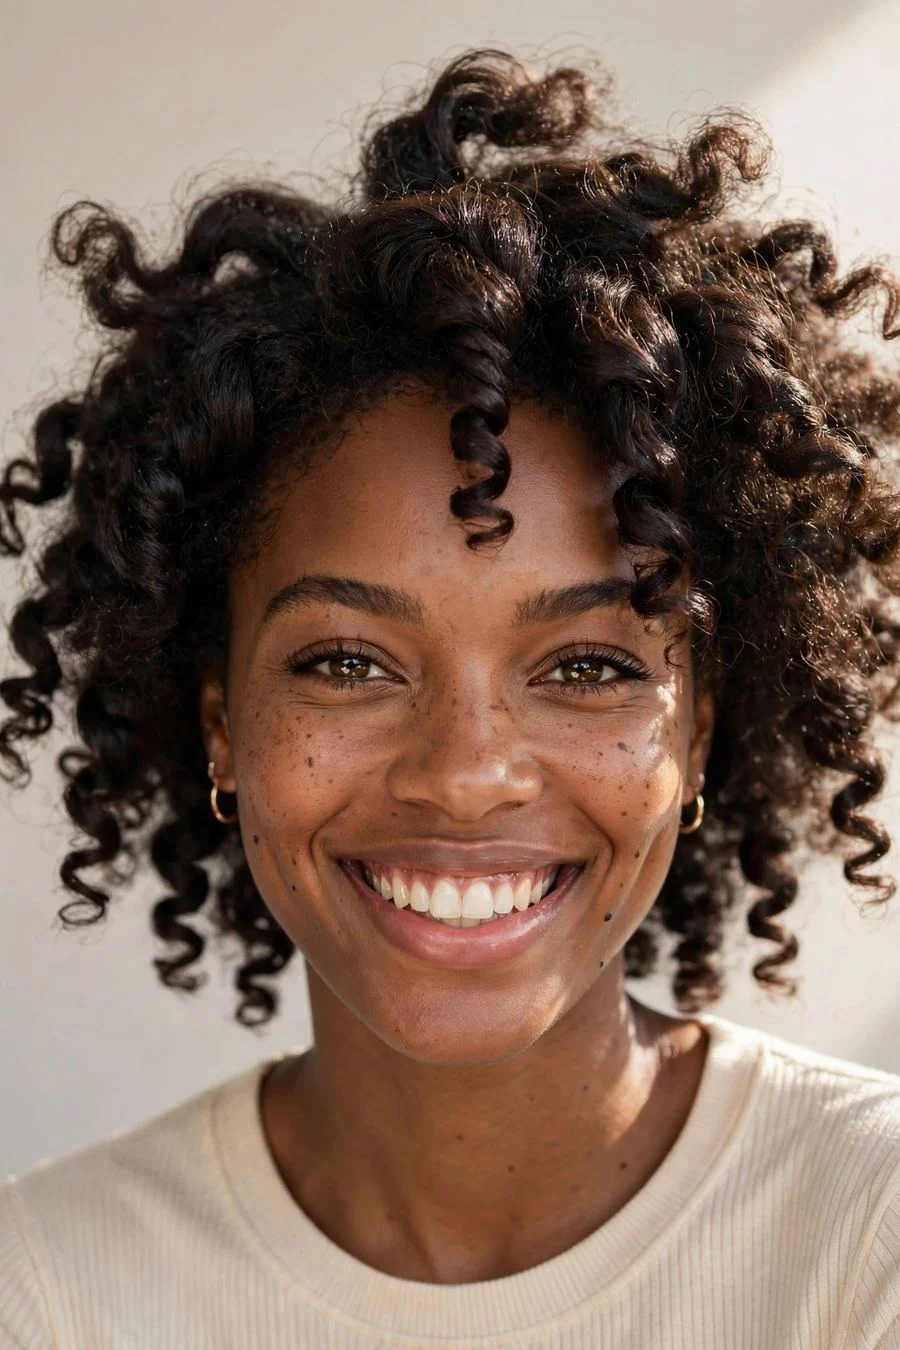
Vibe: Defined, soft, touchable.
Why it works: Two-strand twists set the curl pattern into stretched, defined spirals with far less frizz than wash-and-go styling, the twist does the shaping while the hair dries. The result delivers volume at the roots and definition at the ends, the exact combination every curl routine chases. It works across curl types, and the style stretches across several days with nighttime pineapple-ing and a satin bonnet.
How to get it: On damp, conditioned hair, apply a leave-in followed by a curl cream, then twist two-strand sections from root to tip. Smaller twists produce tighter curls; chunkier twists give looser spirals. Let hair dry completely, a diffuser speeds this up, then unravel each twist and separate gently with oiled fingertips. Fluff the roots with a pick for volume.
💡 Quick Win: Twist on damp, not soaking, hair, it dries faster and the definition holds longer.
Shop the Look
| Product | Leave-in conditioner | Curl-defining cream | Light hair oil | Diffuser attachment | Satin bonnet |
|---|---|---|---|---|---|
20. Double Dutch Braids
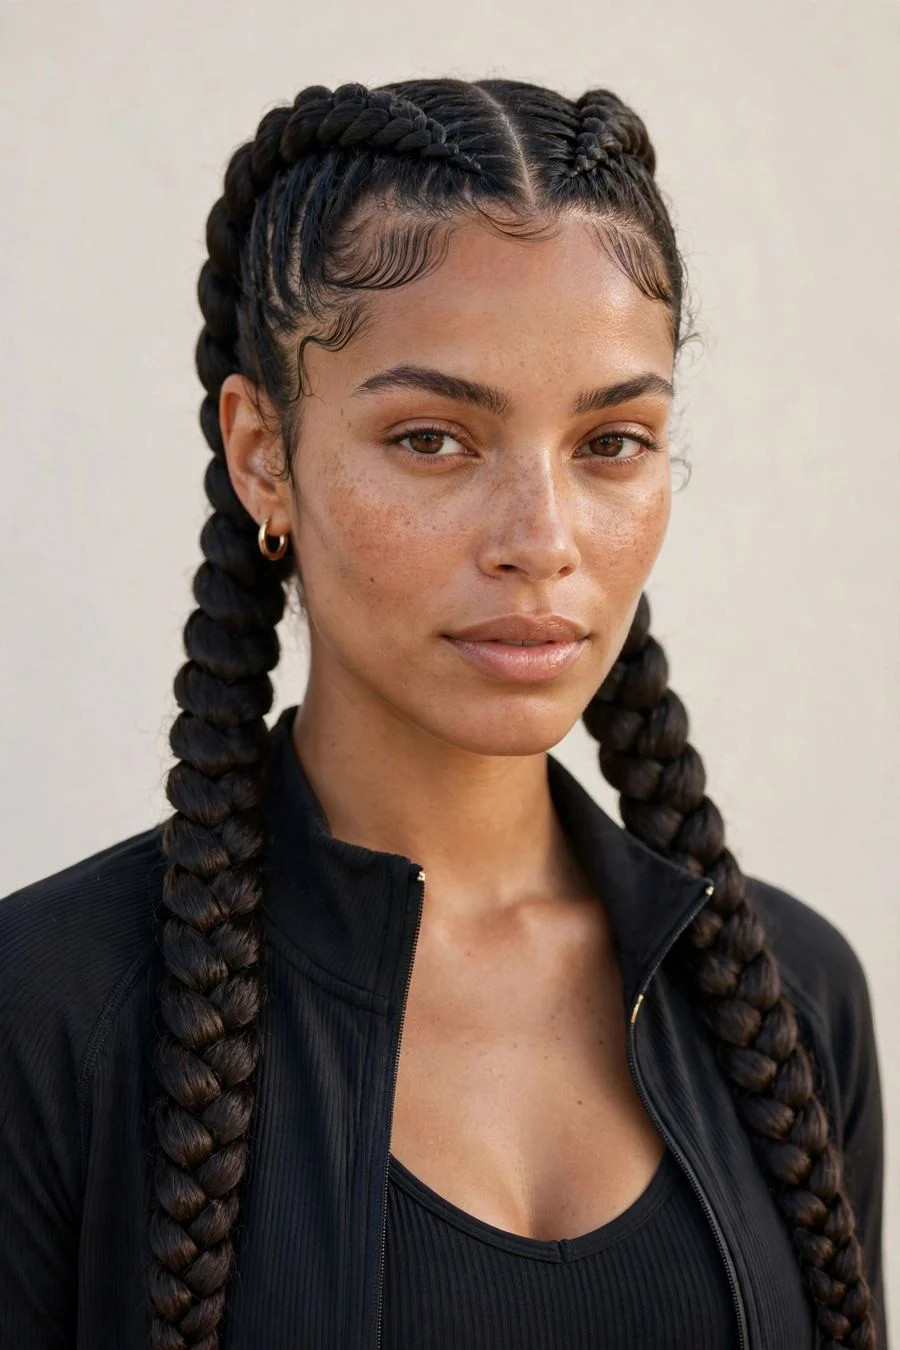
Vibe: Boxer-braid polish.
Why it works: Dutch braids sit on top of the hair instead of being woven in, so they look thicker and more three-dimensional than French braids, maximum impact for the same effort. Doubling them keeps everything symmetrical and secure; the style genuinely lasts two to three days. It is the rare protective-leaning style that also reads fashion-forward, and it keeps breakage-prone ends tucked safely away.
How to get it: Part down the middle and Dutch-braid each side, crossing strands under rather than over, feeding in hair from the hairline to the nape, then finish as regular braids. Secure with elastics and either wrap the ends or leave them out. Smooth edge control along the hairline to keep it crisp.
Shop the Look
| Product | Styling gel | Edge control | Rat-tail comb | Small elastics | Braid sheen spray |
|---|---|---|---|---|---|
21. Low Twisted Chignon
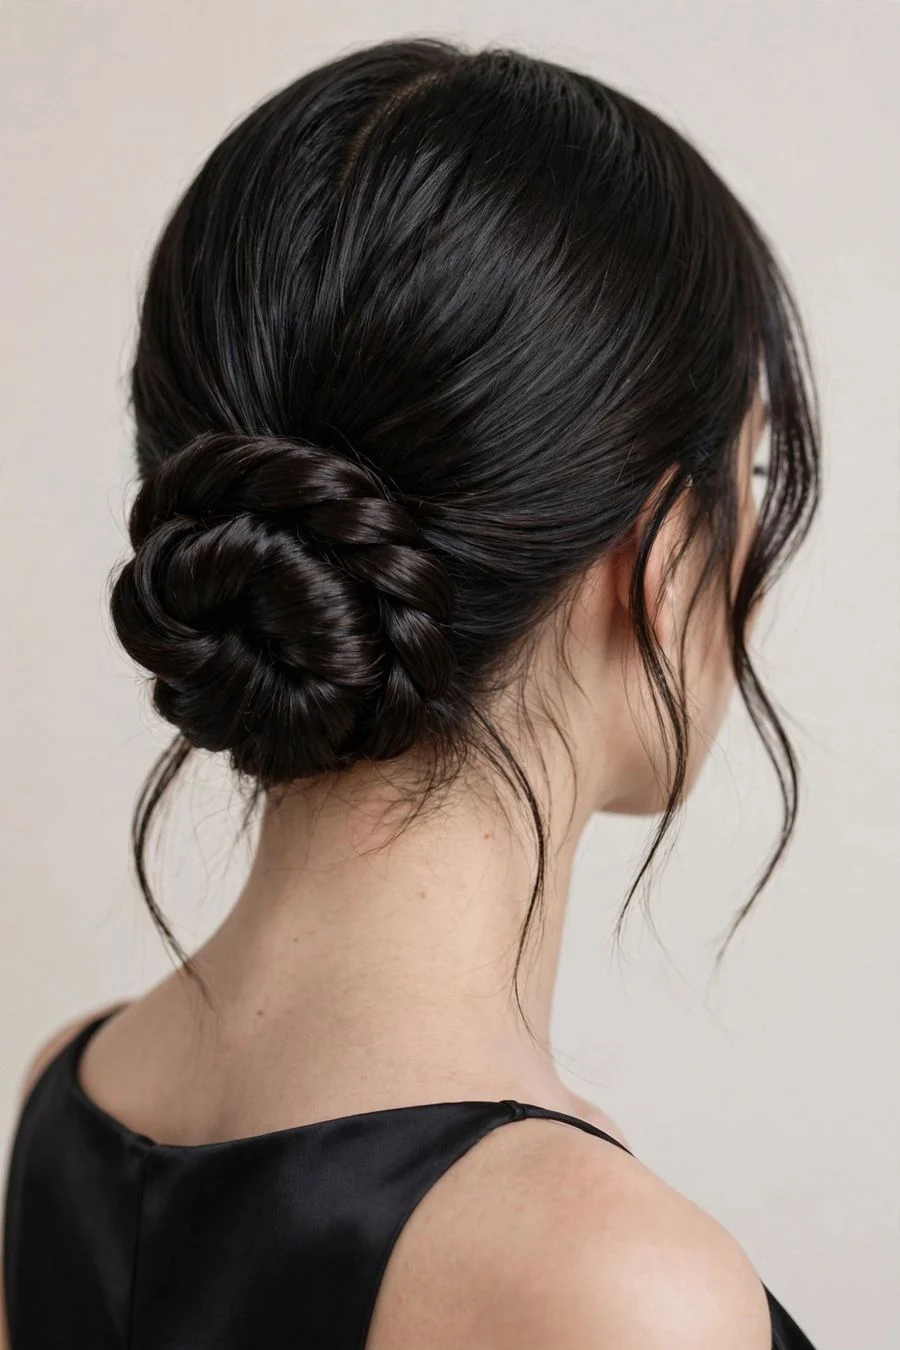
Vibe: Quiet luxury, pinned.
Why it works: Twisting the hair before coiling it into a chignon builds soft, rope-like texture that looks far more expensive than a plain bun, the twist catches light in a way smooth buns cannot. Sitting low at the nape, it suits formal dress codes and photographs elegantly from the side. It also holds better than a standard bun on slippery, fine hair, because the twist gives pins something to grip.
How to get it: Gather hair into a low ponytail, split it in two, twist the sections around each other into a rope, then coil the rope into a bun at the nape and pin. Keep the front soft, a middle part with two loose pieces feels modern rather than severe. Mist with a flexible-hold spray to finish.
💡 Quick Win: Use U-shaped hairpins instead of bobby pins, they disappear into the twist and hold twice as much hair.
Shop the Look
| Product | Flexible-hold hairspray | Bobby pins | Smoothing cream | U-shaped hairpins | Shine mist |
|---|---|---|---|---|---|
22. Ribbon-Tied Low Ponytail
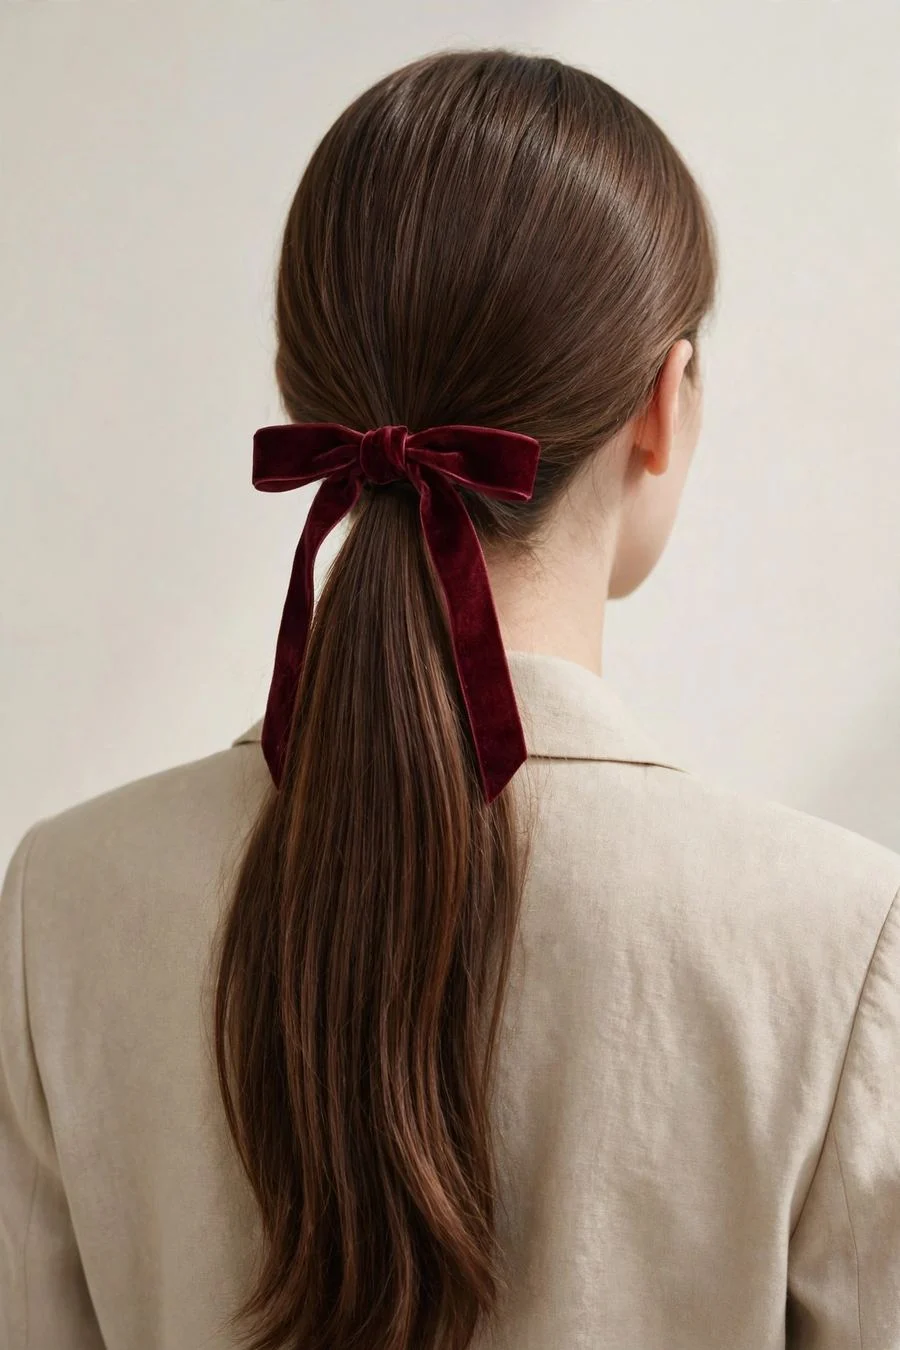
Vibe: Parisian polish, five minutes.
Why it works: A low ponytail is the simplest style there is; the ribbon is what makes it inspo-worthy. Tying velvet or satin at the nape adds color, texture, and a finished focal point exactly where the eye rests. It elevates workwear and occasion outfits equally, and the ribbon can be matched to your outfit in a way hair alone cannot, a small detail with outsized payoff.
How to get it: Secure a low ponytail at the nape with an elastic and smooth the crown with a brush. Tie a ribbon around the base in a bow or a simple knot with long tails. For extra polish, wrap a strand of hair over the elastic before adding the ribbon. Curl the ponytail ends under slightly for a bouncy finish.
Also view: [INTERNAL:ponytail hairstyle ideas]
Shop the Look
| Product | Velvet ribbon | Covered hair ties | Paddle brush | Smoothing serum | 1-inch curling iron |
|---|---|---|---|---|---|
23. Face-Framing Highlights
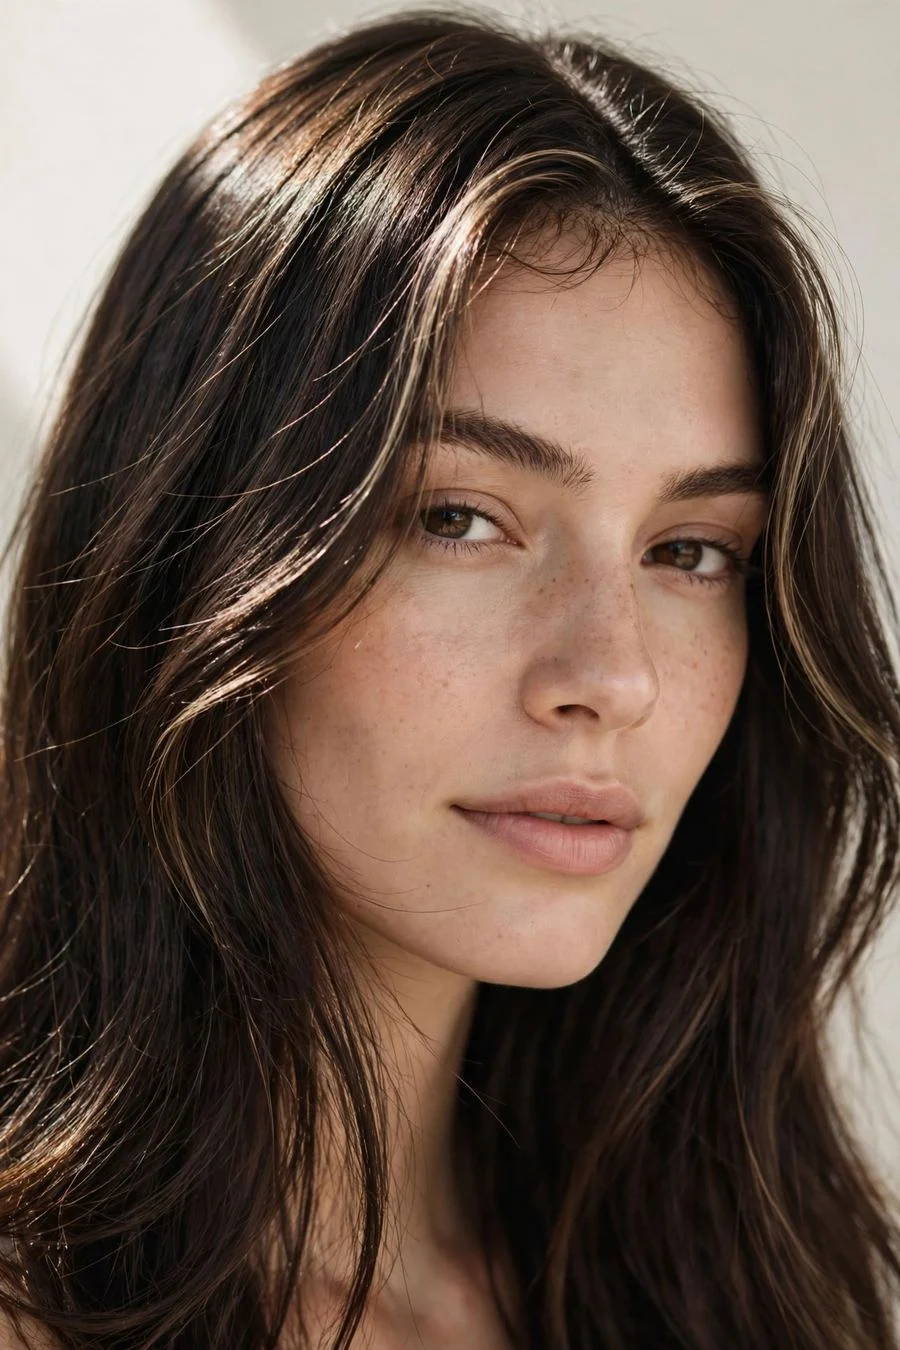
Vibe: Sunlight, exactly where you want it.
Why it works: A few light pieces around the face mimic what the sun does naturally, brightness concentrated precisely where it flatters most. Unlike a full highlight, the grow-out is nearly invisible because the pieces are fine and blended, so appointments can stretch to four or five months. It works on every base color and every length, and because the placement is customized to your face shape, it never looks generic.
How to get it: Ask your colorist for babylights or teasylights concentrated around the hairline and part, lifted one to two levels above your base and toned to match your overall color. Bring a photo showing how bold you want the frame, subtle versus statement completely changes the foil placement.
💡 Quick Win: A clear gloss between appointments keeps the face-framing pieces bright without a full color service.
Shop the Look
| Product | Color-safe shampoo | Toning gloss treatment | Heat protectant | Detangling wet brush | Leave-in spray |
|---|---|---|---|---|---|
24. The Undone Top Knot
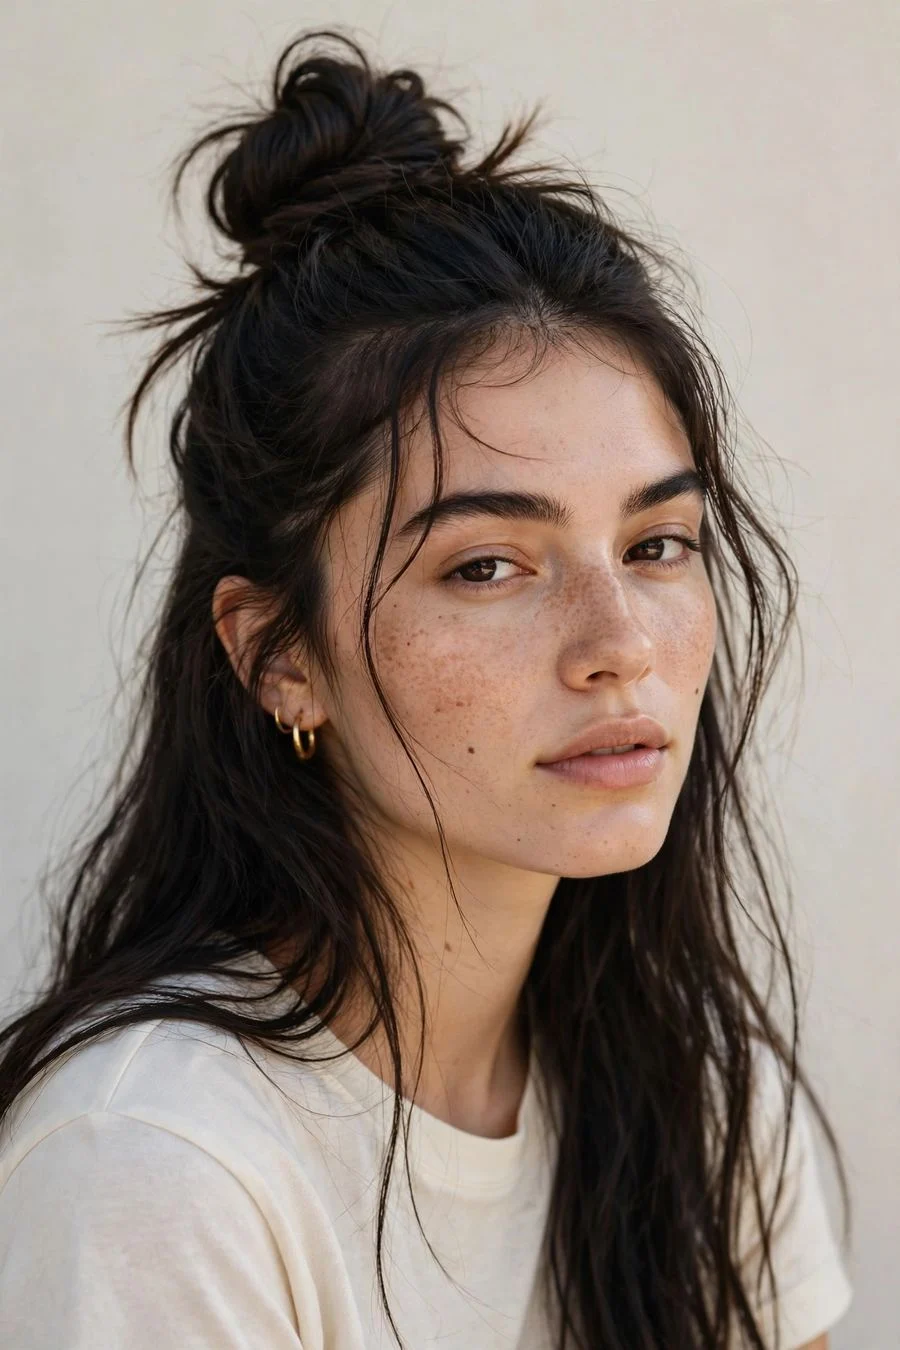
Vibe: Off-duty model energy.
Why it works: The top knot pulls everything up and away, showing off your neck and shoulders while the undone texture keeps it from looking severe or overdone. It is the fastest route to looking styled on no-wash days, the messier your texture, the better the knot works. Sitting high on the crown, it adds the illusion of height, which visually elongates the face.
How to get it: Flip your head over and gather hair into a high ponytail, then twist and wrap loosely into a knot, pinning to secure. Pull out pieces around the hairline and loosen the knot with your fingertips. A little dry shampoo at the roots before styling supplies the grip and volume the look depends on.
Shop the Look
| Product | Dry shampoo | Large bobby pins | Texturizing spray | Hair donut form | Flexible hairspray |
|---|---|---|---|---|---|
25. Cherry Cola Balayage
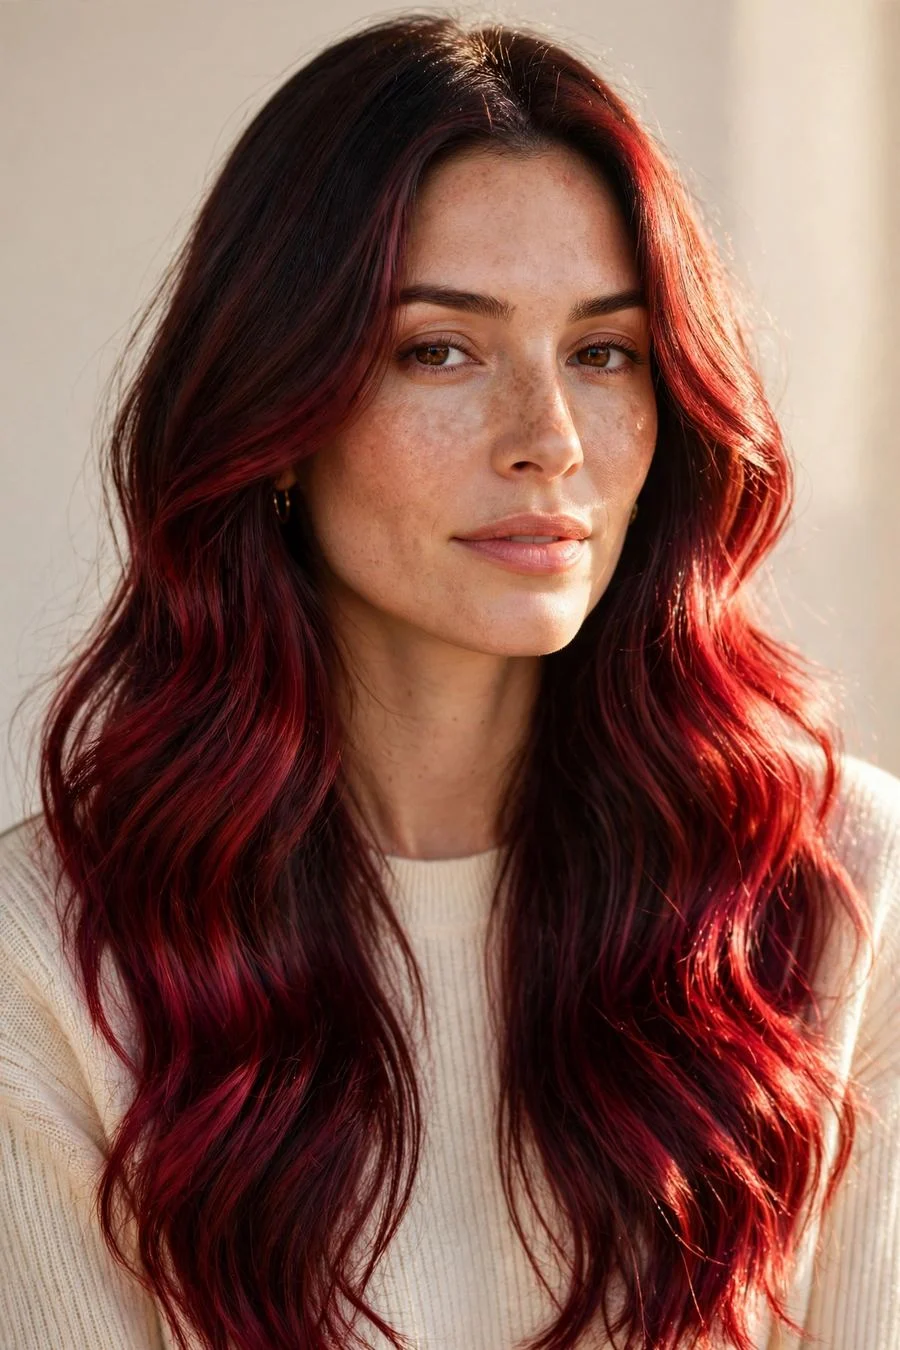
Vibe: Dark cherry fizz.
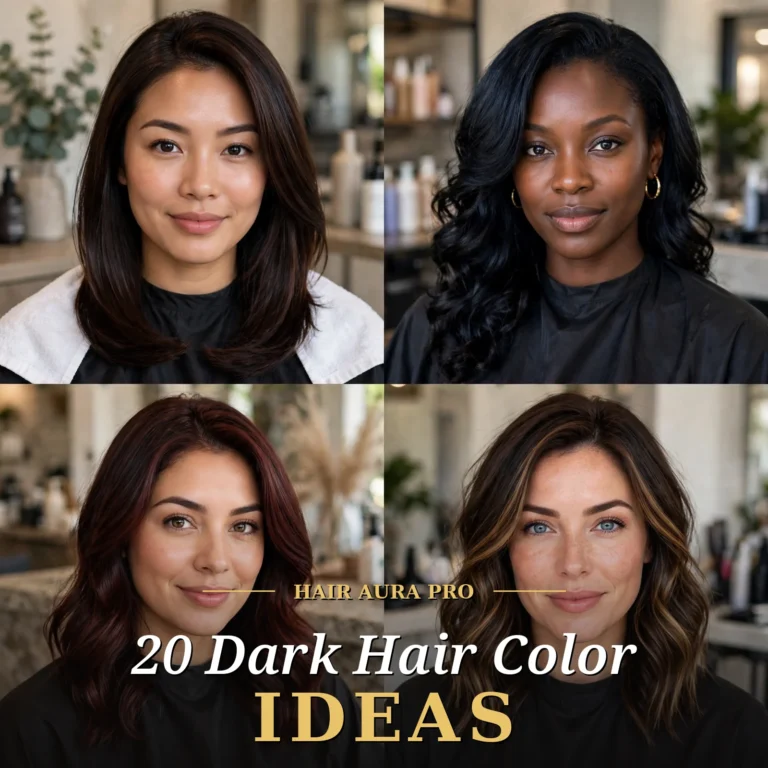
Why it works: Deep cherry painted over a dark brown base delivers redhead energy without the punishing maintenance of an all-over red, the dark root handles the grow-out for you. In sunlight the cherry flashes vivid; indoors it reads as rich, expensive brunette. It flatters warm and neutral skin tones beautifully and makes brown eyes look deeper.
How to get it: Ask your colorist for hand-painted cherry balayage through the mid-lengths and ends over your natural dark base, finished with a cherry gloss. The gloss is non-negotiable, it creates that cola-bottle shine. Refresh the tone at home with a red color-depositing conditioner every other week.
💡 Quick Win: Wash in cool water only, hot water opens the cuticle and lets the red molecules escape faster.
Shop the Look
| Product | Red color-depositing conditioner | Sulfate-free shampoo | Shine gloss treatment | Heat protectant | Wide-tooth comb |
|---|---|---|---|---|---|
How to Start Your Hair Inspo Transformation
Start with a consultation, not a cut. Book a fifteen-minute consultation, many salons offer them free, and bring two or three photos of the same idea from different angles. Tell your stylist your real routine: how often you wash, whether you heat-style, what your mornings actually look like. A good stylist will translate the photo into a version your texture and schedule can sustain, and will tell you honestly if an idea needs growing out first.
The most common mistake is chasing a photo of hair with a completely different density or texture than yours. Fine, straight hair cannot hold the same silhouette as thick, coarse hair, no matter the cut, but it can hold a version of it. Ask your stylist for the adaptation, not the replica. The inspo is a direction, not a contract.
On a budget, the at-home version of most of these ideas costs under fifty dollars: a quality flat iron or curling wand you already own, plus two or three targeted products like dry shampoo, texture spray, and a smoothing serum. Color ideas are the exception, box dye over dark hair rarely matches the photo, so save color changes for the salon and spend your at-home budget on maintenance products instead.
Salon pricing varies by market, but expect roughly $60, $120 for a cut, $150, $350 for balayage or lived-in color, and $40, $80 for a gloss or toner refresh. Vivid and copper tones need glosses every six to eight weeks to stay true, so factor that into the decision before you commit.
Frequently Asked Questions About Hair Inspo
How do I choose which hair inspo idea is right for me?
Start with your non-negotiables: your natural texture, how much time you spend styling each morning, and how often you will realistically visit the salon. Then look for the pattern across your saved photos, the neckline, the fringe, the tone that repeats is your answer. Finally, show the shortlist to your stylist and ask which one your hair type will hold with the least daily effort; the lowest-maintenance match usually wins.
Should I bring photos to my salon appointment?
Yes, always. Photos eliminate the translation problem between what you picture and what words like "lived-in" or "chunky" mean to your stylist. Bring two or three images of the same idea from different angles rather than ten different ideas. Photos of the back view matter as much as the front, especially for cuts like the bixie or shag where the silhouette is three-dimensional.
How often should I update my hair inspo folder?
Treat it as a living collection rather than a one-time project. Save freely for a few weeks, then review: delete anything you no longer feel excited about and notice what keeps surviving the cull. Right before an appointment, narrow the folder to your top three. After the appointment, save a photo of your actual result, future you will thank present you when it is time for a refresh.
Can I get these looks on a tight budget?
Most styling ideas here cost nothing beyond products you may already own, buns, braids, twists, and ponytail variations are free. For cuts, a good stylist matters more than an expensive salon; many excellent cuts happen at mid-range prices. Reserve your budget for color services, which are genuinely hard to replicate at home, and stretch the results with color-safe shampoo and at-home gloss treatments between visits.
What if the style does not suit me after I get it?
First, give it two weeks, most cuts need a settling period, and styling it yourself three or four times teaches you what the cut can actually do. If it still feels wrong, go back: reputable salons offer complimentary adjustments within a week or two. For color, a toner or gloss can shift the tone dramatically without another full service. And remember that hair grows roughly half an inch per month; even a true miss is temporary.
Twenty-five ideas, one folder, zero more excuses for the same ponytail. The right hair inspo does not just change how your hair looks, it changes how you feel walking out the door, and that is worth the ten minutes of scrolling it took to find it.
Your move: save this post, pick the three ideas that made you pause, and book a consultation. Bring the photos, be honest about your routine, and let your stylist build the version that belongs to you. Then pin your favorite look so it is waiting the next time inspiration strikes.
Related Reads
- 18 Low-Maintenance Haircuts That Grow Out Beautifully
- 22 Copper Hair Color Ideas for Warm Skin Tones
- 15 Claw Clip Hairstyles for Busy Mornings
- 20 Balayage Ideas for Dark Brown Hair

2 Comments