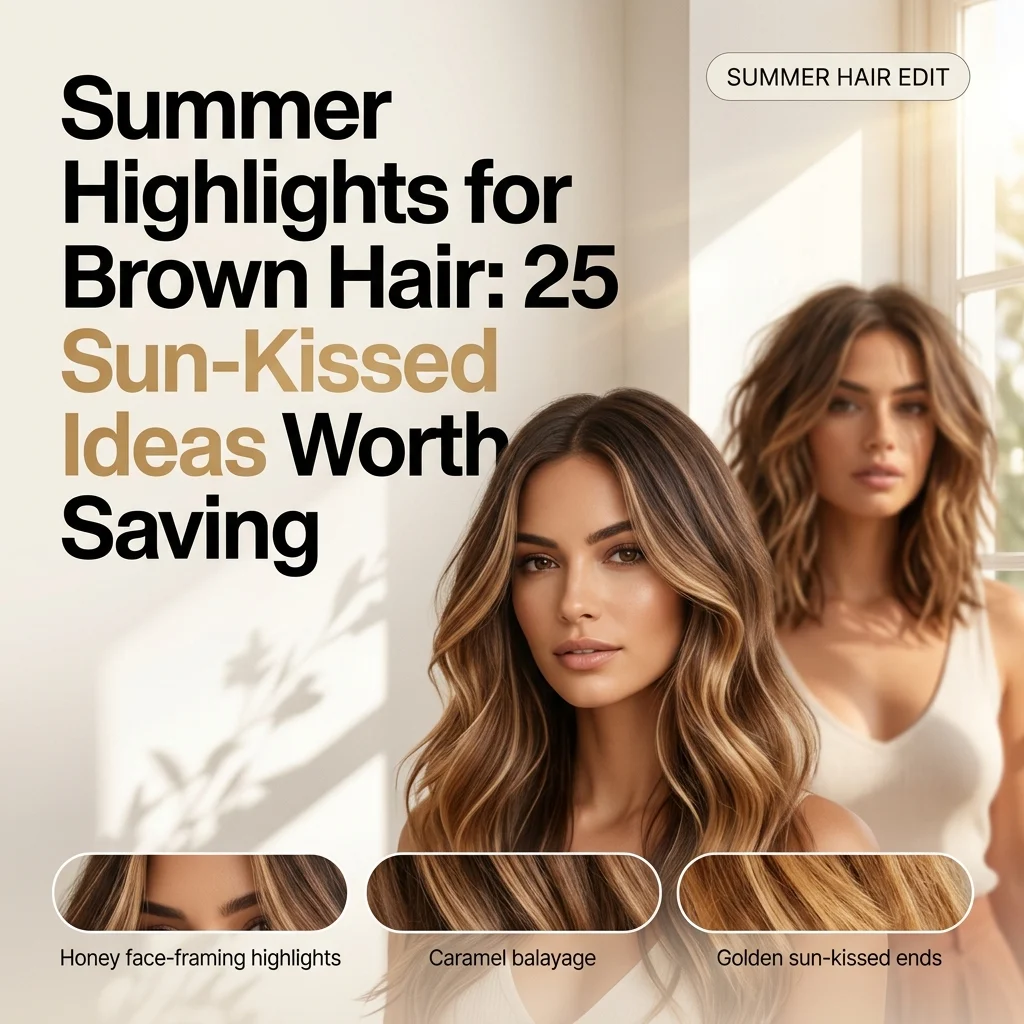
Summer Highlights for Brown Hair: 25 Sun-Kissed Ideas Worth Saving

Summer highlights for brown hair are lightened sections, placed using balayage, foiling, or babylight techniques on a brunette base, that recreate the gradual warmth hair naturally develops after weeks outdoors. This article gives you 25 specific ways to do it, covering color, placement, technique, light behavior, styling, parting, and low-maintenance options.
Done right, this look feels like the first real week of summer: loose, glowing, unforced. Light behaves differently on well-placed highlights depending on the hour; the tone shifts subtly between an office and a patio, and the whole effect reads like something that happened to your hair rather than something done to it. Here are 25 ideas worth saving and stealing.
Why Summer Highlights Work So Well on Brown Hair
Summer highlights are a family of lightening techniques, balayage, foiling, foilyage, and babylights, applied selectively to a brunette base rather than across the whole head. The distinction from all-over blonde color is structural: a colorist lifts only chosen sections, using the untouched base as a frame, which is why the result reads as depth rather than as a new color entirely. This selective lightening is what separates “highlighted brown hair” from “brown hair that used to be darker.”
The working palette sits in warm territory: honey, caramel, copper, golden blonde, chestnut, and toffee, each named for how it reads against a brunette base rather than in isolation. Technique-wise, balayage is hand-painted onto the hair’s surface for soft graduation; foiling uses heat-trapping foil packets for stronger lift; babylights use narrow, closely spaced foils to mimic a child’s natural sun highlights; foilyage combines painting and foil heat for lift on bases too dark for hand-painting alone.
The trend toward multi-tonal, low-maintenance color is tied to a real shift in how often people can realistically get to a salon chair, so techniques that grow out softly (balayage, root smudging) have displaced techniques with a hard regrowth line (traditional cap highlights). Search interest in “low maintenance highlights” has grown accordingly, since the appeal isn’t just the color, it’s the interval between appointments.
Fine and short hair can wear this look, but not by scaling down a full-head formula. Fine hair benefits from fewer, more strategic pieces (a money piece, a set of babylights) rather than dense foiling, which can leave thin strands looking sparse once lightened. Short hair concentrates its highlights near the face and crown, the two areas with the most visible surface per section.
| Element | Detail |
| Philosophy | Recreate selective sun-lightening, not an all-over color change |
| Key Techniques | Balayage, foiling, foilyage, babylights, teasy lights |
| Key Tones | Honey, caramel, copper, golden blonde, chestnut, toffee |
25 Summer Highlights for Brown Hair
1. Honey Balayage Melt
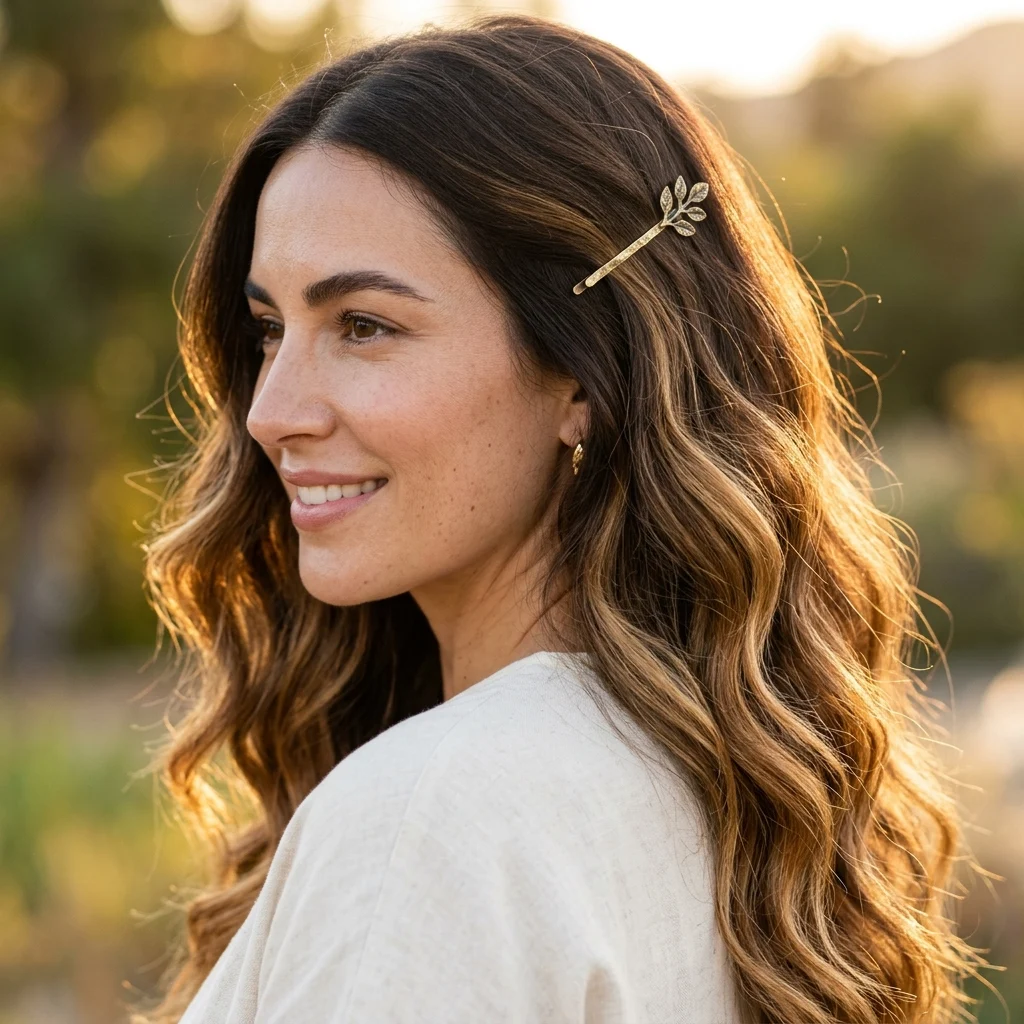
Vibe: Sun-warmed.
Why it works: This applies the graduated lightening principle: hand-painting the color heavier at the ends and lighter near the root mimics how hair actually lightens outdoors, from repeated sun exposure at the tips rather than at the scalp. A foiled highlight lightens evenly along the section, which is exactly the giveaway that separates “colored” from “sun-lightened.”
How to get it: Ask for a low-maintenance balayage using two lifted tones, honey and caramel, painted in a diagonal sweep starting about two inches below the crown and concentrated at the ends.
💡 Quick Win: A honey-toned color-depositing mask works as a temporary glaze between visits, refreshing warmth without lifting new color.
Shop the Look
| Product | Why It Fits |
| Color-depositing honey gloss hair mask | Refreshes tone between salon visits |
| Sulfate-free bond-building shampoo for color-treated hair | Protects lightened strands from fading |
| Argan hair oil serum | Adds shine that catches the melt’s warmth |
| UV protectant leave-in spray for colored hair | Prevents summer sun from brassing out the tone |
| Wide-tooth detangling comb, wood | Gentle on freshly lightened, lower-porosity ends |
2. Foilyage Babylights
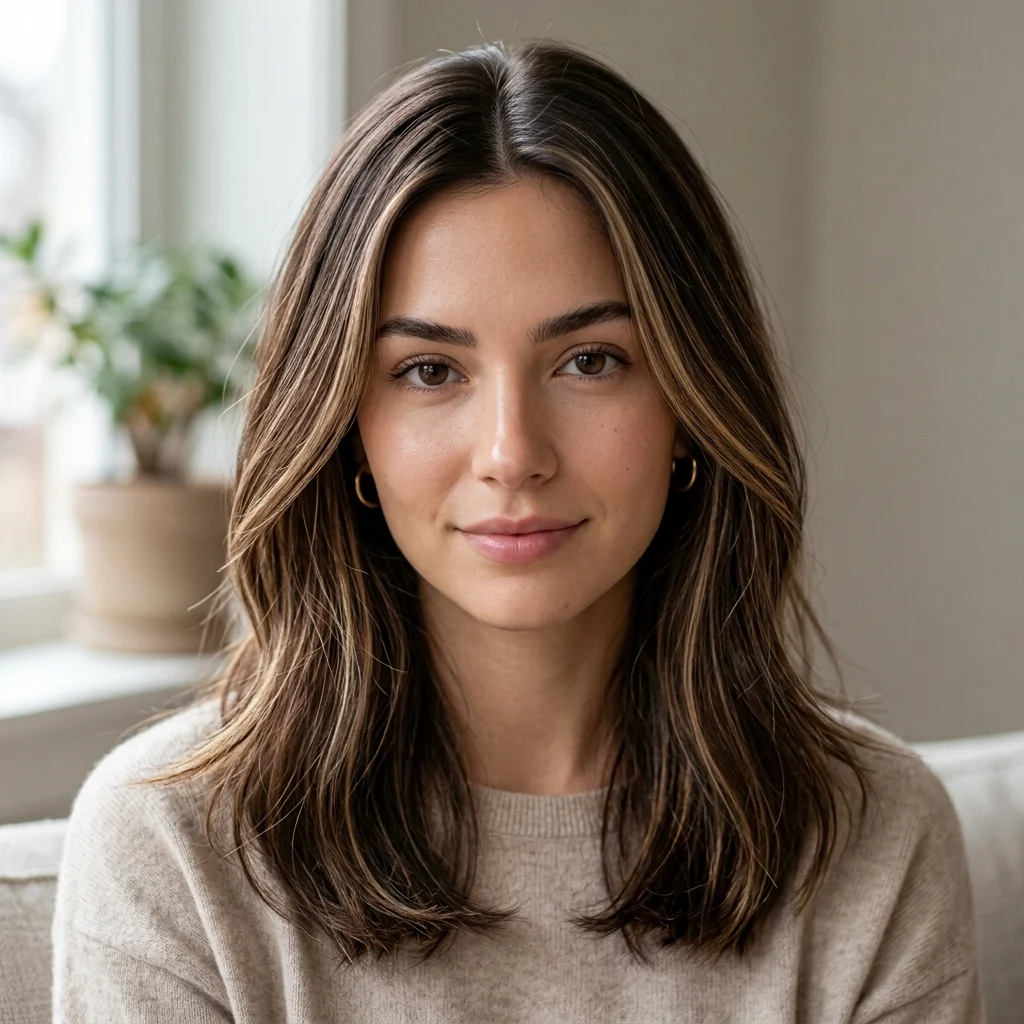
Vibe: Delicate.
Why it works: This applies the lift-through-heat principle: on a level 4 or darker base, hand-painted balayage alone often can’t lift pigment enough to register as visible highlight. Wrapping the painted section in foil traps heat, which pushes the lift further than open-air painting can, so the babylights actually show up instead of fading into the base.
How to get it: Request “foilyage” specifically, not just balayage, if your natural base is a level 4 or darker, since the foil heat is what makes fine babylights visible against deep brown.
Shop the Look
| Product | Why It Fits |
| Silicone-free hydrating hair mask for fine highlights | Restores softness after foil processing |
| Satin pillowcase for color-treated hair | Reduces friction on delicate lightened strands |
| Boar bristle round brush | Smooths fine highlights during blowouts |
| Heat protectant spray, up to 450°F | Shields fine pieces from styling damage |
| Scalp massage brush | Extends the salon-fresh feel between washes |
3. Face-Framing Money Piece
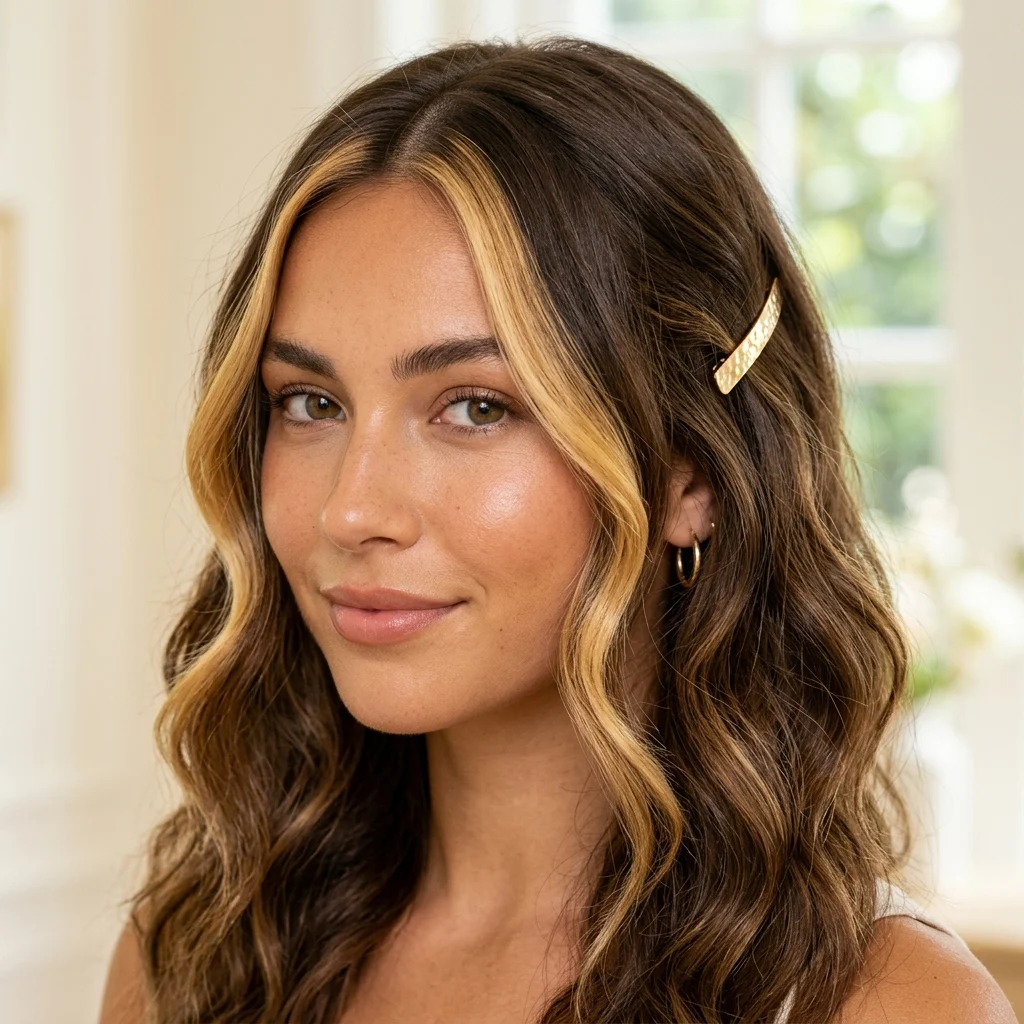
Vibe: Luminous.
Why it works: This applies the concentrated-contrast principle: the eye is drawn to the point of highest contrast in a composition, so placing the lightest pieces exactly at the face, rather than distributing lift evenly, does more visual work per foil than any other placement. It’s also the lowest-commitment placement because it colors the least total hair.
How to get it: Ask for two face-framing pieces, roughly a half-inch wide, foiled two shades lighter than the rest of your highlights, starting right at the part.
💡 Quick Win: A root touch-up spray in a matching honey-brown shade keeps regrowth on just those two pieces from showing for weeks longer than the rest of the head.
Shop the Look
| Product | Why It Fits |
| Root touch-up powder, honey brown | Blends new growth on face-framing pieces |
| Small precision tint brush | Enables clean at-home root touch-ups |
| Curling iron, 3/4 inch barrel | Styles face-framing pieces with tight, defined curl |
| Color-safe dry shampoo, tinted brunette | Refreshes roots without stripping tone |
| Sectioning hair clips | Isolates face-framing pieces during styling |
4. Sun-Kissed Dimension That Moves With Natural Light
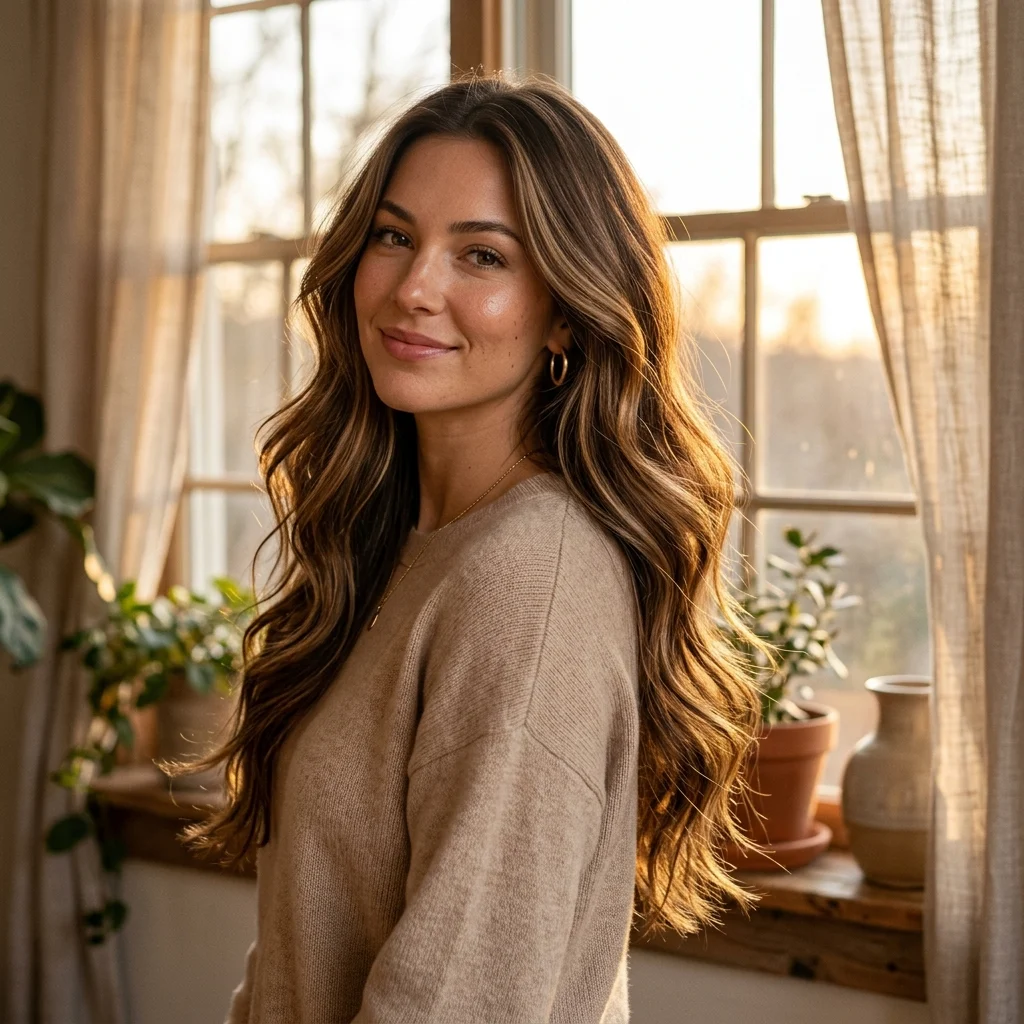
Vibe: Shifting.
Why it works: This applies the multi-tonal range principle: a single flat highlight tone can only reflect one wavelength of light well, so it looks bright under one light source and flat under another. Weaving in three related tones gives the hair a wider reflective range, meaning something is always catching whatever light is available, indoors or out.
How to get it: Ask your colorist to weave in three tones, a base-adjacent brown, a mid-tone caramel, and a light honey, rather than a single flat blonde, so the color has range to catch light from multiple angles.
Shop the Look
| Product | Why It Fits |
| Multi-tonal color gloss kit, at-home | Maintains dimension between appointments |
| Glass-hair finishing serum | Amplifies shine across all three tones |
| Wide-barrel curling wand, 1.5 inch | Creates movement that shows off dimension |
| Color-protecting leave-in conditioner spray | Keeps all three tones from fading unevenly |
| Ionic hair dryer with diffuser attachment | Dries evenly without dulling any single tone |
5. Caramel and Copper Depth
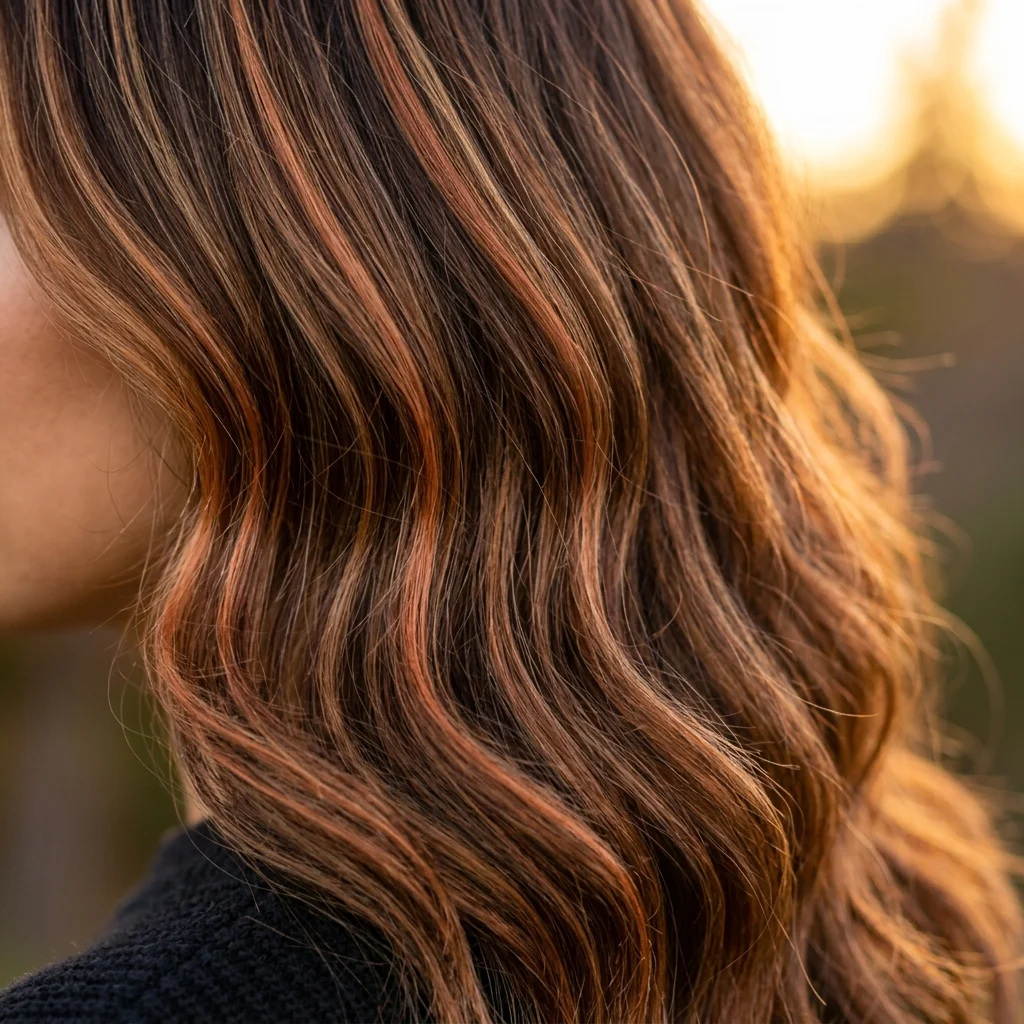
Vibe: Rich.
Why it works: This applies the counterbalance principle: lightening brown hair exposes its underlying warm pigment, which reads as brassy orange if left unaddressed. Copper, rather than fighting that undertone with ash, leans into it deliberately at a controlled ratio, so the warmth reads as an intentional rich tone instead of an accidental one.
How to get it: Request a copper-caramel blend at roughly a 30/70 ratio, copper as the accent and caramel as the dominant tone, concentrated from mid-shaft to ends.
💡 Quick Win: An at-home glaze in a copper-brown shade extends the tone between salon visits for under $20.
Shop the Look
| Product | Why It Fits |
| Copper-brown toning gloss, at-home | Refreshes copper warmth between visits |
| Color-depositing conditioner, caramel shade | Maintains caramel dominance in the blend |
| Anti-brass color corrector shampoo | Prevents copper from drifting orange |
| Deep conditioning hair mask for warm tones | Keeps richly pigmented hair from drying out |
| Rose gold hair oil, dropper bottle | Enhances shine without diluting tone |
6. Beachy Waves to Showcase Highlights
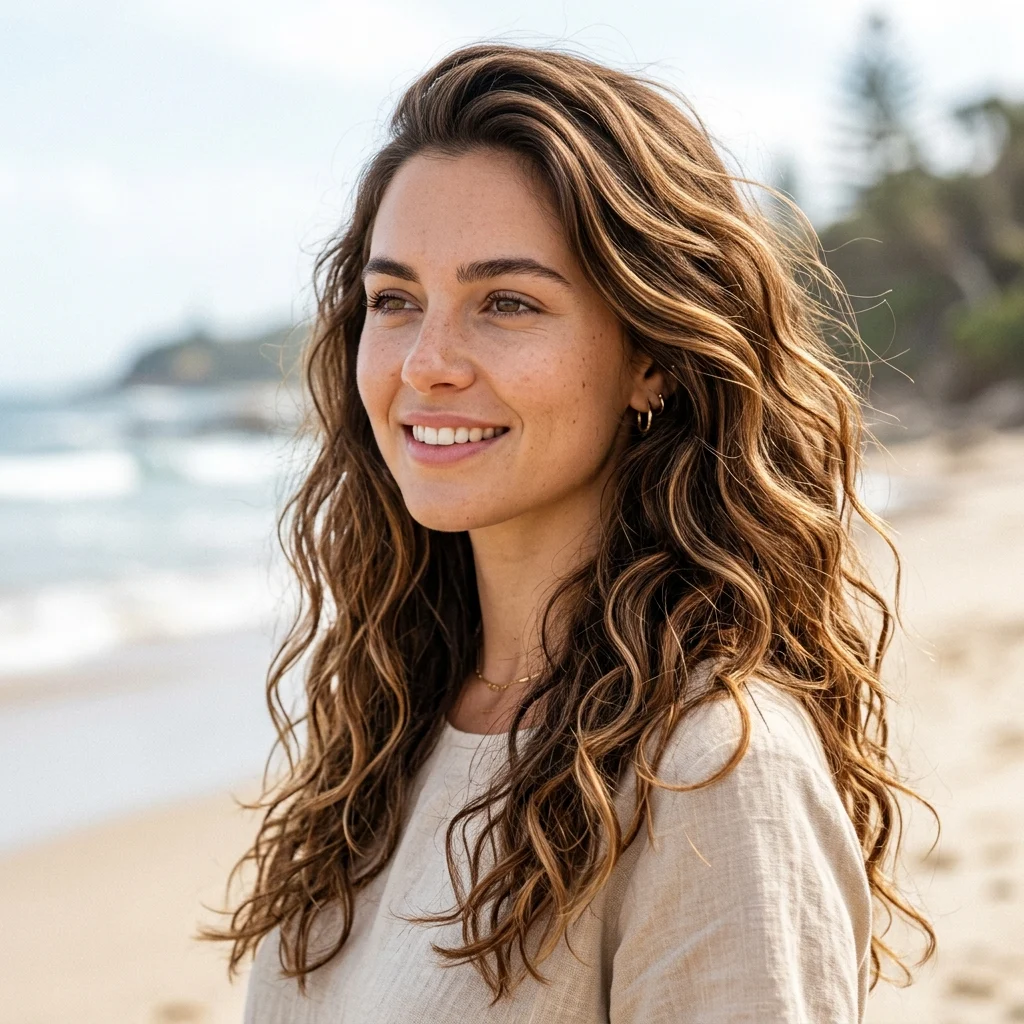
Vibe: Breezy.
Why it works: This applies the exposed-surface principle: highlights are only visible where the strand’s outer curve faces the light. An irregular wave pattern rotates more of each strand’s surface toward the viewer over its length than a straight fall or a tight, uniform curl does, which is why loosely waved hair reads as more highlighted than the identical color styled straight.
How to get it: Use a 1.25-inch curling wand, alternate the direction of each curl away from your face, and run fingers through once cool instead of brushing, to break up the pattern naturally.
Shop the Look
| Product | Why It Fits |
| 1.25 inch curling wand | Creates the irregular wave that shows off highlights |
| Texturizing sea salt spray | Adds grip and undone texture to waves |
| Flexible-hold hairspray | Holds waves without stiffness |
| Wide-tooth comb | Loosens curls into a softer wave pattern |
| Heat protectant mist | Shields highlighted strands during styling |
7. Chunky Face-Framing Foils
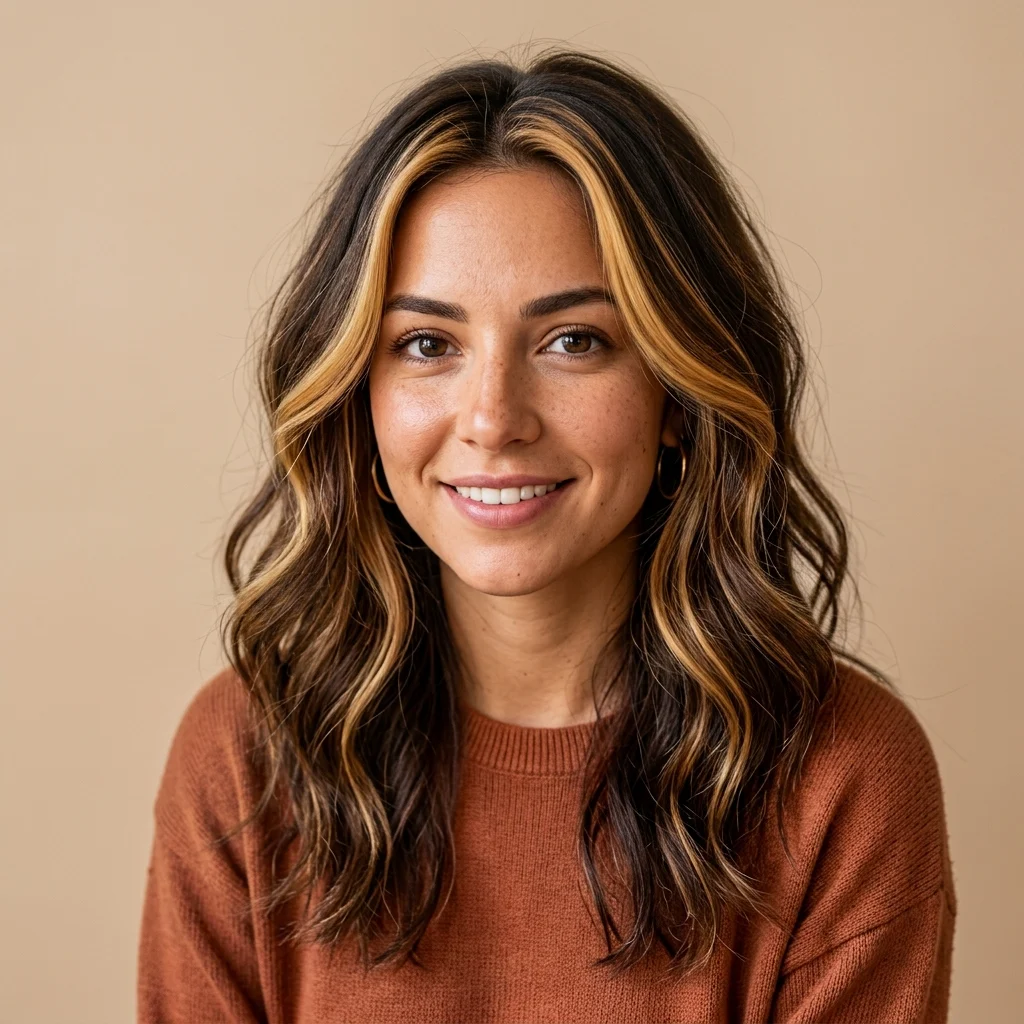
Vibe: Bold.
Why it works: This applies the section-width contrast principle: a quarter-inch foil section lifts more visibly than a hairline-thin babylight, because there’s simply more surface area registering the lightened color. On deep brunette bases, thin sections can look diffuse rather than distinct, so wider foils near the face read as deliberate highlight rather than faded color.
How to get it: Request wider foil sections, about a quarter-inch, at the front pieces only, while keeping the back of the head in finer, more natural-looking foils for balance.
💡 Quick Win: A flat iron pass after styling makes chunky highlights read even more distinctly against the base color.
Shop the Look
| Product | Why It Fits |
| Ceramic flat iron, 1 inch plates | Sharpens contrast on chunky highlighted pieces |
| Highlighting foil sheets, at-home | Enables DIY touch-ups between visits |
| Sectioning clips for foiling | Keeps foiled and non-foiled sections separate |
| Shine spray for finished highlights | Adds gloss that emphasizes the contrast |
| Color-safe clarifying shampoo, monthly use | Removes buildup without stripping color |
8. Off-Center Part to Highlight Contrast
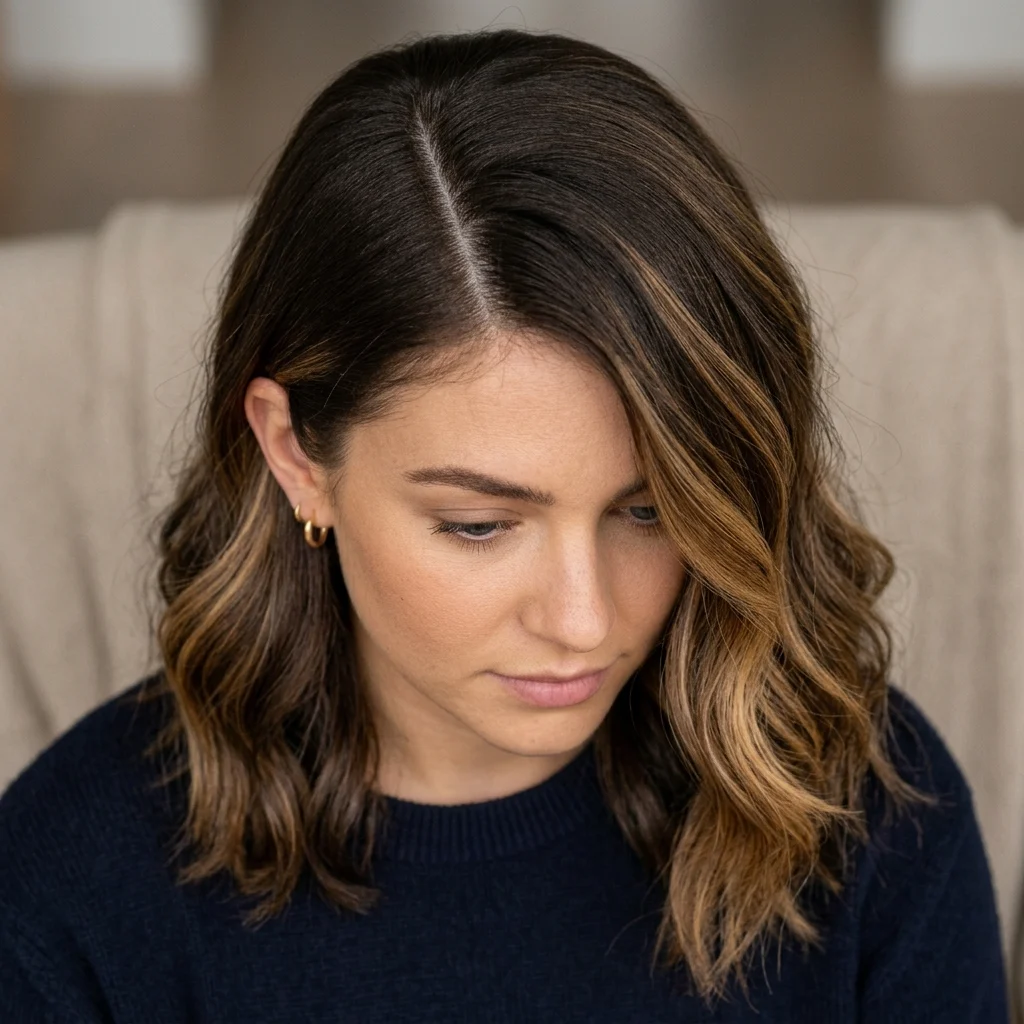
Vibe: Asymmetric.
Why it works: This applies the exposed-gradient principle: a deep side part forces more hair to fall on one side, exposing the full root-to-end transition on that heavier side in a single glance. A center part splits the same highlights symmetrically, which halves how much gradient is visible from any one angle.
How to get it: Shift your part about two inches off-center and let the heavier side fall forward, so the highlighted pieces frame one side of the face more dramatically than the other.
Shop the Look
| Product | Why It Fits |
| Rat tail comb | Creates a precise, deep side part |
| Root-lifting spray | Adds volume at the new part line |
| Small clear hair clips | Holds the part in place while styling |
| Anti-frizz serum | Keeps the part line smooth and defined |
| Wide flat brush | Smooths roots along the new part |
9. Golden Hour Glow
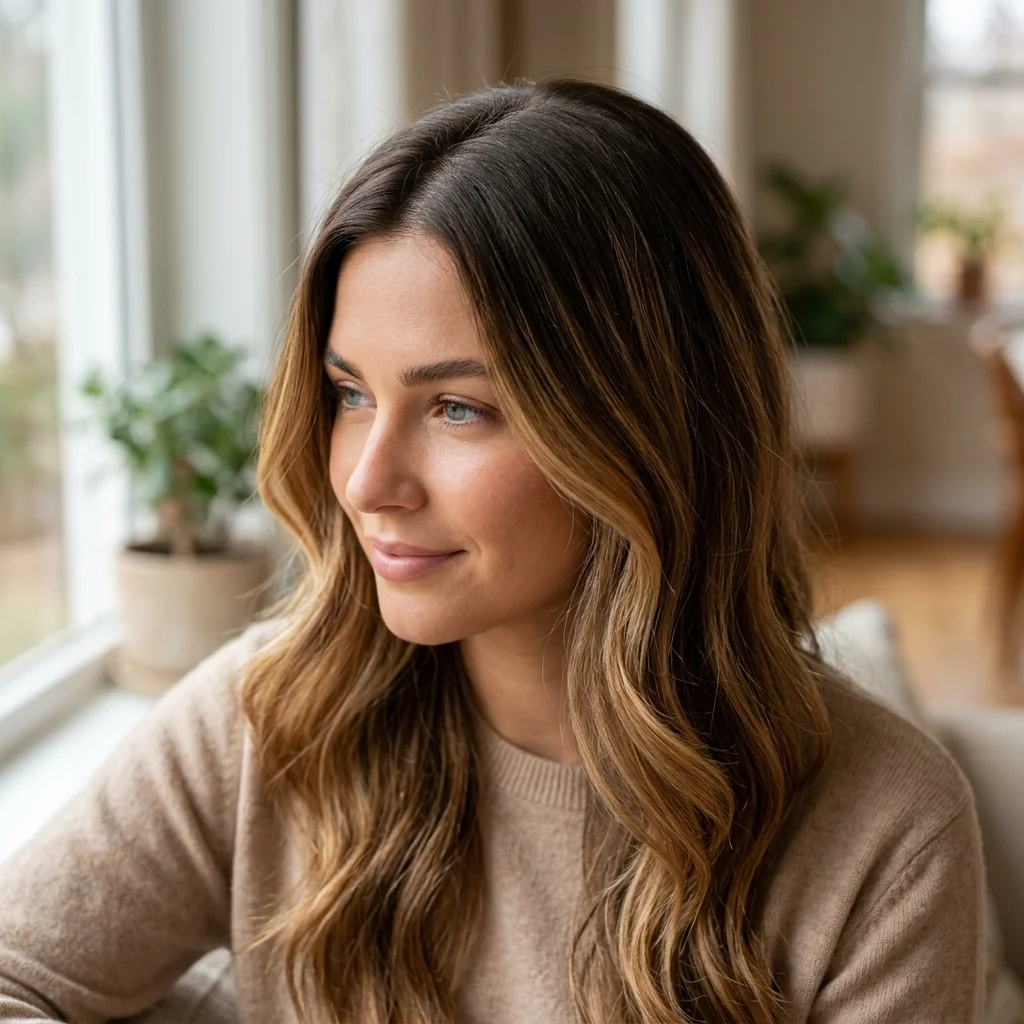
Vibe: Glowing.
Why it works: This applies the wavelength-matching principle: warm tones like honey and caramel reflect more of the red-yellow light spectrum that dominates late-afternoon sun, so they visibly brighten in that light. Cool, ash-based highlights reflect more blue-toned light, which is scarce at golden hour, so they can look comparatively flat in the same conditions.
How to get it: If you take a lot of outdoor photos, lean warm rather than ash-toned when choosing your highlight formula, since warm tones photograph better in natural, golden-hour light.
💡 Quick Win: A hair oil with a slight golden tint, not clear, adds shine that catches light the same way the highlights themselves do.
Shop the Look
| Product | Why It Fits |
| Golden-tinted hair oil | Adds warm-catching shine to match highlights |
| Warm-toned color gloss, honey blonde | Keeps highlights from drifting ashy |
| Glass-hair finishing spray | Enhances the glow effect in sunlight |
| Detangling wet brush | Distributes oil evenly before it dries |
| Travel-size hair oil | Enables quick touch-ups outdoors |
10. Root Smudge for Easy Grow-Out
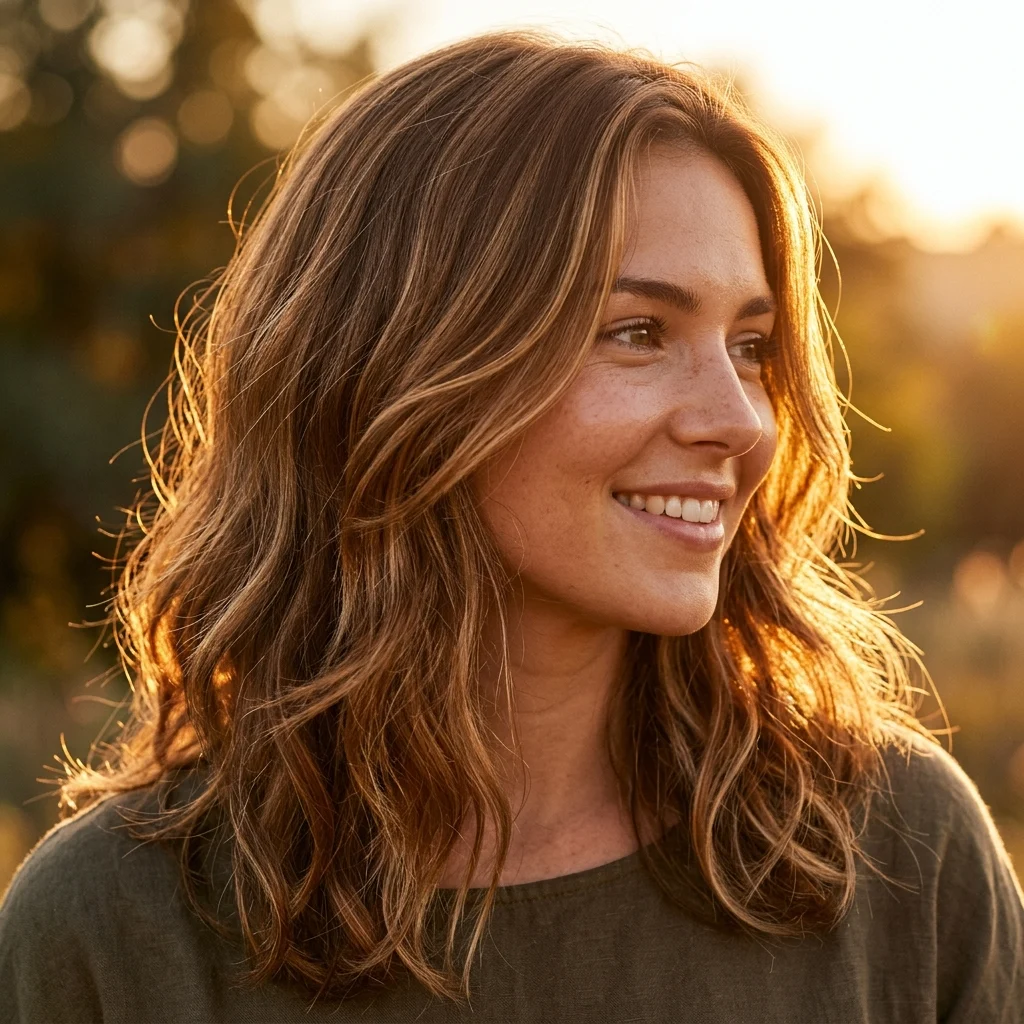
Vibe: Forgiving.
Why it works: This applies the gradual-transition principle: a hard highlight line is created by an abrupt boundary between colored and uncolored hair, which regrowth makes obvious within weeks. Brushing on a shadow just one level darker than the natural root removes that abrupt boundary entirely, so what grows out is a gradient, not a line.
How to get it: Ask your colorist to shadow-root using a shade just one level darker than your natural color, blended with a brush rather than foiled, right at the part and hairline.
Shop the Look
| Product | Why It Fits |
| Root concealer spray, shadow brown | Extends the smudge effect at home |
| Purple-free toning shampoo, color-safe | Maintains warmth without over-cooling the root shadow |
| Blending brush for root touch-ups | Applies concealer with the same soft edge |
| Dry texture spray | Disguises regrowth on non-wash days |
| Leave-in heat protectant | Protects regrowth during regular styling |
11. Golden Bronde Blend
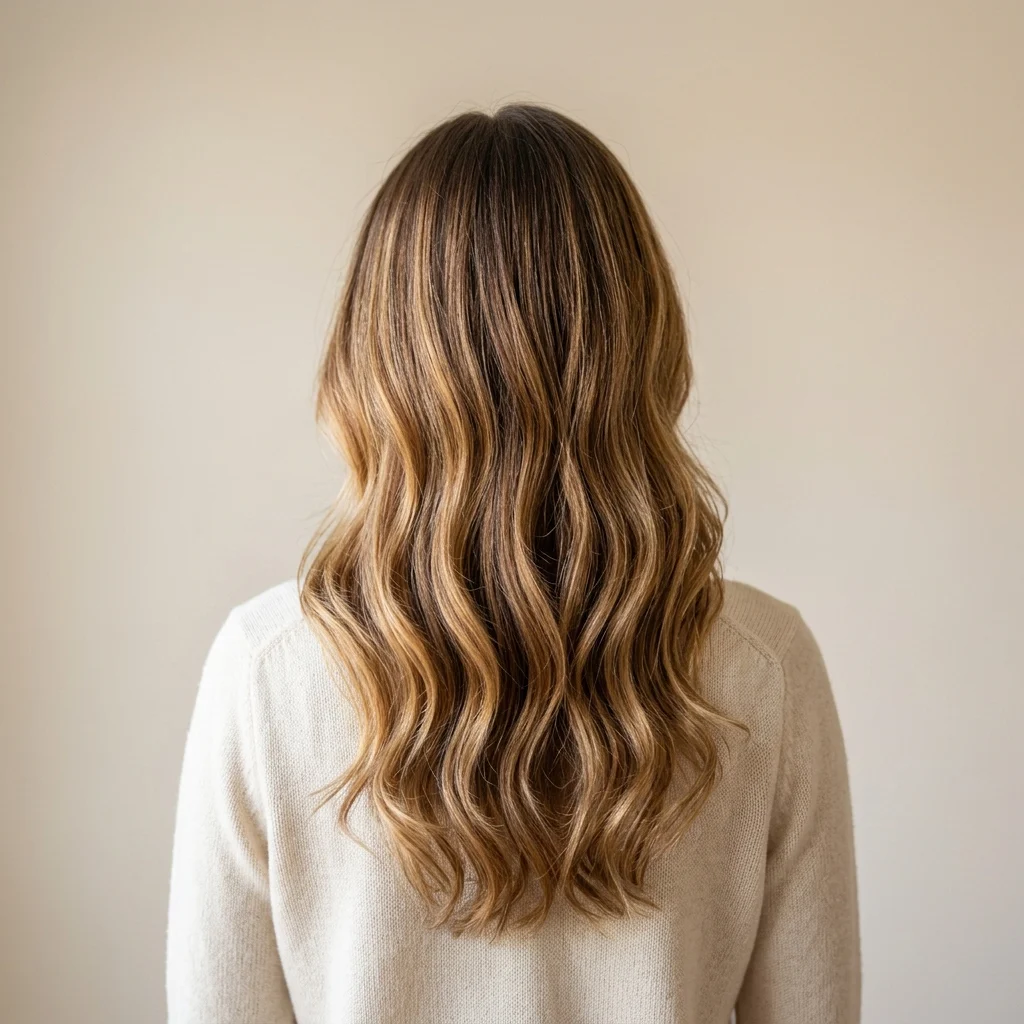
Vibe: Balanced.
Why it works: This applies the ratio-blending principle: bronde is not a single formula but a specific brown-to-blonde ratio, roughly 60/40 in favor of brown, that reads as neither color individually. Push the ratio toward 50/50 and it starts reading as full blonde with roots; keep it closer to 70/30 and it reads as brunette with highlights, so the 60/40 range is what specifically produces the “bronde” effect.
How to get it: Ask specifically for a 60/40 bronde ratio (60 percent brown base, 40 percent golden-blonde lightened sections) rather than a general “some blonde, some brown” request.
Shop the Look
| Product | Why It Fits |
| Bronde-toning gloss kit | Maintains the specific brown-blonde ratio |
| Golden blonde color-depositing shampoo | Refreshes the blonde portion between visits |
| Weightless leave-in conditioner | Keeps the blend from separating visually |
| Wide barrel hot rollers | Blurs the brown-blonde transition when styled |
| Shine-boosting hair gloss drops | Unifies both tones under one finish |
12. Crown Halo Highlights
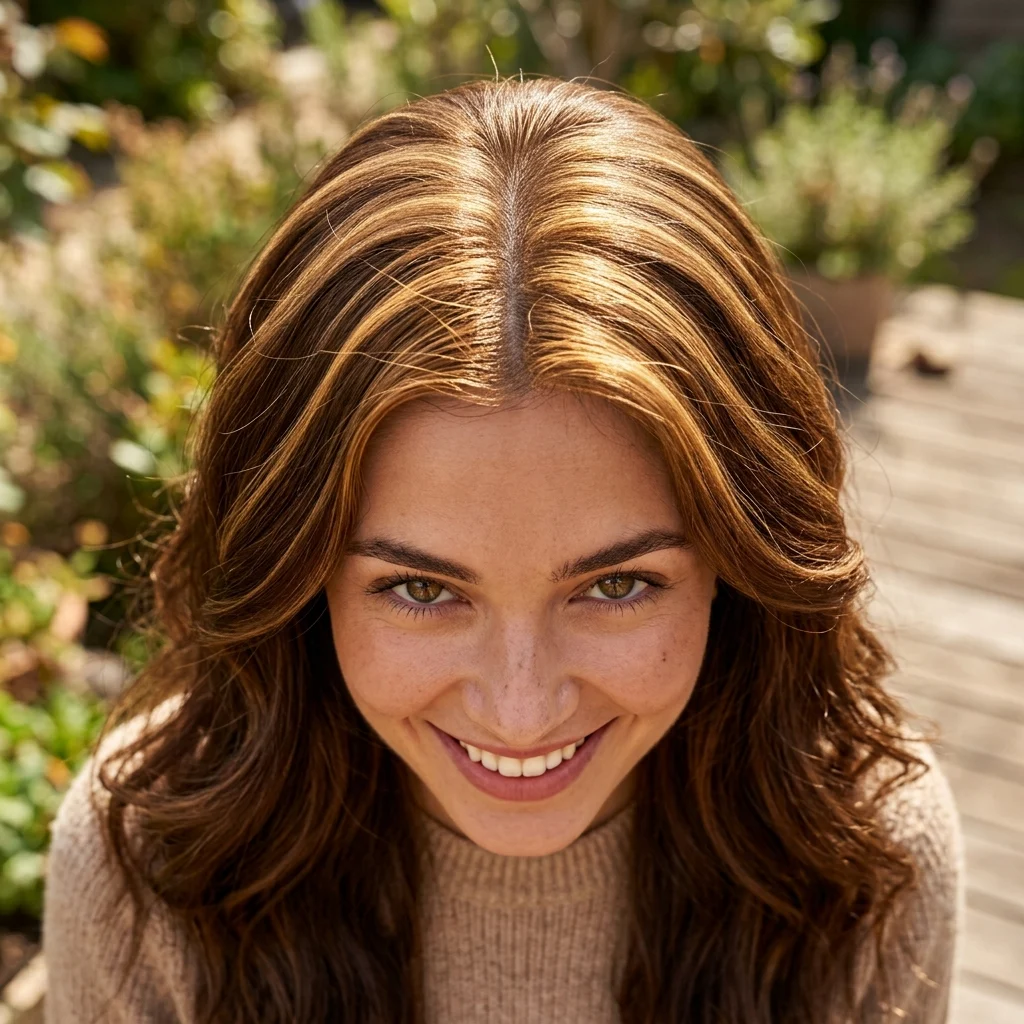
Vibe: Radiant.
Why it works: This applies the top-down visibility principle: the crown is the section most exposed to overhead light and most visible from behind, front-loading highlights there creates the strongest first impression from angles other people actually see you from, including in photos taken from slightly above.
How to get it: Concentrate the densest, lightest foils at the crown and part line specifically, tapering to fewer, finer pieces as you move toward the nape.
💡 Quick Win: A volumizing root spray at the crown makes the highlighted section catch even more overhead light.
Shop the Look
| Product | Why It Fits |
| Volumizing root spray | Lifts crown hair to catch more light |
| Teasing comb, fine-tooth | Builds subtle crown height |
| Shine mist, lightweight | Adds gloss without weighing down the crown |
| Round brush, medium barrel | Styles crown volume during blowouts |
| Color-safe volumizing shampoo | Maintains lift without stripping tone |
13. Hand-Painted Ribbon Highlights
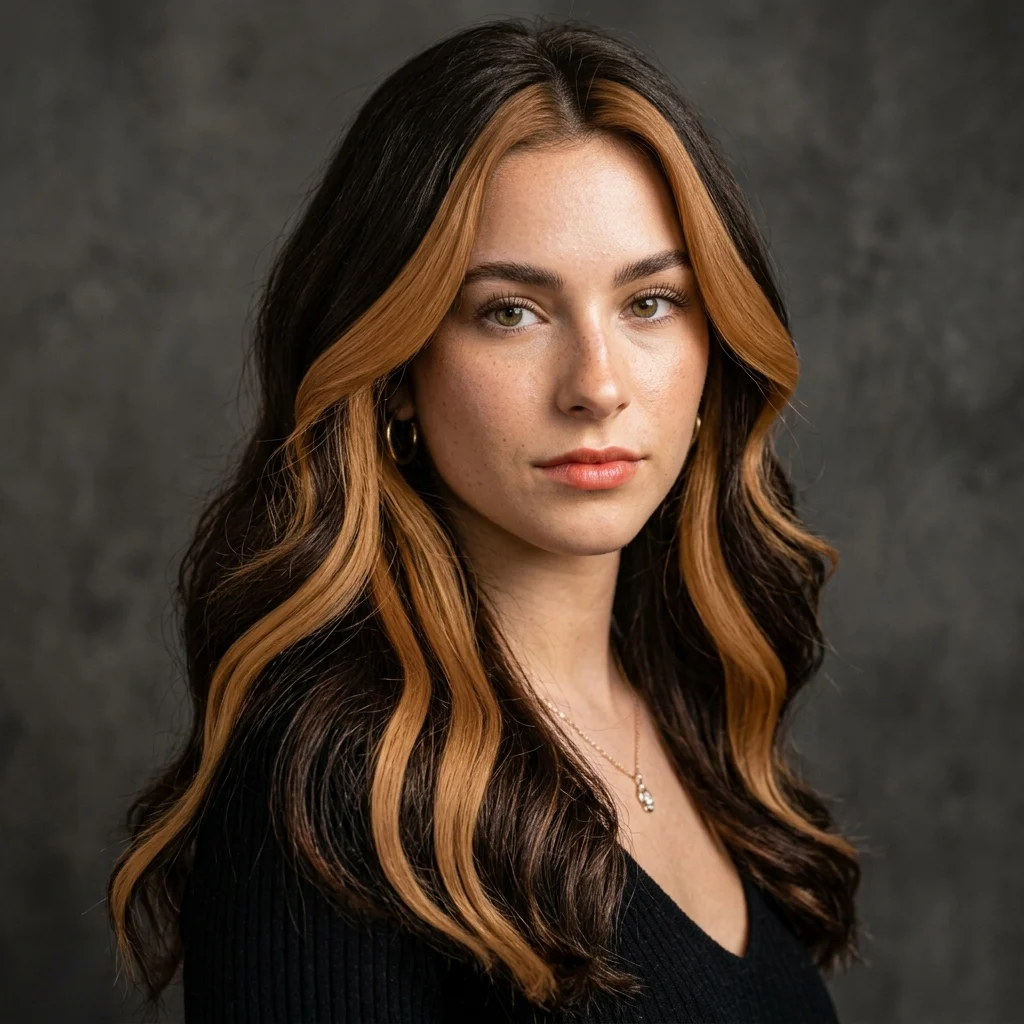
Vibe: Graphic.
Why it works: This applies the fewer-but-bolder principle: most balayage aims for many soft, blended pieces, but ribbon highlighting inverts that, using two or three wide, clearly separated streaks. The reduced count means each streak reads individually rather than blending into overall dimension, producing a more graphic, deliberate look.
How to get it: Ask for two to three ribbon-width sections (roughly one inch each), hand-painted rather than foiled, placed at irregular intervals through the mid-lengths rather than evenly spaced.
Shop the Look
| Product | Why It Fits |
| Wide flat paddle brush | Keeps ribbon sections smooth and visible |
| High-shine finishing serum | Emphasizes the graphic contrast of each streak |
| Color-safe gloss treatment | Maintains saturation in bold streaks |
| Precision hair clips | Isolates ribbon sections during styling |
| Ceramic straightener | Flattens hair so streaks read as clean lines |
14. Braided Styles That Reveal Dimension
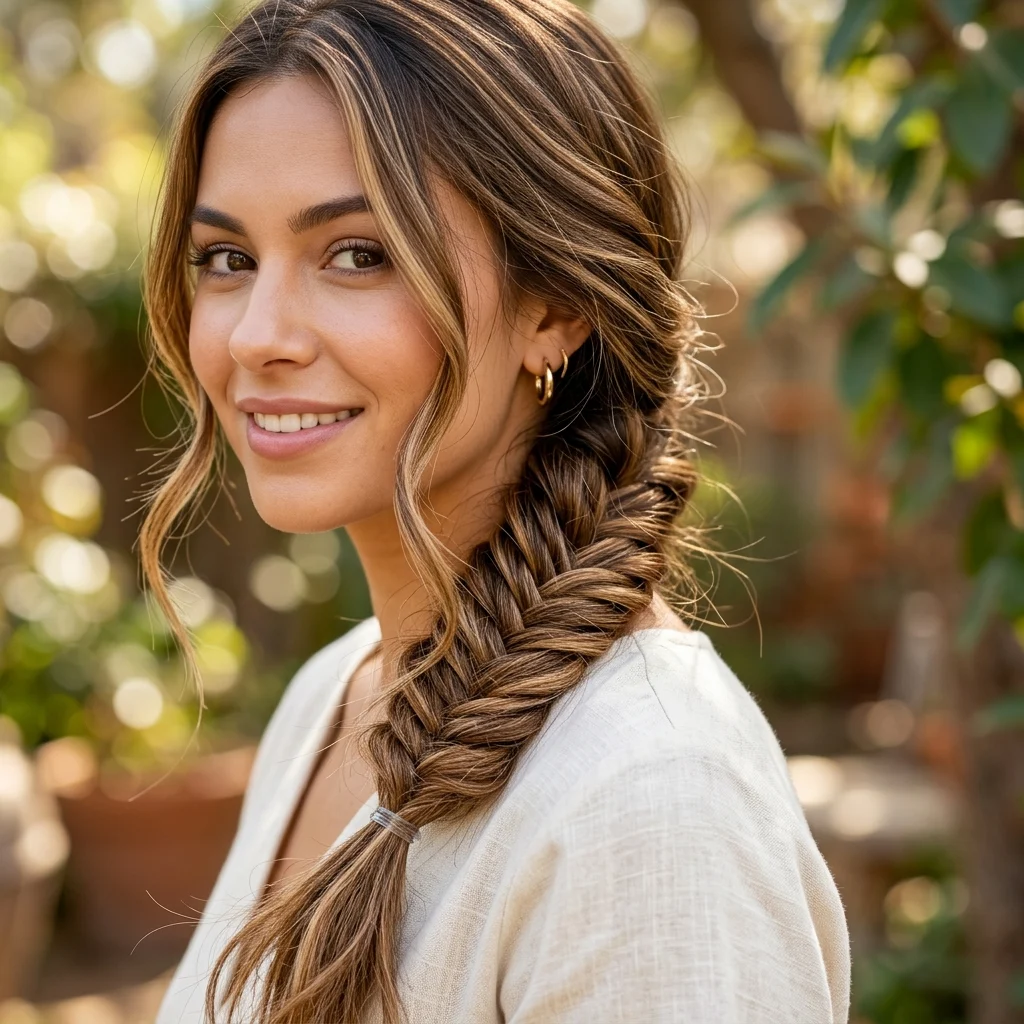
Vibe: Layered.
Why it works: This applies the woven-visibility principle: a braid interlaces sections of hair that would otherwise sit side by side, which means highlighted and non-highlighted strands repeatedly cross each other’s path. That repeated crossing shows far more individual highlighted strands per square inch than the same hair worn loose.
How to get it: Loosen a classic fishtail or Dutch braid by gently pulling at the edges after braiding, which widens each woven section and exposes more of the highlighted strands inside it.
💡 Quick Win: Braiding damp hair with a texturizing spray first makes the finished braid looser and more highlight-revealing once released.
Shop the Look
| Product | Why It Fits |
| Texturizing spray for braids | Loosens braid pattern to expose highlights |
| Small clear hair elastics | Secures braid ends without visible bulk |
| Detangling brush | Prepares smooth sections before braiding |
| Shine spray, lightweight | Adds gloss to braided highlighted strands |
| Bobby pins, bronze tone | Secures loose pieces without clashing with warm tones |
15. Chestnut Base With Sun-Kissed Tips
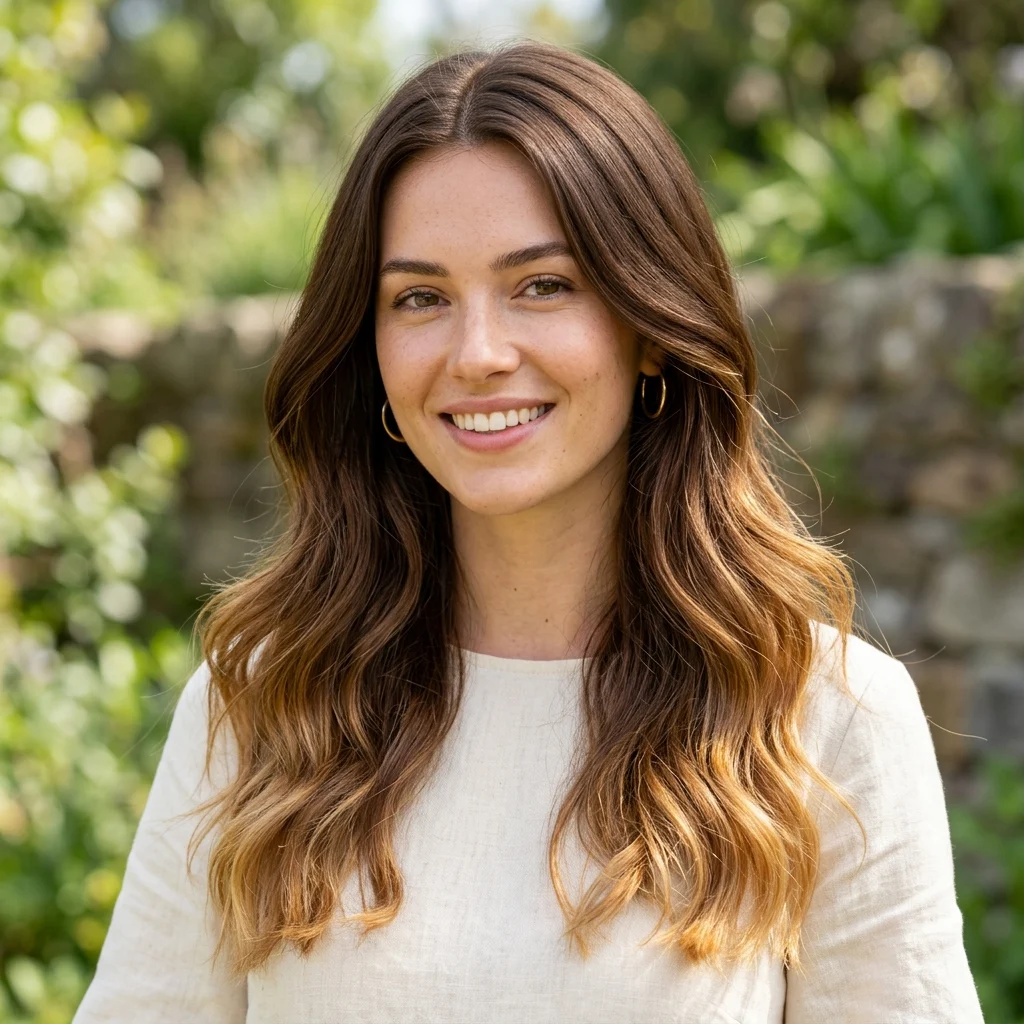
Vibe: Fresh.
Why it works: This applies the accumulated-exposure principle: hair ends have spent the longest time exposed to sun and washing, which is why natural sun-lightening always concentrates there first. Lightening only the last two to three inches recreates this specific accumulation pattern more accurately than lightening the whole length evenly.
How to get it: Ask for lightening concentrated only on the final two to three inches of length, using a soft, feathered technique rather than a hard horizontal line, so the transition looks grown rather than dipped.
Shop the Look
| Product | Why It Fits |
| End-repair bond treatment | Strengthens the most-processed section of hair |
| Color-depositing conditioner, honey shade | Maintains the lightened tip color |
| Silk hair ties | Prevents breakage at the lightened, weaker ends |
| Split-end sealing serum | Keeps lightened tips looking healthy |
| Wide-tooth comb | Gentle detangling for the fragile end section |
16. Zigzag Part for Maximum Highlight Exposure
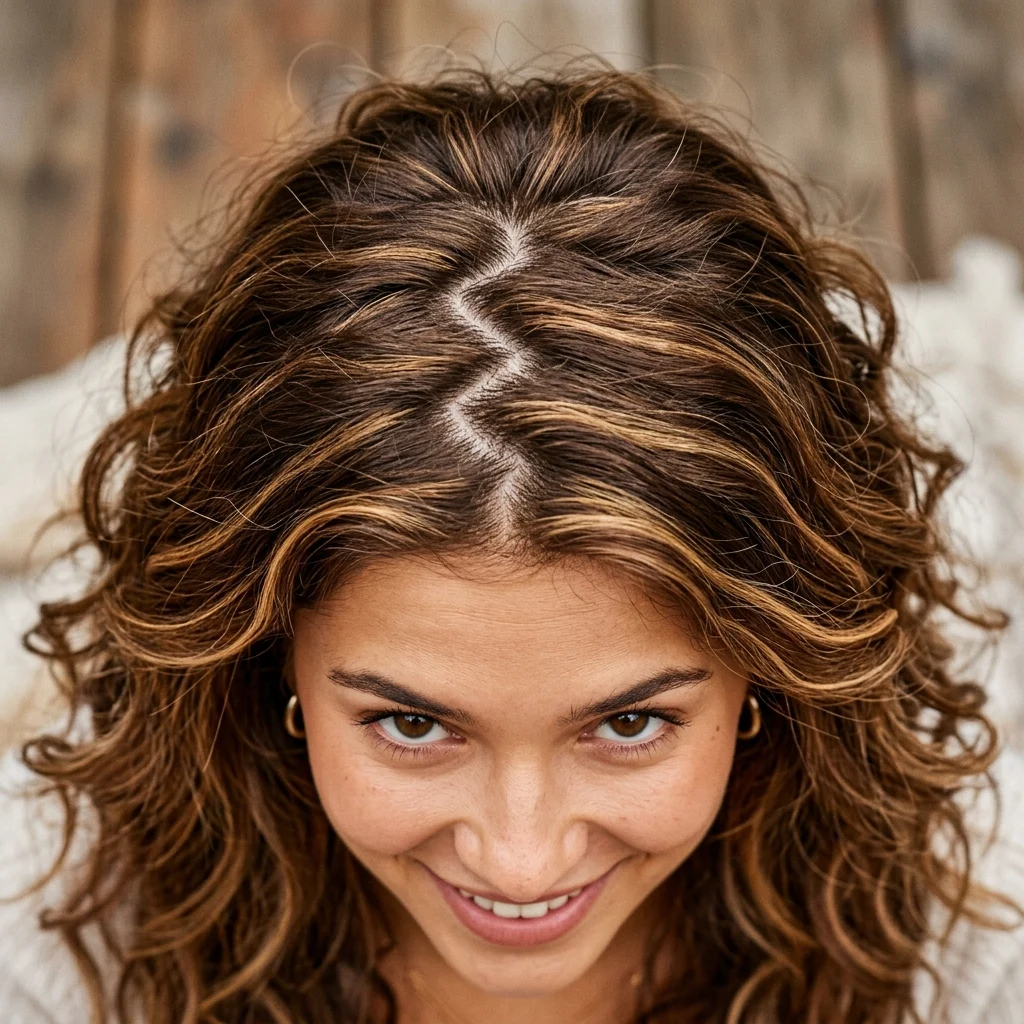
Vibe: Textured.
Why it works: This applies the increased-surface-area principle: a straight part creates one long, unbroken line, while a zigzag part creates many short edges, each one exposing a slightly different section of scalp-adjacent hair. More edges mean more chances for a highlighted piece near the root to become visible.
How to get it: Use the pointed end of a rat tail comb to section hair in a zigzag pattern rather than a straight line, keeping each zag about an inch long before changing direction.
Shop the Look
| Product | Why It Fits |
| Rat tail comb, fine pointed end | Creates precise zigzag sectioning |
| Root touch-up spray | Blends any regrowth exposed by the irregular part |
| Light-hold texturizing paste | Keeps the zigzag part from falling flat |
| Small duckbill clips | Holds zigzag sections while styling |
| Shine serum, lightweight | Highlights the part’s exposed strands |
17. Indoor-Reading Warm Tone Formula
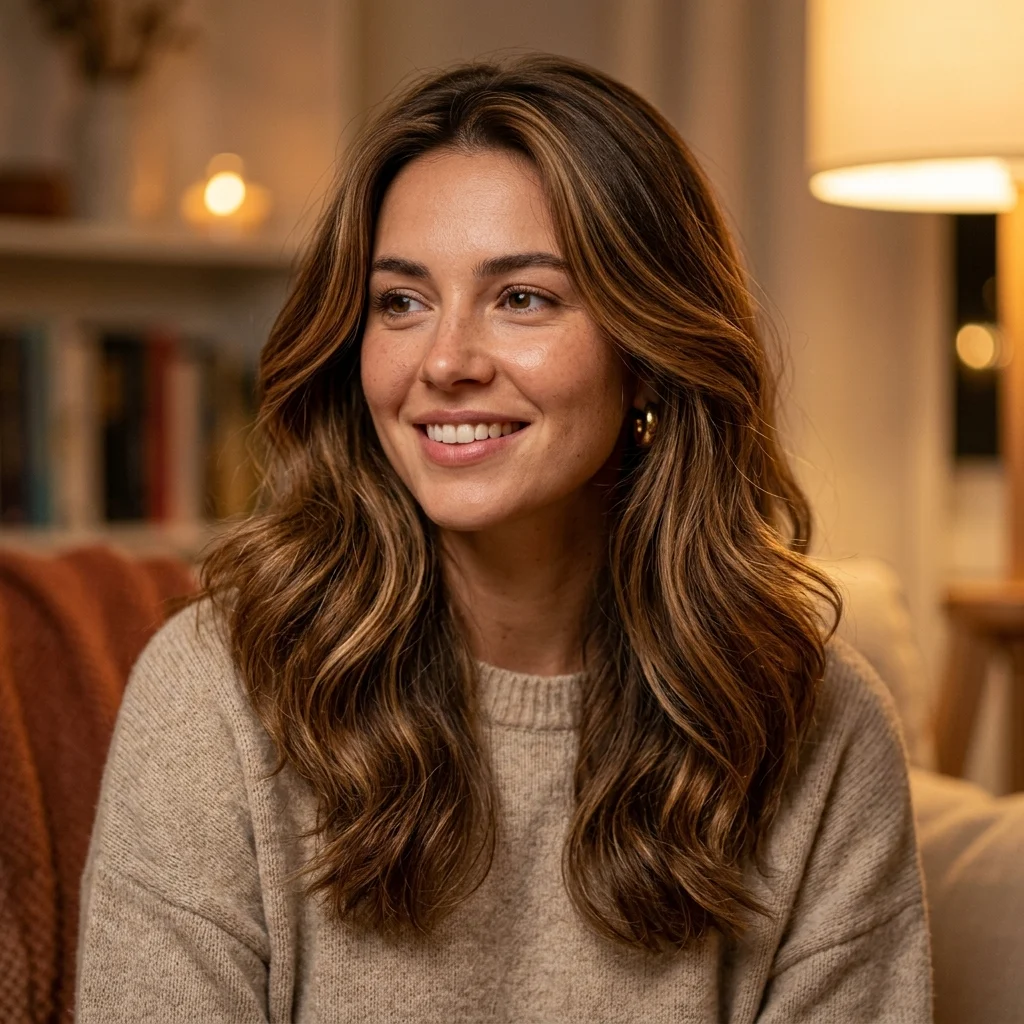
Vibe: Cozy.
Why it works: This applies the light-source-matching principle: most indoor bulbs, especially warm LED and incandescent, skew toward the same red-yellow spectrum as golden hour sun, so warm-toned highlights that look great outdoors generally hold up indoors too. Cool, ash-based highlights can look muddy or grey under the same warm bulbs, since there’s little blue light for them to reflect.
How to get it: If most of your life happens indoors under warm lighting, choose honey or caramel over ash-toned formulas, since warm tones read consistently across both indoor and outdoor light.
💡 Quick Win: Check your highlight color swatch under your bathroom’s actual bulb before your appointment, not just under salon lighting, since the two can render tone differently.
Shop the Look
| Product | Why It Fits |
| Warm-tone color gloss, at-home | Maintains indoor-friendly warmth |
| Amber-toned hair oil | Reinforces warm tone under indoor light |
| Color-safe conditioning mask | Keeps warm pigment from fading unevenly |
| Soft-hold finishing cream | Smooths hair for consistent tone reflection |
| Travel-size gloss touch-up kit | Refreshes warmth on the go |
18. Underneath Peekaboo Highlights
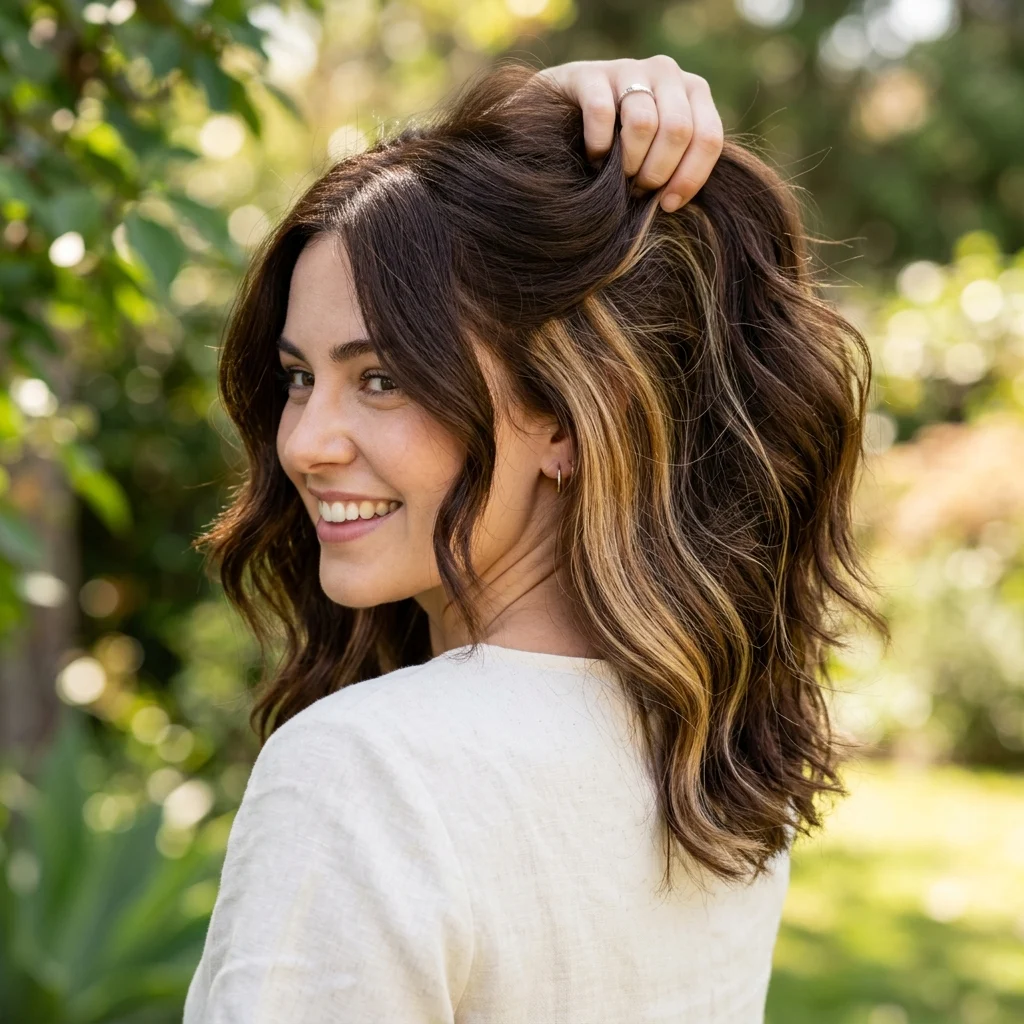
Vibe: Playful.
Why it works: This applies the concealed-contrast principle: placing bolder, higher-contrast color underneath the top layer of hair rather than throughout it means the highlight only appears during movement, when hair is tucked behind an ear, or worn up. This makes the color feel like a discovery rather than a constant statement, and lets it be bolder than a fully visible highlight could be.
How to get it: Ask your colorist to foil a bold panel underneath the crown, one to two inches below the top layer, leaving the visible top layer close to your natural or lightly highlighted color.
Shop the Look
| Product | Why It Fits |
| Sectioning clips, large | Holds the top layer up during styling |
| Bold color-depositing gloss | Maintains contrast on the hidden panel |
| Lightweight texturizing spray | Adds movement that reveals the peekaboo panel |
| Small round brush | Styles the underneath layer for visibility |
| Color-safe shine spray | Keeps the hidden panel glossy when revealed |
19. Teasy Lights: Backcombed Foil Blend
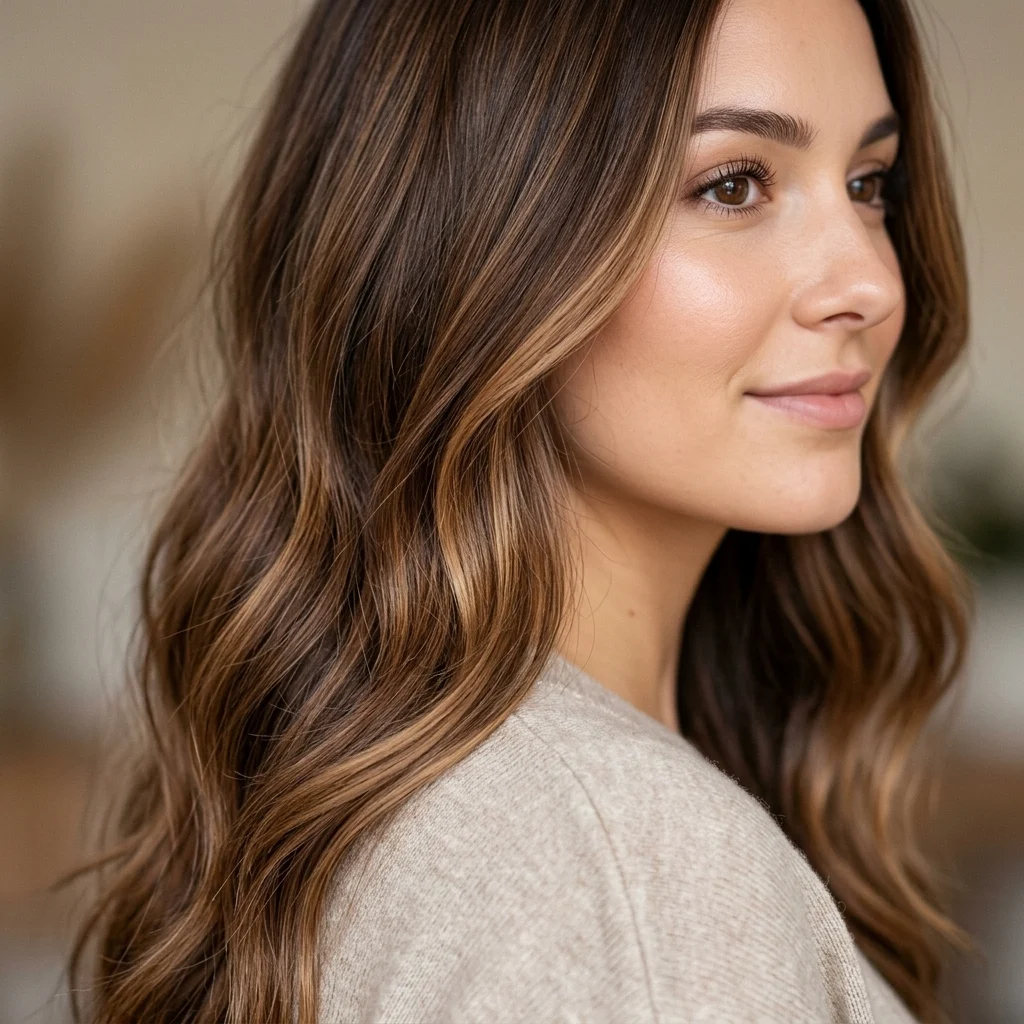
Vibe: Seamless.
Why it works: This applies the softened-edge principle: traditional foiling can leave a visible line where the lightened section meets the base if the foil placement is too clean. Teasy lights backcomb a small amount of the hair at the foil’s edge before processing, which blurs that boundary so the highlighted and natural sections blend into each other rather than meeting at a hard line.
How to get it: Ask specifically for “teasy lights” or “backcombed foils,” a technique where the colorist teases a small section at each foil’s edge before applying lightener, for the softest possible highlight blend.
Shop the Look
| Product | Why It Fits |
| Fine-tooth teasing comb | Referenced technique, useful for at-home touch-ups |
| Bond-repair leave-in spray | Protects hair from the extra processing at foil edges |
| Detangling brush, gentle | Removes any residual teasing without damage |
| Smoothing hair oil | Softens the blended transition further |
| Color-safe deep conditioner | Restores softness after the more involved process |
20. Babylights for Fine Hair
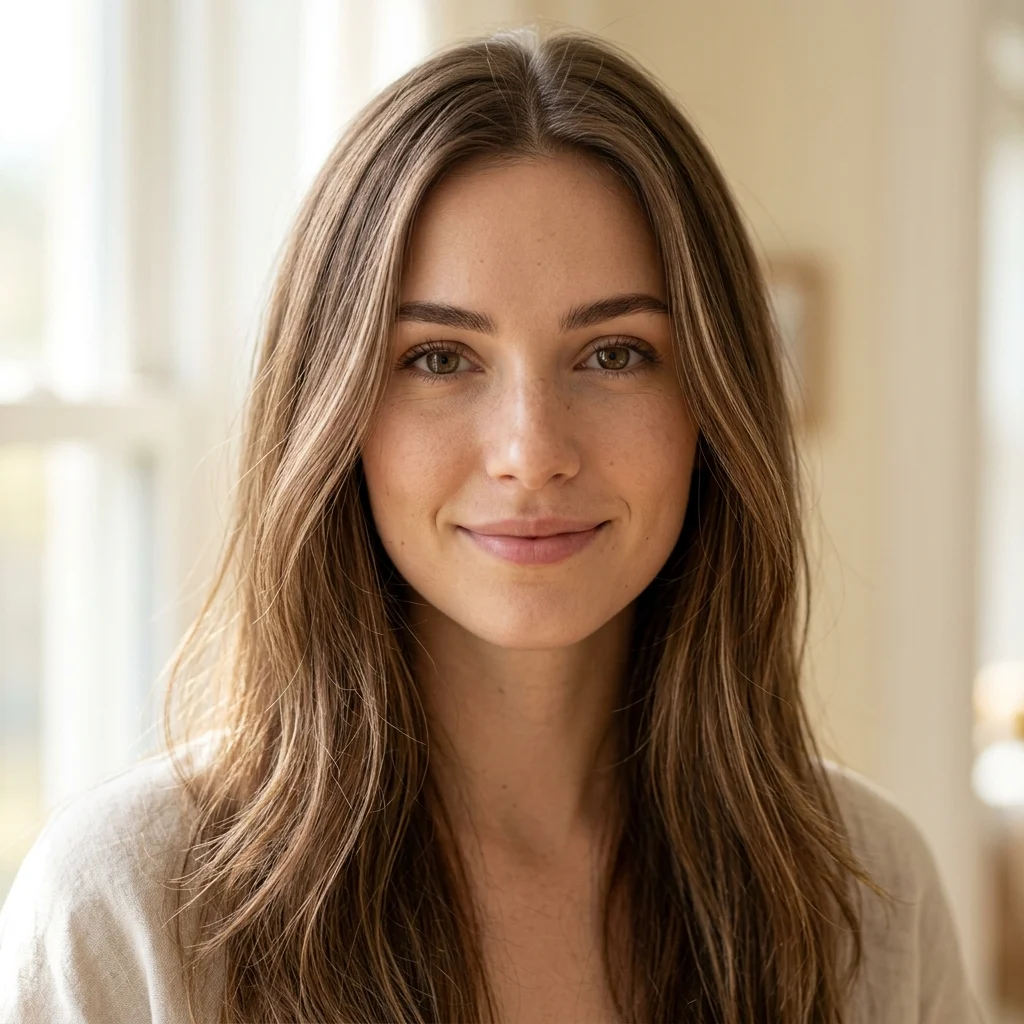
Vibe: Airy.
Why it works: This applies the density-preservation principle: heavy foiling lightens large sections at once, and on fine hair, lightened strands read as visually thinner than natural ones, which can make the whole head look sparser. Babylights use very small sections spaced apart, keeping most of the natural-density hair untouched and preserving the appearance of fullness.
How to get it: Ask for babylights limited to roughly 20 to 30 percent of the head, concentrated at the crown and face-frame, leaving the rest of the fine hair in its natural density and color.
💡 Quick Win: A volumizing dry shampoo used sparingly on non-wash days keeps fine, lightened strands from looking flat.
Shop the Look
| Product | Why It Fits |
| Volumizing dry shampoo | Adds body to fine, lightened strands |
| Lightweight bond-building spray | Strengthens fine hair without added weight |
| Density-boosting root spray | Preserves fullness around babylighted sections |
| Fine-mist shine spray | Adds gloss without weighing hair down |
| Soft round brush, small barrel | Styles fine hair without over-processing look |
21. Toffee and Vanilla Two-Tone
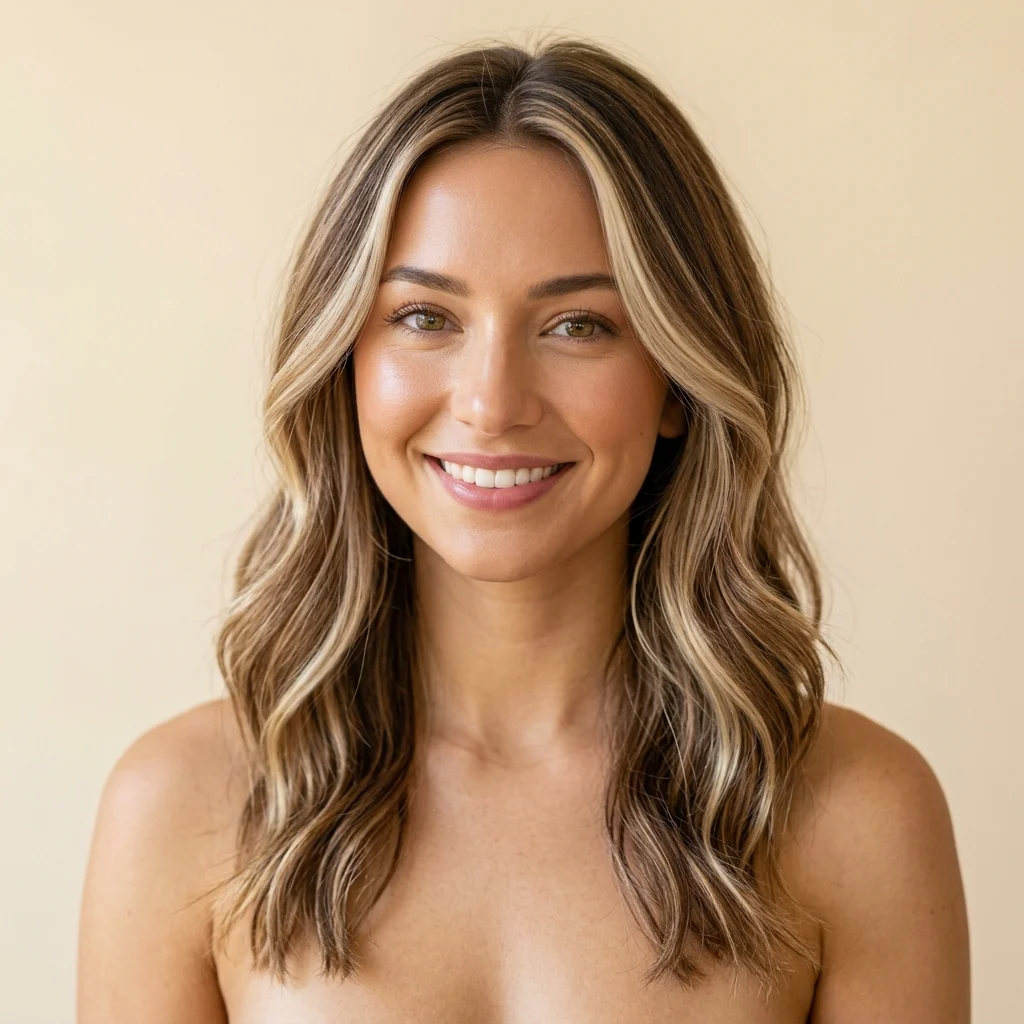
Vibe: Creamy.
Why it works: This applies the two-tone-weaving principle: alternating just two closely related tones, rather than a wider three or four tone blend, creates a striped, woven effect when the sections are placed close together, distinct from the softer graduated look of a single-tone balayage.
How to get it: Request an even alternation of toffee and pale vanilla foils, placed close together rather than spaced apart, so the two tones weave visibly rather than blend into one average color.
Shop the Look
| Product | Why It Fits |
| Vanilla-toned color gloss | Maintains the pale half of the two-tone blend |
| Toffee color-depositing conditioner | Maintains the warmer half of the blend |
| Weightless shine oil | Unifies both tones under one finish |
| Wide flat iron | Smooths hair so the woven pattern reads clearly |
| Color-safe purple-free shampoo | Prevents the vanilla tone from dulling |
22. Slicked-Back Bun to Show Off Face-Framing
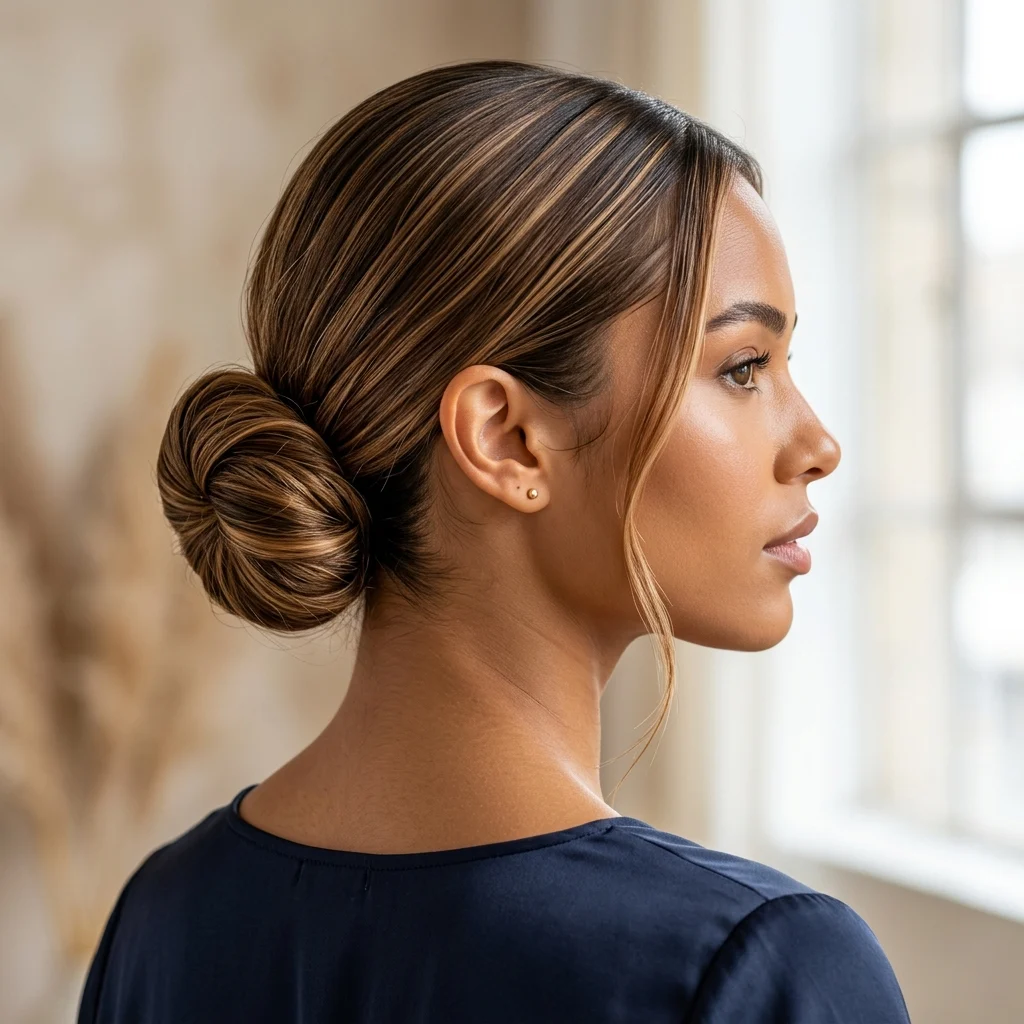
Vibe: Polished.
Why it works: This applies the isolation-through-removal principle: pulling all hair back into a sleek bun removes the visual competition from loose, moving strands, isolating the face-framing highlighted pieces as the only visible color detail. This makes even a subtle money piece read as more deliberate than it would in loose hair.
How to get it: Slick hair back with a smoothing gel, leaving only the face-framing highlighted pieces loose at the hairline before securing the rest into a low bun.
Shop the Look
| Product | Why It Fits |
| Smoothing edge control gel | Slicks hair back cleanly for the bun |
| Small boar bristle brush | Smooths flyaways during slicking |
| Bun-shaping hair donut | Creates a clean, uniform bun shape |
| Shine spray, high-gloss | Polishes the slicked-back finish |
| Bobby pins, matching hair tone | Secures the bun without visible contrast |
23. Ends-Only Dip Highlight
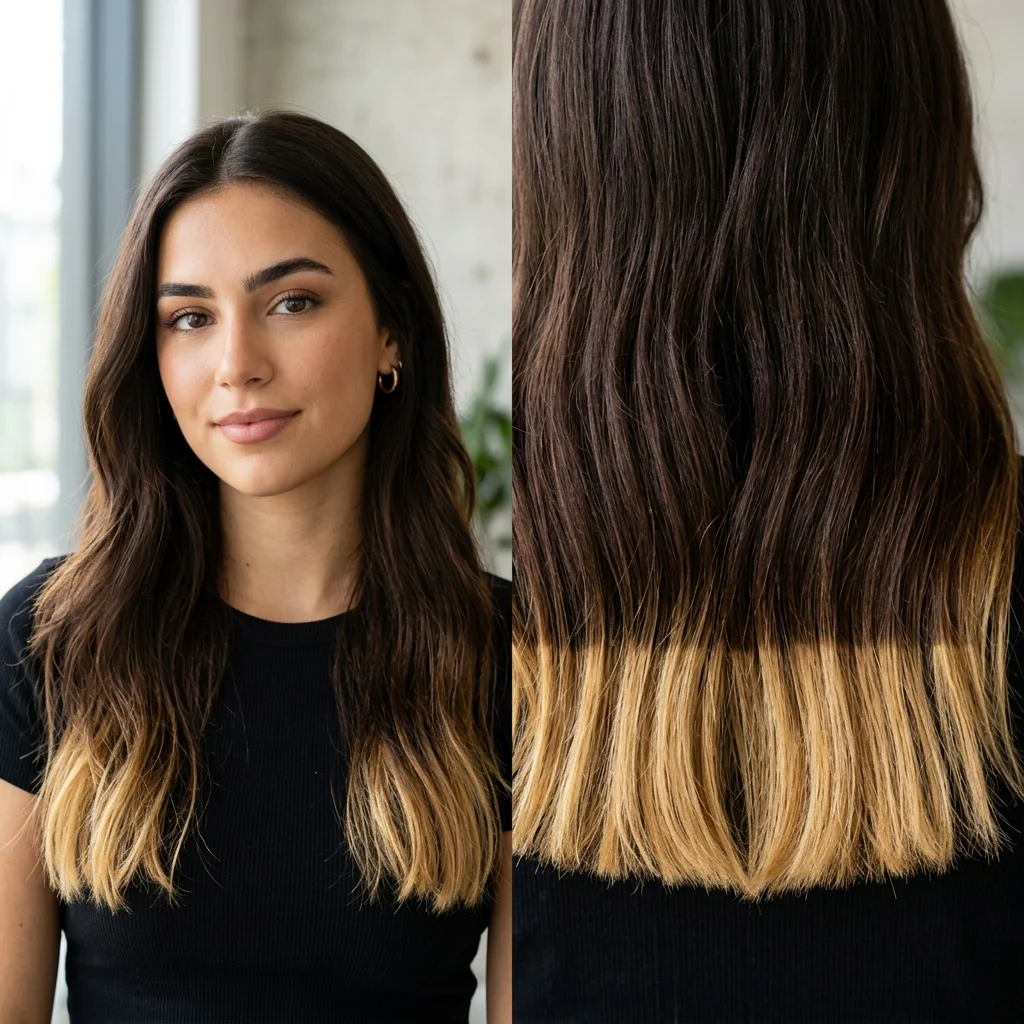
Vibe: Modern.
Why it works: This applies the low-commitment placement principle: because the color sits entirely below the point where new hair growth is visible for months, this placement can be trimmed away entirely if it’s not liked, unlike root-adjacent highlights, which makes it the lowest-risk way to test a lighter tone before committing further up the hair shaft.
How to get it: Ask for a dip-dye style lightening on just the last two inches, dipped rather than feathered, for a clean, deliberate color block instead of a soft transition.
Shop the Look
| Product | Why It Fits |
| End-sealing hair serum | Protects the most-processed, exposed ends |
| Color-depositing honey conditioner | Maintains the ends-only tone |
| Precision hair scissors | Keeps the color block’s edge clean over time |
| Bond-repair end treatment | Strengthens the lightened tips |
| Silk-lined hair tie | Prevents breakage at the color transition point |
24. Full Foil Sombré Transition
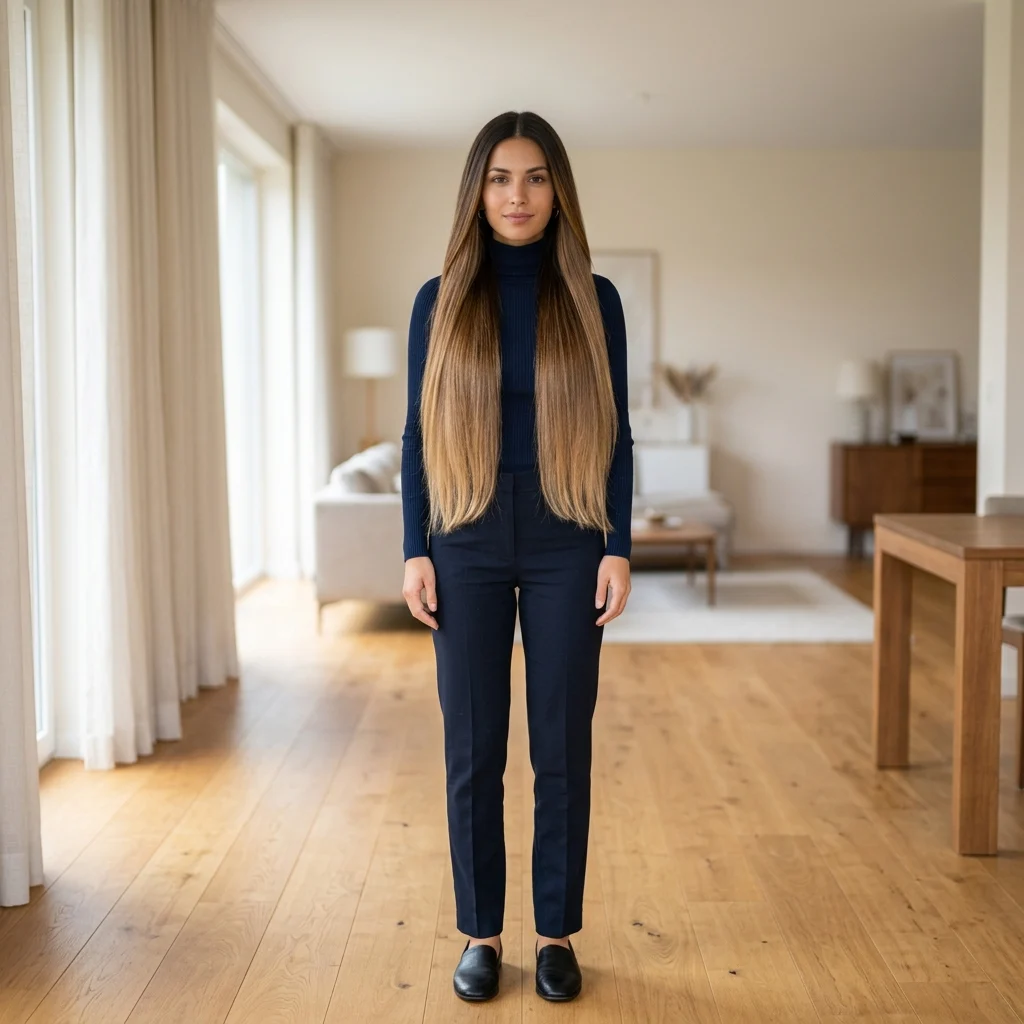
Vibe: Sophisticated.
Why it works: This applies the full-coverage gradient principle: unlike selective highlighting, a sombré foils the entire head in a continuous root-to-tip gradient, producing the most complete and even transition possible. It requires more foils and more processing time than any other technique on this list, but the payoff is a gradient with no visible untouched sections at all.
How to get it: Request a full-head foil sombré with at least four graduated tone stops from root to end, which requires more foils than a partial balayage but produces a more even, complete gradient.
Shop the Look
| Product | Why It Fits |
| Multi-tonal gloss treatment | Maintains the full gradient’s evenness |
| Bond-building shampoo and conditioner set | Supports hair through the more intensive process |
| Color-safe leave-in spray | Protects the full-length gradient from fading |
| Wide-tooth detangling comb | Gentle care across the full processed length |
| Weekly deep conditioning mask | Restores moisture after full-head processing |
25. Clip-In Highlight Extensions for Commitment-Free Testing
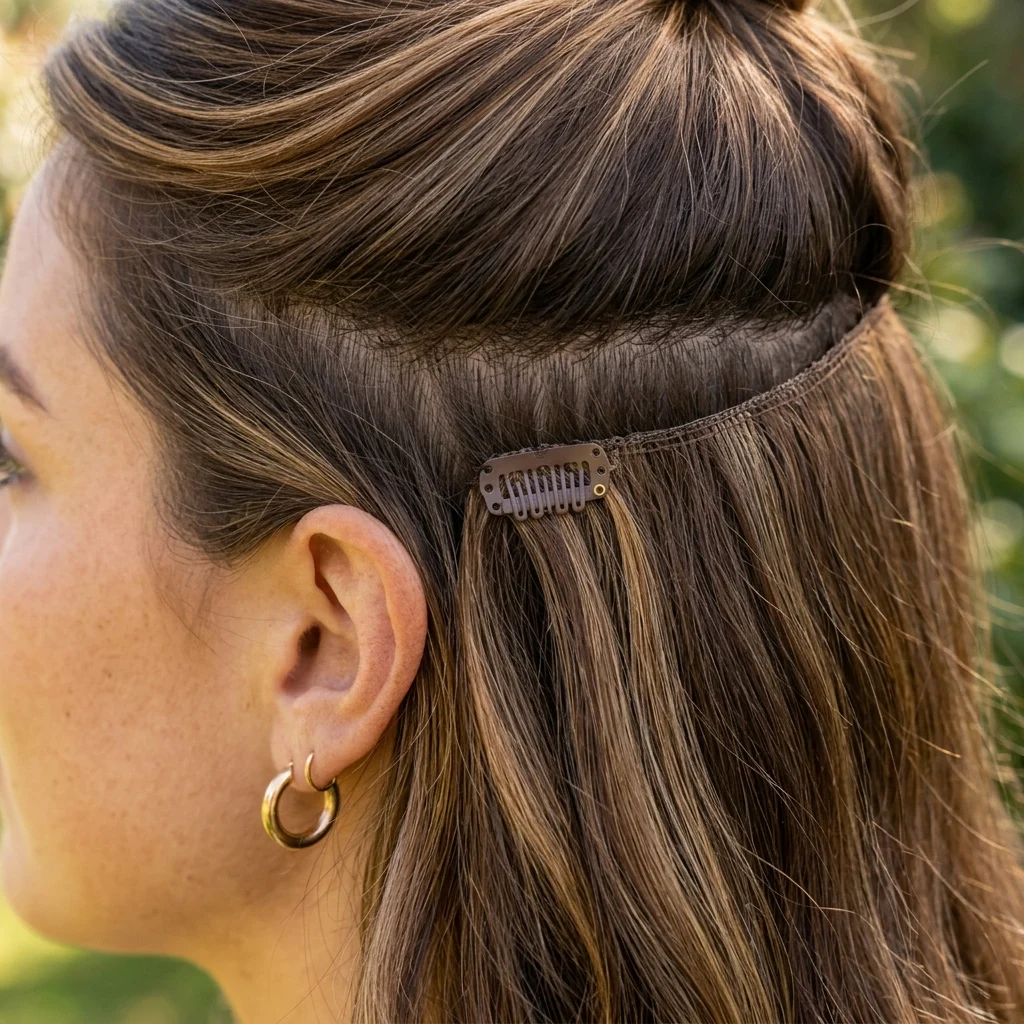
Vibe: Exploratory.
Why it works: This applies the reversible-testing principle: every technique above this one is a chemical process that can’t be fully undone without growing it out or cutting it off. Clip-in highlight pieces let you preview a specific tone and placement, removed at the end of the day, before committing to any permanent lightening at all.
How to get it: Buy pre-toned clip-in highlight wefts matched to your target tone, and clip them in at the crown and face-frame, the same placements used for permanent highlights, to preview the look before booking an appointment.
💡 Quick Win: Bring a photo of yourself wearing the clip-ins to your colorist consultation so they can match the formula to what you’ve already tested.
Shop the Look
| Product | Why It Fits |
| Clip-in highlight extension wefts | Provides a reversible preview of the look |
| Extension-safe detangling brush | Prevents snagging at the clip seams |
| Heat protectant spray for synthetic-blend extensions | Protects clip-ins during styling |
| Small flat iron for blending seams | Smooths the transition between natural hair and clip-ins |
| Travel case for extensions | Keeps clip-ins organized between wears |
How to Start Your Summer Highlight Transformation
The one move to make first is booking a consultation and asking for a strand test on a single face-framing piece before committing to a full head. This anchors everything else: it shows exactly how your hair lifts, how long it takes to process, and whether the tone reads warm or brassy against your specific base, all without risking the whole head.
The most common beginner mistake is requesting a full head of highlights in one session on hair that’s never been lightened before. This over-processes virgin hair and often lifts too warm too fast, producing a flat, orange-leaning result instead of dimension. The fix is spacing it out across two sessions with a toning gloss in between, giving the colorist room to correct tone before pushing further.
Three items under $50 that create immediate impact: a bond-building, purple-free toning shampoo to keep warmth intact between visits; a honey-toned color-depositing gloss mask for at-home refresh; and a golden-tinted hair oil serum that adds shine and enhances warmth in natural light.
A single face-framing session takes about 45 minutes and runs $75 to $150. A full balayage, foilyage, or sombré transformation typically takes 3 to 5 hours and ranges from $150 to $400 depending on length and how much lift is needed. Full dimensional color from a level 4 base can take two sessions spaced six to eight weeks apart to look fully blended.
Frequently Asked Questions About Summer Highlights for Brown Hair
What’s the difference between balayage and foilyage for brown hair?
Balayage is hand-painted directly onto the hair’s surface, creating a soft, low-contrast graduation that suits already-light or medium brown bases. Foilyage adds foil heat on top of that painting technique, which lifts pigment further and works better on deep brunette bases (level 4 or darker) that resist lightening from painting alone. Foilyage generally costs $20 to $50 more than balayage because of the added processing time.
What highlight color works best on brown hair?
Warm tones, honey, caramel, and copper, tend to complement brown hair’s natural warmth better than ash or platinum blonde, which can look stark against a brunette base. The right specific shade depends on skin undertone: copper and caramel flatter warm or olive undertones, while a softer honey or vanilla tone suits cooler undertones without looking too orange.
How much do summer highlights cost for brown hair?
A face-framing money piece alone runs $75 to $150 and takes under an hour. A full balayage, foilyage, or sombré service typically costs $150 to $400 depending on hair length, thickness, and how much lift the colorist needs to achieve. Root smudging or toning touch-ups between full sessions usually run $40 to $75.
Do highlights work on fine or short brown hair?
Yes, though the placement should shift. Fine hair does best with fewer, more strategic pieces limited to roughly 20 to 30 percent of the head, like a money piece or sparse babylights, rather than a full head of foils, since heavy lightening can leave finer strands looking thin. Short hair concentrates highlights near the face and crown, where there’s more visible surface area per section to show off the color.
How do you keep brown hair highlights from turning brassy?
Brassiness happens when warm underlying pigment shows through as highlights fade, which is common with caramel and copper tones especially in hard water or high sun exposure. A purple-free, anti-brass color-correcting shampoo used once or twice a week helps neutralize orange tones without over-cooling warm highlights the way a true purple shampoo would. A toning gloss every 4 to 6 weeks also keeps the tone from drifting.
Ready to Create Your Dream Summer Highlights?
From honey balayage melts to teasy-light blends, face-framing pieces to full sombré transitions, these 25 ideas cover color, technique, placement, light behavior, and upkeep for every level of commitment. Starting small, with a single money piece, a root smudge, or even a clip-in test run, isn’t a compromise, it’s the smartest way to see how your hair responds before going further.
Today, book a consultation and bring a photo of the specific tone and placement you’re after, like the honey balayage melt or the copper-caramel depth. Once it’s done, brown hair with well-placed summer highlights feels effortless in a way flat, all-over color never quite does, the kind of color you can run your fingers through and forget you’re wearing. Save your favorite look now, so you have it ready the next time you’re in the chair.